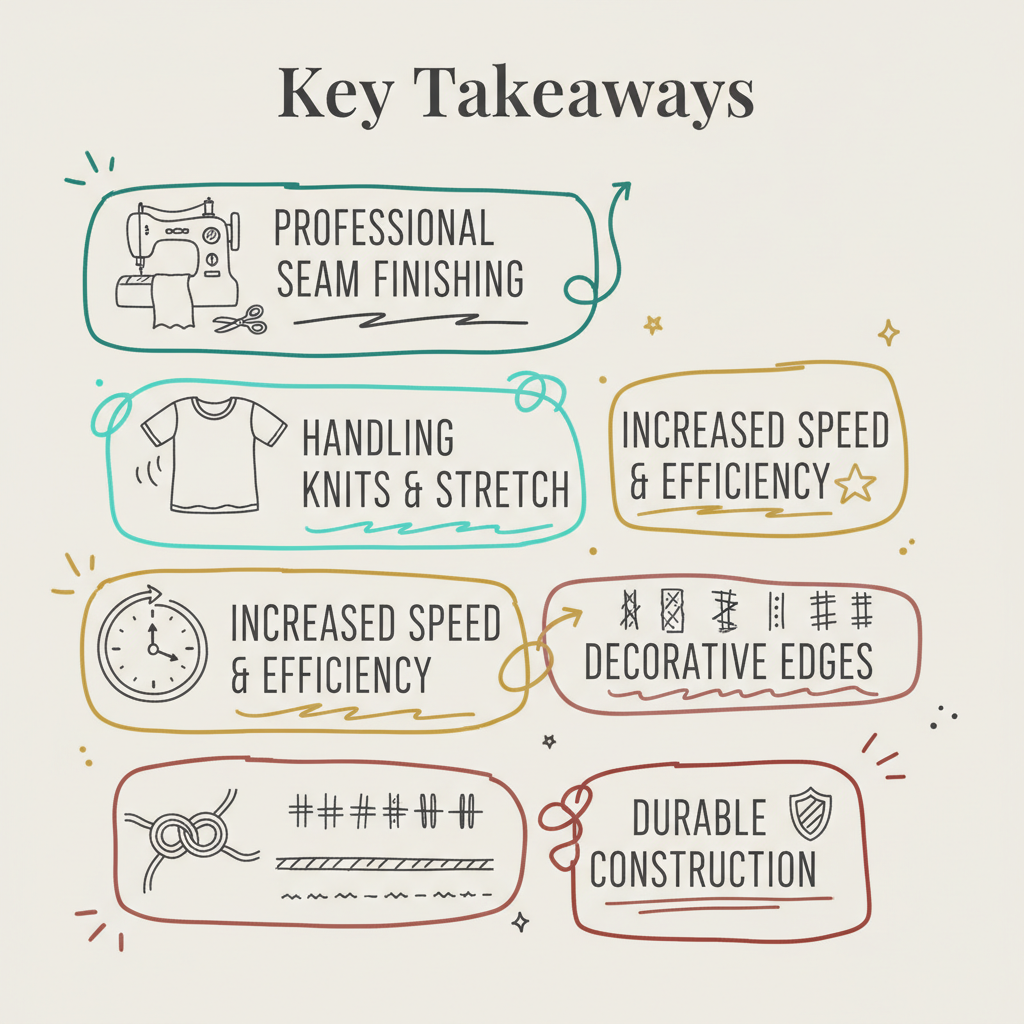
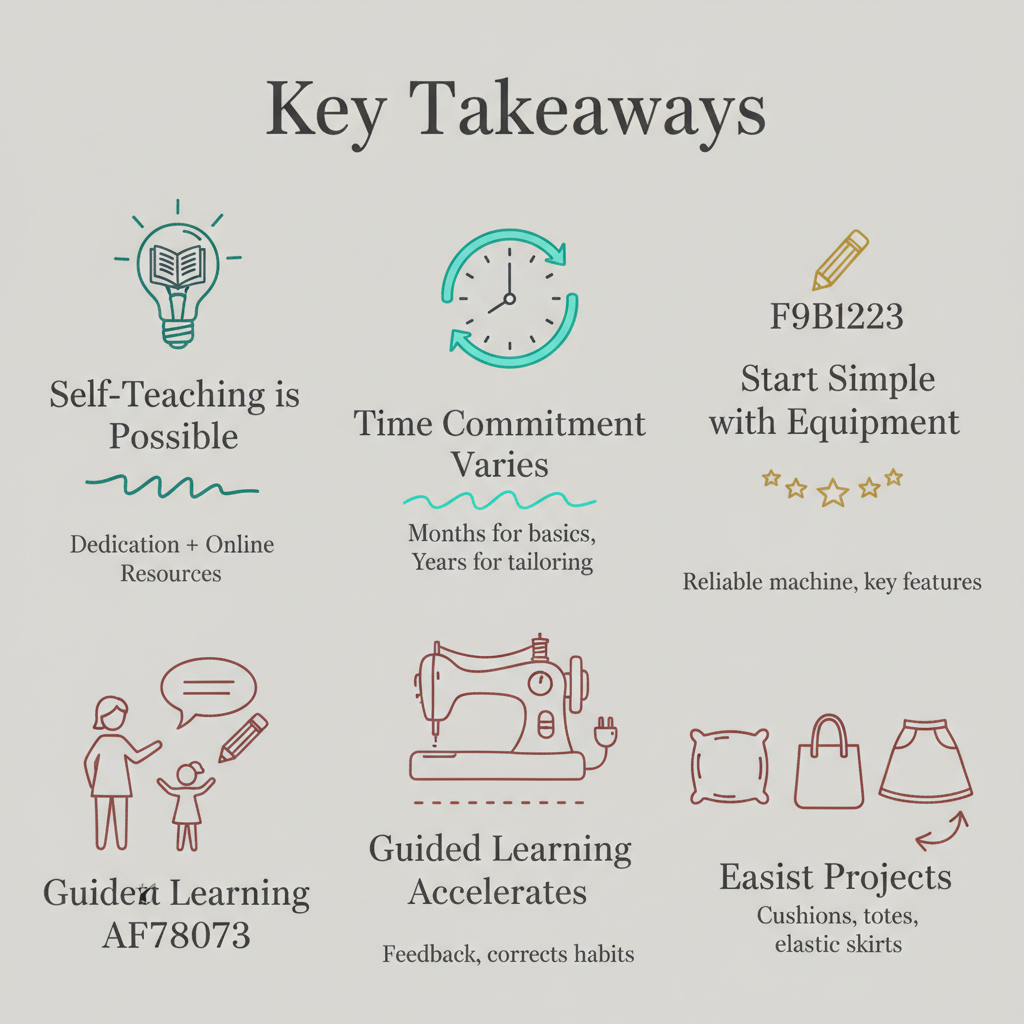
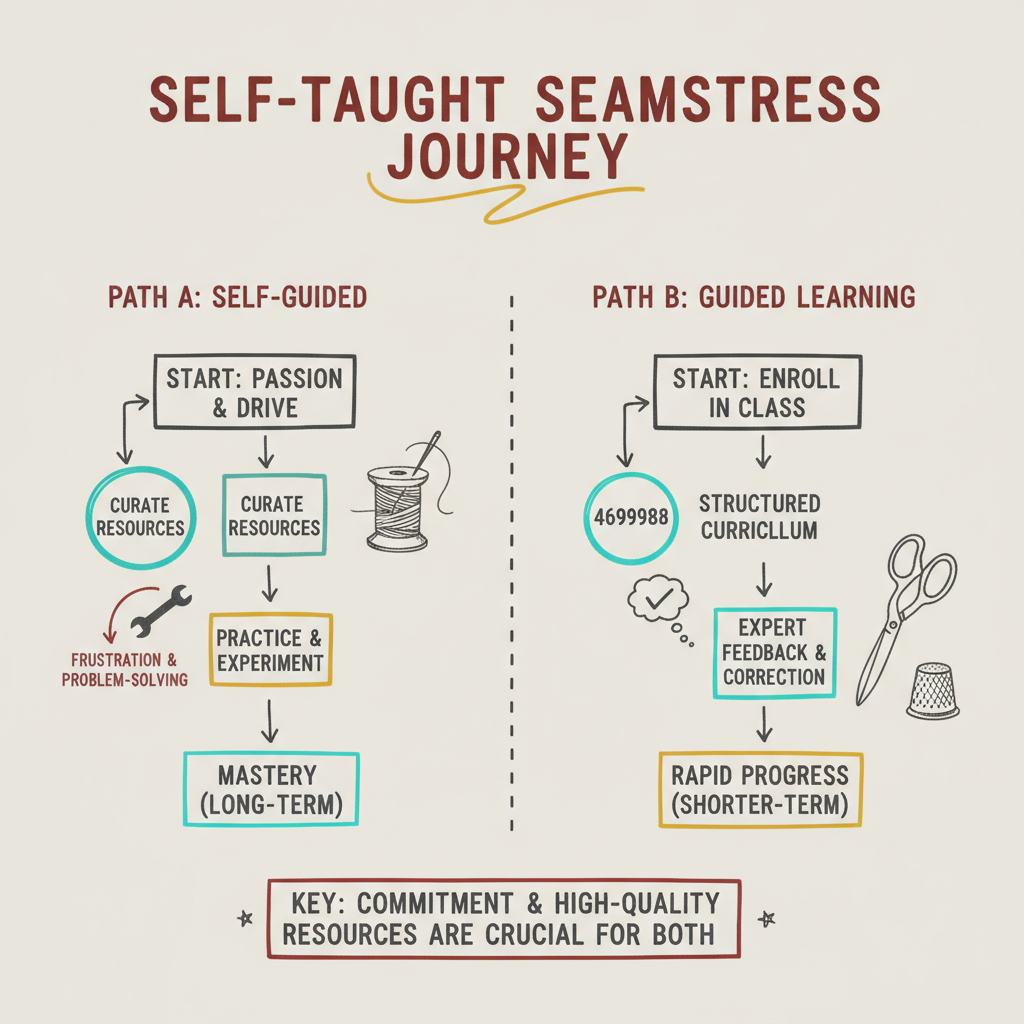
Author: Grace Barrett

  • What is a Serger? Your Complete Guide to the Overlocker Machine

    What is a Serger? Your Complete Guide to the Overlocker Machine

    Key Takeaways

    • Terminology: A serger is simply the North American term for an overlocker machine. In the UK, we almost exclusively use the term overlocker.
    • Core Function: The primary role of a serger is to simultaneously stitch, trim, and overcast the edge of fabric, creating professional, non-fraying seams quickly and efficiently.
    • Not a Replacement: An overlocker does not replace a standard sewing machine; it complements it. It excels at finishing edges and constructing knit garments but cannot perform tasks like buttonholes or topstitching.
    • Professional Finish: Using an overlocker is the fastest way to achieve the durable, factory-like finish seen on high-street clothing, especially for securing raw edges and creating stretchy seams.
    • Buying Guide Focus: When deciding what serger should I buy?, focus on the number of threads (3/4-thread is standard), ease of threading, and the presence of differential feed for working with knit and stretchy fabrics.

    The Next Step: what is a serger sewing machine?

    You’ve mastered your standard sewing machine, and now you’ve encountered a mysterious new tool: the serger. You might hear it called a serger, an overlocker, or even a serger sewing machine, but rest assured, they all refer to the same brilliant piece of kit. It’s the machine that transforms a home-sewn garment from ‘homemade’ to ‘professionally finished,’ and it’s essential for anyone serious about their craft.

    Overlocker vs. Serger: Clearing Up the Confusion

    Let’s tackle the most common point of confusion first. What is a serger? In short, it’s the name used predominantly in North America. Here in the UK and in most Commonwealth countries, we call it an overlocker. They are exactly the same machine, performing the same function.

    Think of it like calling a tap a faucet—different words for the same thing. Since our classes and articles use British English, we will primarily refer to it as an overlocker from here on, but know that any machine labelled a serger is its twin.

    The Core Function: what does an overlocker do?

    The overlocker’s function is unique and distinct from a regular sewing machine. A standard machine uses two threads (top and bobbin) to create one line of stitching. An overlocker, or serger, uses three, four, or even five threads that interlock around the raw edge of the fabric.

    Critically, the machine includes a built-in blade that trims the fabric edge just before the threads wrap around it. This process achieves three things simultaneously:

    1. Stitch: It joins two or more pieces of fabric together.
    2. Trim: It neatly cuts the raw edge of the fabric.
    3. Overcast: It wraps the thread securely around that newly cut edge, preventing fraying forever.

    This speed and efficiency are the answers to the question, what does an overlocker do? It creates strong, durable, and highly professional-looking seams in a single, fluid pass.

    Our Unique Insight: The Critical Difference a Serger Makes

    When we teach our students about garment construction, we always highlight that the durability and longevity of a piece of clothing often come down to the quality of the seam finish. This is the critical difference a serger makes.

    Imagine sewing a T-shirt. You sew the side seam on your regular machine. The seam allowances inside are left raw. Over time, in the washing machine and through wear, those raw cotton or knit edges will begin to shed fibres and fray, weakening the seam.

    Mastering the Machine: what do overlockers do?

    Understanding what do overlockers do is about appreciating their versatility beyond a simple seam finish. While the 4-thread overlock stitch is its most common function, these machines are powerhouses with several specialty stitches that can elevate your projects.

    Beyond the Seam: Decorative and Specialty Stitches

    The overlocker’s true magic lies in its ability to create specialist finishes that are impossible on a regular machine:

    • 3-Thread Overlock: Ideal for finishing the edge of non-fraying woven fabrics, such as fine wool or gabardine, or for decorative edges.
    • Rolled Hem: This stitch is a game-changer for finishing lightweight or delicate fabrics like chiffon and silk. The overlocker rolls the fabric edge tightly into itself and encases it with dense stitching, producing the neat, fine edge you see on scarves and professional eveningwear.
    • Flatlock Stitch: A strong, flat seam often used for sportswear or creating decorative texture. This stitch is designed to be comfortable against the skin, making it perfect for activewear construction.

    When to Use an Overlocker for a Professional Finish

    You should reach for your overlocker whenever you are:

    1. Working with Knits: Constructing tops, dresses, or any garment made from a stretch fabric. The overlock stitch has the necessary ‘give’.
    2. Finishing Raw Edges: Sealing the seams inside a jacket, a pair of trousers, or any woven item to ensure they survive regular washing.
    3. Doing Fine Detail Work: Creating delicate edges on ruffles, napkins, or shirt collars with the rolled hem feature.
    4. Batch Sewing: When you need speed and efficiency, the overlocker cuts down on the time spent finishing seams.

    The Purchase Decision: what serger should i buy?

    Now that you know the answer to what is a serger and understand the value of an overlocker, the next logical question is: what serger should i buy? The market can seem overwhelming, filled with three-thread, four-thread, and even five-thread models. As your patient tutor, I want to guide you through the features that genuinely matter, ensuring your investment enhances, rather than complicates, your creative journey.

    Essential Features: What to Look for in a Beginner Overlocker

    Choosing your first overlocker isn’t about finding the most expensive model; it’s about finding a reliable workhorse with the right foundations. When shopping, focus on these three critical features:

    1. 3/4-Thread Capability: For almost all home sewing, a machine that can perform both a 3-thread and 4-thread stitch is perfect. The 4-thread stitch is your go-to for strong, construction seams on knits, and the 3-thread is ideal for finishing woven fabric edges and performing rolled hems. Anything more complex, like a 5-thread coverstitch, is usually only necessary for professional tailoring or commercial volumes.
    2. Differential Feed: As we mentioned before, this is non-negotiable. If you plan to sew stretchy fabrics—the very thing an overlocker excels at—you need the differential feed to prevent wavy, stretched-out seams or puckering. Ensure the machine has clearly labelled, easily adjustable dials for this function.
    3. Ease of Threading: Overlockers have a reputation for being tricky to thread, but modern machines have vastly improved this process. Look for machines with colour-coded guides inside the looper covers. Better yet, some premium models now offer air-threading, where you simply push the thread into a port and the machine blasts it into place. If you are learning Sewing Classes North London, we often recommend a model with good threading support to reduce frustration.

    Addressing the Buying Anxiety: what is the best serger to buy?

    The question what is the best serger to buy? is personal, but we can offer some clear direction. The “best” machine is the one you will actually use. For beginners and those moving to Intermediate London Sewing Courses for Adults, we recommend models from established, reliable brands (often Janome, Brother, or Juki).

    Instead of focusing on a specific model number, look for the features above, and read reviews that focus specifically on:

    • Noise Level: Some cheaper overlockers are extremely loud, which can make long sewing sessions unpleasant.
    • Stitch Quality: Ensure the machine produces even, balanced stitches across a range of fabric thicknesses.
    • Customer Support: A good brand will have videos and manuals readily available to help you master re-threading and tension adjustments.

    Our expert advice is to invest in the best quality machine you can comfortably afford, focusing on the core 3/4-thread capability and a good differential feed.

    Actionable Strategy: Troubleshooting Common Serger Issues

    While overlockers are fantastic, they can occasionally present challenges. Knowing how to quickly troubleshoot common issues will keep your machine running smoothly:

    1. Skipped Stitches: This is almost always a sign that your needles are blunt or incorrectly inserted. Solution: Replace the needles (use high-quality serger needles) and ensure the flat side of the needle shank is facing the correct direction, usually toward the back of the machine.
    2. Wavy Seams (Puckering or Stretching): Solution: Adjust the differential feed. If the fabric is stretching and getting wavy, increase the differential feed setting (e.g., from 1 to 1.5). If the fabric is bunching up or puckering, decrease the setting (e.g., from 1 to 0.7).
    3. Tension Tangles: If your stitches are messy or loops are forming on the underside, your tension is wrong. Solution: Reset all four dials back to their factory standard setting (usually marked around 4 or 5). Adjust only one dial at a time, usually the needle tension, to see what impact it has before adjusting the loopers.

    Frequently Asked Questions (FAQ)

    How many threads does a serger need?

    A serger typically needs either three or four threads for general home sewing. A 3-thread stitch is used for finishing the edges of woven fabrics and creating rolled hems. A 4-thread stitch is the most common for constructing strong, professional, and stretchy seams on knits. While 2-thread machines exist, and 5-thread machines are available, the 3/4-thread model offers the best balance of versatility and ease of use for the home sewist.

    Is a serger hard to re-thread?

    The process of re-threading a serger can be daunting at first glance due to the multiple threads. However, if you follow the colour-coded paths precisely and use a pair of long-nosed tweezers, it becomes quite manageable. Many experienced sewists use the “tie-on” method: cutting the old threads, tying the new thread ends to the old ones, and simply pulling them through the machine. This bypasses the need to thread the loopers manually altogether.

    Can I use a serger without a regular sewing machine?

    You can certainly use an overlocker machine independently, but you cannot replace a regular sewing machine with it. The overlocker is fantastic for creating strong seams and finishing edges, but it cannot perform essential tasks such as topstitching, creating buttonholes, sewing zips, or detailed decorative stitches. The two machines work in tandem, with the overlocker focusing on bulk construction and seam finishing, and the regular machine handling closures and flat stitching.


    Conclusion

    The overlocker, or serger, is the indispensable companion to your standard sewing machine. It is the tool that closes the gap between the garments you sew at home and the clothes you buy in the shops. By understanding what is a serger and embracing its unique ability to stitch, trim, and overcast simultaneously, you unlock a new level of speed, durability, and professionalism in your projects.


    About the Author: Grace, Founder of London Sewing Courses

    Grace is the heart and hands behind London Sewing Courses. A passionate and experienced sewing instructor, she founded the studio with a unique mission: to create a calm, friendly space for adults to learn and connect, while using the profits to fund free sewing classes for local children in need. Her personal expertise and commitment to community building are at the core of every class and every stitch.


    Sources

  • What Does a Walking Foot do on a Sewing Machine?

    What Does a Walking Foot do on a Sewing Machine?

    Key Takeaways

    • The Function: A walking foot is an essential presser foot that works with your machine’s feed dogs to feed fabric from both the top and bottom simultaneously.
    • The Result: This dual-feed action completely eliminates fabric shifting, bunching, puckering, and misalignments when stitching.
    • The Use: It is critical for successfully sewing challenging materials like slippery silks, thick fleece, stretchy knitwear, and multiple layers, such as those found in quilting.
    • The Look: A walking foot is easily recognisable by its larger, often mechanical frame and a fork-like arm that sits over the needle screw.
    • The Alternative: While the walking foot solves one major problem, specialty feet like the zipper foot solve others by allowing you to sew right up to a raised edge.

    Guide to Perfect Sewing

    Welcome to the wonderful world of presser feet! As a sewing tutor, I often see students struggling with fabric that just won’t behave—it stretches, it puckers, or the layers shift away from each other. If you’ve ever found yourself asking what does a walking foot do on a sewing machine, you’re about to discover the solution to these common frustrations. This accessory isn’t just a nice-to-have; it’s an absolute game-changer for mastering tricky fabrics and complex projects. It represents one of the most significant upgrades you can make to your machine’s capabilities.

    The Simple Answer: Understanding the Walking Foot’s Magic

    In the simplest terms, what does a sewing machine walking foot do? It makes your machine feed the top layer of fabric at exactly the same rate as the bottom layer.

    Normally, your sewing machine relies on small, jagged metal teeth, called feed dogs, which grab the bottom layer of fabric and pull it under the needle. The presser foot holds the top layer down. However, on slippery or very thick materials, this one-sided action is insufficient. The bottom layer moves perfectly, but the top layer drags slightly, resulting in an uneven seam, or “puckering,” especially near the end of the seam line.

    The walking foot acts as a secondary set of feed dogs working from above. It has its own mechanism that literally “walks” the top fabric layer forward in perfect sync with the feed dogs below. This means the two layers meet the needle at precisely the same moment, ensuring an impeccable, professional-quality stitch every time.

    what does a walking foot do on a sewing machine

    What Do You Use a Walking Foot For? Taming Tricky Fabrics

    Understanding what do you use a walking foot for opens up a whole new range of projects you can tackle with confidence. It is designed to solve any problem where uneven feeding or shifting layers are a concern.

    How the Dual Feed System Works: A Closer Look

    When you attach the walking foot, you’ll notice a small, C-shaped arm that sits right over the screw that holds the needle bar. This arm is the key. As the needle bar moves up and down during stitching, it activates the walking foot’s internal mechanism, causing the foot’s sole to lift and move the fabric forward. This continuous, rhythmic movement—the “walk”—ensures an even journey for both fabric layers.

    If you are learning to use a sewing machine, getting comfortable with the machine involves understanding how each foot interacts with your materials, and the walking foot is often the first essential accessory we introduce to students.

    Taming Multiple Layers: Quilting and Binding

    Perhaps the most famous application for the walking foot is in quilting. A standard quilt sandwich consists of three layers: the top fabric, the batting (wadding), and the backing fabric. Without a walking foot, stitching through this thickness is almost guaranteed to result in a wrinkled or bunched backing layer.

    The walking foot keeps those thick, heavy layers aligned perfectly, allowing you to quilt smoothly and accurately, whether you’re stitching in the ditch or using decorative lines. For those taking your skills further, this foot is indispensable for garment construction that involves bulk, such as installing linings or working with heavy coat fabrics.

    Working with Slippery and Stretchy Fabrics

    Beyond bulk, the walking foot is a hero for materials that slip and slide, or stretch out of shape. Think of working with luxurious but tricky fabrics like velvet, organza, or silk charmeuse—the walking foot ensures the top layer doesn’t glide away from the bottom.

    Likewise, when sewing elastic knit fabrics, such as jersey or spandex, the walking foot prevents the machine from stretching the fabric as it feeds, eliminating those frustrating wavy or lettuce-leaf edges. To truly master understanding how to sew and alter clothes, you must first master the right tools for the job.

    what does a walking foot do on a sewing machine

    Our Unique Insight: What a Sewing Machine Walking Foot Does for Garment Construction

    The utility of a walking foot, or what does a walking foot do on sewing machine, extends far beyond quilting. For those of you on a dedicated seamstress courses journey, the walking foot is a silent partner in achieving professional finishes on tailored garments.

    Consider projects that require matching patterns, like checks or stripes. Even the slightest shift between the pieces will ruin the entire look. By locking the layers in place, the walking foot allows you to precisely align your prints, ensuring seamless transitions across collars, cuffs, and pockets. It’s an invaluable tool for ensuring that meticulous alignment you see in high-end ready-to-wear clothing. For those seeking private sewing lessons London tailored just for you, mastering pattern matching with this foot is often a core lesson.

    sewing machine zipper foot guide

    What Does a Zipper Foot Do and When to Use It?

    While the walking foot solves the problem of fabric shifting, it’s only one of many specialist feet that belong in your toolkit. To truly advance your skills, you need to understand what do different sewing feet do, starting with the second most common specialist foot: the zipper foot.

    Unlike the all-purpose standard foot, the zipper foot is designed with a narrow profile that allows you to stitch right next to a raised edge, whether that’s the teeth of a zipper, the cording of piping, or a bead-encrusted trim.

    The key feature of a zipper foot is its adjustability; you can snap it on so that the needle passes to the left or the right of the foot itself. This adjustability means you can stitch close to the zipper teeth without accidentally sewing over them, which would break your needle. It is absolutely essential for achieving the neat, professional finish seen in high-quality garments.

    The Essential Role of the Standard Foot

    It is important not to forget your trusty standard foot. This is the all-rounder, the one you use for basic straight stitching and zigzag seams on medium-weight, stable woven fabrics. It provides a balanced hold that works well with the feed dogs for everyday sewing.

    However, as you progress, you’ll discover that the standard foot struggles with the very challenges the walking foot is designed to overcome. Recognising when to switch from your basic tool to a specialised one is a fundamental skill taught in all quality sewing classes London for adults. Knowing when a basic tool is sufficient and when you need a specialist one is a key takeaway from our intermediate London sewing courses for adults.

    Actionable Strategy: A Quick-Guide to What Do Different Sewing Feet Do

    Mastering your machine is not just about threading the needle; it’s about choosing the correct accessory for the task at hand. Here is a quick, actionable guide to help you decide which foot to use today.

    Mastering Presser Feet: Walking, Zipper, and Beyond

    Foot TypePrimary PurposeWhen to Use ItLook and Key Feature
    Walking FootEliminates shifting and puckering.Quilting, working with knits, velvet, or vinyl.A large, mechanical foot with an active upper feed system.
    Zipper FootSewing close to a raised edge.Installing zippers, adding piping or cording.A narrow, often asymmetrical foot that attaches to the left or right of the needle.
    Standard FootGeneral straight and zigzag stitching.Seaming stable woven fabrics (e.g., cotton, linen).The machine’s default foot, usually wide and balanced.
    Buttonhole FootCreating automated, consistent buttonholes.Making shirts, blouses, or jacket fronts.Often has a frame to measure the button size automatically.
    Free-Motion/Darning FootAllowing fabric to be moved in any direction.Darning holes or free-motion quilting.A small, round or oval foot that “hovers” over the fabric.

    Learning these distinctions is a key step for those who are learning to use a sewing machine. When you move beyond the basics, you begin to appreciate the precision each foot offers, which is especially helpful in custom private sewing lessons London.

    When to Change Your Foot: A Fabric-by-Fabric Guide

    If you’re unsure if a foot is needed, simply look at your fabric. If it’s slippery, very thick (more than two layers of denim), stretchy, or if you are deliberately stitching near a bulky edge (like a cord), swap out your standard foot immediately for a specialist.

    The walking foot (or twin-feed foot, as it’s sometimes called) is arguably the most valuable purchase you can make after the machine itself because of how many challenging materials it instantly renders manageable. It’s a game-changer for avoiding the frustration of fabric bunching up at the end of a seam.

    Frequently Asked Questions (FAQ)

    What does a walking foot for sewing look like?

    A walking foot is easily identifiable because it looks more complicated and mechanical than your standard presser foot. It is generally larger and bulkier, featuring its own set of feed dogs on the underside of the foot itself. The most defining visual feature is a fork-like arm or lever at the top of the foot. This arm must sit over the needle clamp screw, allowing the needle movement to drive the foot’s unique ‘walking’ action.

    Is a walking foot only for quilting?

    No, while the walking foot is highly prized by quilters for managing the three layers of a quilt sandwich, its use extends far beyond that. It is the best tool for any material where the top layer might drag or shift unevenly compared to the bottom. This includes sewing highly stretchy knits like jersey, slippery fabrics such as silk or sheer organza, and any project that involves matching complex patterns like plaids or stripes.

    Can I use a walking foot with my regular sewing machine?

    In most cases, yes. Walking feet are an accessory and are generally compatible with most low-shank or high-shank domestic sewing machines, though you may need to purchase one specific to your machine’s brand (e.g., Brother, Janome, or Singer) or a universal walking foot that matches your machine’s shank size. Always ensure the foot’s fork-like arm can properly engage with the needle screw for the mechanism to work effectively.

    Conclusion

    The journey through the world of presser feet might seem complex at first, but with a patient and encouraging approach, each foot becomes a familiar friend. When it comes to achieving flawless results on challenging materials, the answer to what does a walking foot do on a sewing machine becomes perfectly clear: it’s your indispensable ally against puckering, shifting, and stretching.

    By providing an even, dual-feed system, the walking foot ensures that whether you are tackling thick quilted layers or delicate silk organza, your seams will be impeccably neat and perfectly aligned. The difference between struggling with a slippery fabric and gliding smoothly through a seam often comes down to this simple, yet ingenious, piece of equipment. Remember that tools like the zipper foot and the walking foot are designed not to complicate your life, but to empower you to handle any project with elegance and confidence.

    If you are a beginner sewist just discovering the magic of these tools, or an advanced student looking to refine your finishing techniques, the path to expert sewing is always smoother with the right knowledge and the right accessories.

    Ready to put this knowledge into practice? Why not take the next step in your creative journey? We offer friendly, tailored Sewing Classes North London for all levels, from those just learning how to sew to those mastering advanced garment construction. Come and join our community, where we guide you through every presser foot, seam, and stitch. You can also dive deeper into specialised topics by visiting our informative Sewing Blog for more expert advice and inspiration.

    About the Author: Grace, Founder of London Sewing Courses

    Grace is the heart and hands behind London Sewing Courses. A passionate and experienced sewing instructor, she founded the studio with a unique mission: to create a calm, friendly space for adults to learn and connect, while using the profits to fund free sewing classes for local children in need. Her personal expertise and commitment to community building are at the core of every class and every stitch.

    Sources

    The following resources were consulted to provide you with the most up-to-date and authoritative information:

    The Sewing Directory (Guide to the Walking Foot) https://www.thesewingdirectory.co.uk/walking-foot-guide/

    Brother USA (Mass Sewing Foot Guide)

    https://www.brother-usa.com/-/media/files/had/masssewingfoot_final_links.pdf

    YouTube (Video on the Walking Foot in Action) https://www.youtube.com/watch?v=10DBLRNFOMc

  • Can Sewing Be Self Taught?

    Can Sewing Be Self Taught?

    Key Takeaways

    • Self-Teaching is Possible: The answer to “can sewing be self taught” is yes, but it demands dedication and a structured approach, often starting with high-quality online resources.
    • Time Commitment Varies: Basic proficiency can be reached in months, but mastering complex skills like tailoring takes years of consistent practice.
    • Start Simple with Equipment: A reliable, decent sewing machine for a beginner doesn’t require a huge initial investment, but look for key features like adjustable stitch length and good reviews.
    • Guided Learning Accelerates Progress: While possible to teach yourself, a sewing class provides immediate feedback, corrects bad habits early, and shortens the learning curve significantly.
    • Easiest Projects: Start with non-garment items like cushion covers, tote bags, or simple elastic-waist skirts to build confidence.

    the creative world of fabric, thread, and machine is calling. Perhaps you’ve been scrolling through images of beautifully made garments or perfectly tailored home furnishings, and the spark of ambition has ignited. Now you face the first, most fundamental question on your journey: Can sewing be self taught? The short, encouraging answer is a resounding “yes.” Countless talented seamstresses and tailors across history have started their journey with nothing more than a curious mind, a needle, and a piece of cloth. The path is open to anyone with the passion and patience to pursue it.

    However, the journey of learning to sew outside of a formal setting is less a straight road and more an adventure full of twists, turns, and the occasional unpicking session. It requires discipline, a knack for finding high-quality resources, and the mental resilience to learn from every mistake. As seasoned educators in the craft, we believe that understanding the commitment involved is the true first step. The modern world offers an unparalleled wealth of video tutorials, blogs, and online communities that make self-teaching more viable than ever before. But to truly succeed, one must approach it with the rigour of an actual student, following a curriculum rather than simply bouncing from one project to the next.

    Is it Possible to Be a Self-Taught Seamstress?

    Absolutely, it is possible to become a highly competent self-taught seamstress or tailor. The craft is fundamentally a collection of mechanical skills—how to operate the machine, how to cut fabric, how to manage tension—all of which can be learned through dedicated practice. The internet has levelled the playing field by putting world-class instruction in front of anyone with an internet connection. Whether you are looking to create simple items for your home or dream of one day designing your own capsule wardrobe, your commitment is the only true prerequisite. You can certainly learn the mechanical fundamentals of the machine and the basics of stitching without ever setting foot in a classroom.

    Passion Trumps Pedigree: The Self-Teaching Mindset

    The key differentiator for those who succeed in self-teaching is mindset. It’s not about having a certificate; it’s about having an unshakeable drive. The self-teaching path requires you to be your own most patient tutor. You will inevitably encounter problems—tension issues, puckered seams, misaligned patterns—that a professional would solve instantly. When this happens, you must embrace a spirit of forensic investigation. You need to be prepared to search for the answer, read multiple sources, and meticulously test adjustments until the problem is solved. This resilient, problem-solving approach is what defines a successful self-taught crafter. Your enthusiasm for the final creation must outweigh the frustration of the learning process.

    The Importance of High-Quality Resources

    While a tutor offers direct, real-time feedback, the self-taught student must become adept at curating their own syllabus. The quality of your learning materials directly impacts the speed and depth of your progress. Relying on poor tutorials can lead to ingraining bad habits that are incredibly difficult to unlearn later on. When looking for guidance on how to sew and alter clothes, for example, seek out sources that are clear, provide high-quality visuals, and explain why a certain technique is used, not just how. Look for comprehensive guides on how to learn to use a sewing machine before you even thread your first needle. A strong foundation built on reliable teaching is essential for long-term success, even in a self-guided environment.

    seiwng Self-Taught

    Our Unique Insight: Self-Taught vs. Guided Learning

    The choice between self-teaching and guided learning often boils down to two things: time and confidence. While can sewing be self taught is a question of possibility, how quickly and how well is a question of strategy. The greatest advantage of a structured learning environment, such as dedicated sewing classes London for adults, is the immediate access to expert knowledge and real-time correction. This support system dramatically reduces the amount of time spent on guesswork and frustration.

    Why a Class Accelerates ‘How Long Does It Take to Learn to Sew’

    One of the most common questions we hear is, how long does it take to learn to sew? The answer is heavily dependent on your learning environment. A self-taught student may spend an entire weekend trying to solve a machine tension problem that a tutor in a Sewing Classes North London course could identify and fix in five minutes. Classes provide a proven, sequential curriculum that ensures you master foundational skills—like cutting accurately and understanding fabric grain—before moving on to more complex patterns. This structured approach means you progress faster, build a solid technical base, and avoid the pitfalls of skipping crucial steps in your development. For those serious about rapid skill acquisition, joining sewing classes London for beginners is the most effective accelerator.

    The Hidden Costs of Trial-and-Error

    Self-teaching can seem free, but it often comes with hidden costs. The money saved on tuition can quickly be spent on wasted fabric due to bad cutting or incorrect seam allowances. More importantly, there’s the cost of time and motivation. Constantly struggling with a project or trying to decipher confusing instructions can lead to burnout, and many aspiring sewists abandon their machine altogether. A tutor not only shows you the right way but also teaches you the industry-standard techniques that make projects look professional. They provide the encouragement and structure needed to keep momentum, turning potential frustration into satisfying progress.

    The Time Commitment: How Long Does It Take to Learn to Sew

    The answer to the time commitment query is nuanced, as it depends entirely on your goal. To be able to operate a machine competently, mend clothing, and produce simple items like cushion covers, you might reach this basic level of functional skill within a few months of dedicated, weekly practice. This early phase is focused on mastering the mechanics. However, to achieve a state where you can confidently tackle complex patterns, understand fabric drape, and make garments that look professionally finished, the timeline extends significantly.

    From Zero to Hero: The Beginner’s Timeline

    For the purpose of achieving basic proficiency, let’s look at the rough timeline:

    • 1-2 Months (The Basics): Learning to thread the machine, understanding different stitches, sewing a straight line, and completing simple projects like a tote bag or a pillowcase.
    • 3-6 Months (Functional Skill): Confidently following a simple pattern, managing basic fabrics (cottons, linens), and learning to insert a simple zip or elastic waistband. This stage is where your skill truly starts to solidify, allowing you to confidently tackle simple patterns with minor adjustments. It is vital to consistently practice different types of seams and finishes, which elevates a handmade item from a simple project to a piece of carefully crafted work. Do not rush through this foundation phase; solid skills now prevent costly mistakes later on.
    • 1 Year+ (Intermediate Skill): You can alter commercial patterns, handle trickier fabrics (e.g., silk, knits), understand garment construction techniques, and complete tailored items like jackets or trousers. At this point, moving to intermediate London sewing courses for adults is a great way to refine your skills and address specific weaknesses.

    How Long Does It Take to Learn to Sew Clothes?

    Focusing specifically on garment making, the complexity increases significantly because clothes require three-dimensional thought and an understanding of how fabric behaves on a human form. To make a simple item, like an elasticated skirt or pyjama trousers, you can achieve a wearable result within a few weeks of concentrated effort. However, to consistently produce well-fitting garments—where the shoulders don’t slump and the darts are perfectly positioned—you should budget at least one year of consistent practice. This time is spent not just sewing but mastering fit, pattern reading, and the often-overlooked skill of pressing. It is in this field that a supportive environment, such as that offered by various sewing classes London for adults, truly pays dividends by correcting fitting errors early on.

    How Long Does It Take to Learn Tailoring? The Advanced Skillset

    Tailoring is not just sewing; it is an entirely different discipline and is widely considered the pinnacle of garment construction. If you are asking, how long does it take to learn tailoring with the goal of producing bespoke, structured items like fully lined suit jackets, the answer is measured in years, not months. A master tailor spends years as an apprentice honing skills in padding, canvassing, and complex hand-stitching. While you can certainly learn advanced techniques through a specific programme, true mastery requires consistent dedication, an exceptionally fine eye for detail, and a deep understanding of wool and interlining. Acquiring these skills means dedicated study of advanced pattern drafting, fabric manipulation, and meticulous handwork, and for many, this is where the support of a master tutor becomes indispensable. This pursuit represents the ultimate commitment to the craft, and even professionals seek out custom private sewing lessons London to hone specific, high-level skills.

    a row of sewing machines sitting on top of a table

    Actionable Strategy: Your First Sewing Machine and Projects

    The machine is your primary tool, and choosing the right one is crucial to maintaining enthusiasm when self-teaching. The market is flooded with options, but a beginner needs a reliable, user-friendly model that won’t fight them on every seam. The first step in this actionable strategy is to set a budget and focus on core features over unnecessary digital bells and whistles.

    How Much is a Decent Sewing Machine? Setting a Realistic Budget

    Asking how much is a decent sewing machine is like asking how much a decent car costs—it depends on your needs. For a beginner, you do not need an industrial or high-end embroidery machine. A solid, mechanical machine from a reputable brand (like Brother, Janome, or Singer) can be acquired new for between $\text{£}150$ and $\text{£}300$. This budget range provides you with a robust, metal-framed machine that will handle most common fabrics and offer the essential stitches (straight, zigzag, buttonhole) you need. Anything significantly cheaper may lack the necessary power or reliability, leading to tension and maintenance issues that will frustrate a novice.

    Which Sewing Machine is Best for Home Use Beginners?

    When selecting which sewing machine is best for home use beginners, look for the following features:

    1. Top-Loading Bobbin: These are much easier to install and monitor than front-loading bobbins, reducing a common source of beginner frustration.
    2. Adjustable Stitch Length and Width: While basic, having the control to adjust these is vital for sewing different types of fabric.
    3. Automatic Needle Threader: A huge time-saver and a great convenience feature.
    4. Included Accessories: Ensure it comes with a few basic presser feet (zipper foot, buttonhole foot).

    A simple mechanical machine is often better than a complex computerised one because it forces you to understand the mechanics, not just push a button. You want a workhorse, not a gadget.

    Keeping Your Machine a Trusted Companion: Basic Maintenance

    A crucial piece of advice for the self-taught sewist is to become intimately familiar with your machine’s maintenance routine. A high-quality sewing machine is an investment, but it will quickly underperform if neglected. You must learn the essentials: cleaning out the bobbin case area, removing lint buildup from the feed dogs, and regularly oiling the specified points. These simple acts are often overlooked by beginners but are responsible for the most common faults, such as skipped stitches or uneven tension. Every machine comes with a manual—consider this your second most important instruction book after your first pattern. Take the time to read the maintenance chapter cover-to-cover. By knowing how to care for your machine, you transform it from an intimidating tool into a trusted, reliable companion, saving you countless trips to a repair technician and preventing hours of troubleshooting frustration. This proactive approach to machine care ensures your dedication to the craft is rewarded with consistent, high-quality results.

    What is the Easiest Thing to Sew? 3 Perfect Starter Projects

    To build confidence and a successful track record, you must start with simple, flat projects before attempting anything that requires a sleeve or a neckline. Directly answering what is the easiest thing to sew, we suggest these three perfect starter projects:

    1. The Cushion Cover (Envelope or Simple Zip): This project teaches you to cut straight, sew a perfectly square seam, and master a closure method. It’s forgiving and instantly rewarding.
    2. The Simple Tote Bag: Ideal for learning to manage seam allowances, reinforce stress points (like handles), and handle a slightly heavier weight fabric.
    3. The Elastic-Waist Skirt/Pyjama Bottoms: Your first garment! Because there are no complex curves, set-in sleeves, or tricky waistbands, it’s a great introduction to using a pattern, sewing in the round, and creating a wearable item.

    Beyond the Basics: Mastering Advanced Skills

    Once you have mastered your first set of projects, you will inevitably hit a wall where self-teaching becomes less efficient. You know the basics, but your finished garments lack that professional polish, or you struggle with complex materials. This is the natural point where many sewists seek out professional instruction to make the leap from competent hobbyist to skilled artisan.

    Making the Leap to Intermediate London Sewing Courses for Adults

    The decision to enrol in formal training is an investment in quality and speed. Intermediate London sewing courses for adults are designed to tackle the skills that are hardest to teach yourself. These classes typically cover:

    • Advanced dart manipulation and complex fitting adjustments.
    • Working with specialist fabrics (e.g., chiffon, leather, stretch knits).
    • The use of interfacings, linings, and specific closures.

    The value here is the direct, expert critique of your work. A tutor can spot a tension issue or a pressing mistake that you may overlook, shaving months off your learning curve. This focused, collaborative environment is the best way to move from simply making clothes to creating well-made clothes. You can see the range of options available on our sewing blog.

    The Path to Custom Private Sewing Lessons London

    If your passion leans towards highly specialised work—perhaps bridal alterations, advanced menswear, or historical costume—you will find that general classes no longer meet your needs. At this stage, the ultimate step is to seek out custom private sewing lessons London. This is a one-on-one consultation with a master tutor designed entirely around your specific goal. You may want to master a specific French seam technique, learn advanced grading, or troubleshoot a complex design project. Private lessons offer an unparalleled depth of focused instruction, providing the most direct route to professional-level mastery and the precision needed for complex tasks like tailoring.

    Frequently Asked Questions (FAQ)

    What is the quickest way to learn to sew?

    The quickest way to learn is through immersion and consistency. Enrolling in intensive seamstress courses or a series of dedicated workshops provides a structured curriculum and immediate access to a tutor for rapid feedback. This eliminates the trial-and-error of self-teaching. Commit to practising the same technique until it is perfect, and focus on mastering the machine’s operation before moving on to complex patterns.

    How many hours a week should I practise?

    For meaningful progress, aim for a minimum of 4-6 hours of focused practice per week. This can be split into two or three sessions. Consistency is far more important than intensity; two hours twice a week is better than one eight-hour marathon session. Regular, short practice allows your brain to retain muscle memory and prevents burnout, which is a common problem for the self-taught.

    Do I need a professional machine to start?

    No, a professional or industrial machine is unnecessary for beginners. In fact, a dedicated home-use beginner machine is often better as it is designed to be more intuitive and versatile for a wide range of projects. Professional machines are highly specialised for one type of fabric or stitch. Focus your investment on a reliable, mechanical model with good reviews that offers essential features like adjustable stitch length and a decent set of included feet.

    Conclusion

    So, can sewing be self taught? Yes, it absolutely can. Your journey into the world of fabric and thread begins the moment you decide to pick up a needle or sit at a machine. The path you choose—whether it’s a self-guided adventure through online tutorials or a structured course with our London sewing courses—depends entirely on your budget, your timeline, and your personal learning style.

    The self-taught sewist must embrace the role of the dedicated detective, seeking out quality resources, troubleshooting every setback, and remaining motivated through every unpicking session. For those who value speed, professional polish, and an accelerated learning curve, formal Sewing Classes North London or other metropolitan areas offer an invaluable, confidence-building head start. Ultimately, whether you teach yourself or take classes, your greatest asset will always be your passion for the craft. If you have the drive to turn a flat piece of fabric into a three-dimensional creation, the world of sewing is wide open and ready for your talent to take root and flourish. If you’re ready to start your guided journey, we encourage you to get in touch with us today.

    About the Author: Grace, Founder of London Sewing Courses

    Grace is the heart and hands behind London Sewing Courses. A passionate and experienced sewing instructor, she founded the studio with a unique mission: to create a calm, friendly space for adults to learn and connect, while using the profits to fund free sewing classes for local children in need. Her personal expertise and commitment to community building are at the core of every class and every stitch.

    Sources

    How to Sew

  • Tips for Your Portable Sewing Machine

    Tips for Your Portable Sewing Machine

    Tips for Your Portable Sewing Machine

    Introduction: The Convenience of Portable Stitching

    In today’s fast-paced world, finding time and space for hobbies can be a challenge. But what if your passion for sewing didn’t have to be confined to a single corner of your home? The rise of the portable sewing machine in the UK has revolutionised the way we approach sewing. No longer just a hefty, stationary piece of equipment, a small sewing machine or compact sewing machine is now a versatile and convenient tool for crafters, students, and anyone with a creative spark. They are an excellent addition to any crafter’s toolkit, especially for those in a small flat, a university dorm, or anyone who loves to travel.

    This article will guide you through everything you need to know about these fantastic little machines. We’ll explore the different types available, help you choose the best portable sewing machine for your needs, and offer practical tips on how to use and care for your lightweight sewing machine so you can enjoy the freedom of stitching wherever you are.

    Understanding the Basics of Portable Sewing

    Before you dive in, it’s important to understand the different types of portable sewing machines available on the market and their unique advantages.

    What is a Portable Sewing Machine?

    A portable sewing machine is, at its core, a sewing machine designed with a focus on size, weight, and ease of transport. While a full-sized machine can weigh 10kg or more, a portable model is typically much lighter, often around 2-5kg, and has a smaller footprint. This makes it perfect for those who want to sew on a coffee table, a small desk, or take it with them on the go.

    There are a few key types to be aware of:

    • Mini Sewing Machines: A mini portable sewing machine is often the smallest and most basic type. They are perfect for very simple, light-duty tasks like quick hemming, small repairs, or learning the absolute fundamentals. They are not designed for heavy fabrics or complex projects.
    • Compact/Lightweight Full-Feature Machines: This category offers the best of both worlds. They are light and small enough to be easily moved, but they still provide a good range of features, including multiple stitch types, speed control, and a more robust build. These are often the best portable sewing machine options for dedicated hobbyists.
    • Handheld Sewing Machines: A handheld sewing machine is exactly what it sounds like—a small, battery-operated device that you can hold in your hand. They are designed for on-the-spot repairs and are not a substitute for a full machine. They are very useful for tasks like mending a seam on a curtain while it’s still hanging. You may also see the term “portable hand sewing machine” used to describe these devices.
    • Portable Sewer Machine: While less common, this term is sometimes used interchangeably with portable sewing machine. However, in the UK, the term “sewer” more often refers to drains and sanitation, so the correct term you should look for is always “sewing.”

    Advantages of Using a Portable Sewing Machine

    The benefits of owning a portable sewing machine are numerous and make it an attractive option for many different types of users:

    Quick Fixes: A portable sewer machine, or more accurately a portable sewing machine, is perfect for tackling quick, on-the-spot repairs without the fuss of setting up a larger machine.

    Space Saving: For those living in smaller homes or with limited dedicated crafting space, a compact sewing machine can be a game-changer. It can be easily stored away in a cupboard or on a shelf when not in use.

    Portability/Travel: A travel sewing machine is perfect for taking to sewing classes, workshops, or even on holiday. It allows you to continue your projects and fix any clothing mishaps wherever you are.

    Affordability: A mini portable sewing machine is often an incredibly affordable sewing machine, making it a low-risk entry point into the world of sewing.

    Ease of Use: Many lightweight sewing machine models are designed with simplicity in mind. They often have fewer dials and settings, making them an ideal sewing machine for beginners who might feel intimidated by a more complex, full-sized model.

    Selecting the Right Portable Sewing Machine

    Choosing the right portable sewing machine is about balancing your needs with the features of the machine. Here’s what to look for when you’re ready to buy.

    Key Features to Look for in a Lightweight Sewing Machine

    • Weight and Size: The whole point of a lightweight sewing machine is its portability. Check the dimensions and weight to ensure it meets your needs. A weight of around 5kg is generally a good benchmark for a compact, yet capable, machine.
    • Stitch Variety: At a minimum, your portable sewing machine should have a straight stitch and a zigzag stitch. More advanced models might include decorative stitches, an overcasting stitch for finishing seams, and a one-step buttonhole.
    • Power Source: Most portable machines run on mains electricity, but some smaller models, particularly a handheld sewing machine, can be a battery-operated sewing machine. A dual-power option offers the most flexibility.
    • Build Quality and Durability: A machine with a metal internal frame is generally more durable sewing machine than one made entirely of plastic. While plastic casings are fine, a metal frame provides stability and longevity.
    • Speed Control: A speed control slider or a foot pedal with variable speed is a great feature, particularly for a sewing machine for beginners, as it allows for better control and precision.
    • Ease of Threading: Look for a machine with a clear threading path and a top-loading bobbin. An automatic needle threader, while not essential, is a fantastic feature to have.
    • Free Arm: This is a crucial feature for sewing cuffs, hems, and other small tubular projects. Most good compact sewing machine models will have a removable storage compartment that reveals a free arm.

    Recommendations for the Best Portable Sewing Machines

    When looking for the best portable sewing machine, it’s worth checking out reviews and exploring the offerings from reputable brands. A search for “portable sewing machine reviews” will bring up a wealth of information to help you make an informed decision.

    • General Brands: Brands like Brother, Janome, and Singer are known for producing reliable, high-quality machines across a range of price points. Hobbycraft also sells its own-brand machines that are popular with beginners.
    • Specific Model Types: An entry-level mechanical singer portable sewing machine, such as a model from their ‘Tradition’ or ‘Simple’ ranges, is often a great place to start. For those with a bigger budget, a feature-rich computerised compact sewing machine can offer a fantastic experience without the bulk of a full-sized machine.
    • Addressing Specific Needs: If you’re a beginner, a good portable sewing machine with a simple stitch selection dial is often the best choice. If you’re into quilting, you’ll want to look for a portable quilting machine with a larger throat space or an extension table. A best compact sewing machine for general home use will typically have around 10-20 stitch options.

    Affordable Sewing Machine Options

    It’s entirely possible to find a good portable sewing machine on a budget. Retailers like Argos, Hobbycraft, and Amazon often have sales and offer starter models at very competitive prices. A mini portable sewing machine is often the most cost-effective option, perfect for quick fixes and very light projects.

    Vintage and Antique Portable Machines

    For the collectors and enthusiasts, an antique portable singer sewing machine or a vintage portable singer sewing machine can be a beautiful piece of history. While they are often heavy and lack modern features, their durable sewing machine build quality is legendary. Be aware that parts and servicing can be more difficult to find for an old portable Singer sewing machine.

    Essential Portable Sewing Machine Accessories (Sewing Machine Accessories)

    Your machine is just the start! The right accessories can make your sewing experience even more enjoyable and efficient.

    Must-Have Portable Sewing Machine Accessories

    • Needle Assortment: Having the right needle for your fabric is crucial. Keep a selection of universal, denim, and ballpoint needles handy.
    • Extra Bobbins: Pre-wound bobbins save a huge amount of time, especially with a sewing machine portable.
    • Thread: A basic selection of good quality threads in black, white, and a few key colours.
    • Seam Ripper: An indispensable tool for unpicking mistakes.
    • Small Scissors/Thread Snips: For quick, clean thread cutting.
    • Measuring Tape/Ruler: For accurate measurements on the go.
    • Fabric Clips or Pins: To hold fabric layers securely together.
    • Small Screwdriver: For basic maintenance tasks, such as changing the needle plate.

    Choosing the Right Portable Sewing Kit

    A portable sewing kit is a brilliant complement to your machine, allowing you to handle quick hand sewing tasks. A good pre-made kit should contain needles, thread, a thimble, scissors, and a measuring tape. You can also easily compile your own custom kit with the essentials you use most.

    Additional Useful Accessories

    Portable Embroidery Machine: For those with an interest in machine embroidery, a portable embroidery machine is a specialised option that allows you to add beautiful designs to your projects wherever you are.

    Portable Sewing Machine Table: An extension table gives you more space for larger projects and helps to support the weight of the fabric.

    Carry Case/Dust Cover: A dedicated case or dust cover will protect your machine from damage and dust when you’re transporting or storing it.

    Finding Quilt Shops Near Me

    (Quilt Shops Near Me / Quilting Shops Near Me / Quilt Shop Near Me / Quilt Stores Near Me / QuiTechniques for Efficient Portable Machine Sewing (Portable Machine Sewing)

    Even with a simple machine, there are a few techniques that will make your portable machine sewing experience smoother.

    How to Set Up Your Portable Sewing Machine

    1. Stable Surface: Always place your sewing machine portable on a flat, stable surface to prevent vibration and ensure a consistent stitch.
    2. Powering Up: Whether you’re using mains electricity or batteries, ensure your machine is properly powered on before you start.
    3. Threading: Always consult your machine’s manual for the correct threading path. Incorrect threading is the number one cause of most sewing machine problems.
    4. Test Stitching: Before you start on your project, always do a quick test stitch on a scrap of fabric to check your tension and stitch quality. This is especially important for a sewing machine for beginners.

    Best Practices for Portable Machine Sewing

    • Fabric Compatibility: Remember that a mini portable sewing machine has limitations. Avoid heavy-duty fabrics like thick denim or multiple layers, as this can strain the motor and lead to broken needles.
    • Speed Control: A steady, manageable pace is key. Don’t rush, as this can lead to uneven stitches and potential machine jams.
    • Guiding Fabric: Use your hands to gently guide the fabric through the machine, but never pull or force it. Let the feed dogs do the work.
    • Start with Simple Projects: Begin with easy tasks like hemming, simple repairs, or crafting a small pouch. This will help you build confidence.
    • Managing Tension: Learn how to make basic tension adjustments. A good rule of thumb is to start with a medium setting and adjust as needed, checking your test stitches.

    Troubleshooting Common Issues

    Even with the best preparation, you might encounter issues. Don’t worry, these are almost always fixable.

    Machine Jams: Always ensure your bobbin is inserted correctly and that you are not sewing over pins.

    Skipped Stitches: This is often caused by a blunt, bent, or incorrectly inserted needle.

    Thread Breakage: This can be due to poor quality thread, improper threading, or incorrect tension.

    Maintenance Maintenance and Care for Your Portable Sewing Machine

    Keeping your portable sewing machine in good condition is vital for its longevity and performance.

    Keeping Your Portable Sewing Machine in Good Condition

    • Regular Cleaning: Use a small brush to regularly clean the lint and thread build-up from the bobbin area and the feed dogs.
    • Oiling: If your machine requires it, follow the manufacturer’s recommendations for oiling. This is a vital step for a durable sewing machine.
    • Needle Replacement: Change your needle regularly. A fresh, sharp needle makes a huge difference in stitch quality.

    Tips for Cleaning and Storing Portable Sewing Machines

    • Proper Storage: Always store your machine in a clean, dry place, and use a dust cover or hard case to protect it from dust and bumps.
    • Battery Removal: If you have a battery-operated sewing machine, remove the batteries when storing it for a long period to prevent corrosion.
    • Professional Servicing: Even a small machine can benefit from a professional check-up every year or two, especially if you use it frequently.

    Conclusion: Empowering Your Sewing On The Go

    A portable sewing machine is more than just a convenience—it’s an invitation to a more creative and flexible way of life. Whether you’re mending a hem in a hurry, taking your skills to a workshop, or simply don’t have the space for a full-sized machine, a compact sewing machine can be a powerful and empowering tool.

    With the right knowledge about features, the right sewing machine accessories, and a little care, you can make the most of your portable sewing machine. We encourage you to read portable sewing machine reviews, choose the best portable sewing machine for your needs, and enjoy the freedom of stitching wherever you are. Happy sewing!

    About the Author: Grace, Founder of London Sewing Courses

    Grace is the heart and hands behind London Sewing Courses. A passionate and experienced sewing instructor, she founded the studio with a unique mission: to create a calm, friendly space for adults to learn and connect, while using the profits to fund free sewing classes for local children in need. Her personal expertise and commitment to community building are at the core of every class and every stitch.

  • How to Sew and Alter Clothes

    How to Sew and Alter Clothes

    Your Gateway to Sewing

    Welcome, aspiring sewists and seasoned stitchers alike, to a truly rewarding journey into the world of fabric and thread! Here at London Sewing Courses, we believe that learning how to sew is not just about mastering a practical skill; it’s about unlocking a vibrant creative outlet that brings immense satisfaction and allows you to express your unique style. Whether you dream of creating your own wardrobe, mending beloved garments, or crafting thoughtful gifts, this comprehensive guide will walk you through everything you need to know, from the absolute basics to practical alterations and inspiring beginner sewing projects.

    Sewing has an enduring appeal, connecting us to a rich craft heritage that spans thousands of years, long before the invention of the sewing machine. Today, with an abundance of online resources, it’s easier than ever to get started, regardless of your prior experience. We’re here to guide you, step by step, with a warm and encouraging approach, just as we would in our London classrooms. So, let’s begin to transform flat pieces of fabric into beautiful, wearable creations, one stitch at a time.

    Essential Tools for Sewing

    Before we delve into the exciting realm of stitches and seams, let’s talk about the foundation of any successful sewing endeavour: your tools! Think of them as your trusted companions on this creative journey. While the world of sewing offers a vast array of gadgets, you certainly don’t need everything to start. As you progress, you’ll naturally discover which tools become indispensable for your projects. A well-organised sewing box is a wonderful way to keep your essentials tidy and accessible.

    1. Sewing Machine: Your Primary Companion

    For many, the sewing machine is the heart of their sewing space. It’s a versatile tool that can drastically speed up your projects and allow for a wider range of techniques compared to hand sewing alone.

    Choosing Your First Machine: What to look for in a sewing machine for beginners

    If you’re looking to purchase your first machine, it can feel a little daunting with so many options available. Don’t worry about getting the most advanced model right away. A good sewing machine for beginners should be straightforward to operate and offer essential functions. Many machines, even older ones like a Singer machine from a previous generation, can work perfectly well. If you’re on a budget, consider borrowing one from a friend or family member or looking for a secondhand machine. The most important thing is that it makes stitches on fabric effectively.

    Understanding Machine Parts

    While machines vary, they all share fundamental components. Familiarising yourself with these parts will give you confidence and control.

    • The Hand Wheel: This is a circular dial typically found on the side of your machine. Always turn it towards you to manually form a stitch. It’s particularly useful when you’re a beginner and prefer to go slowly, or when you need precise control, such as when pivoting at corners.
    • Stitch Selector: This dial or display allows you to choose the type of stitch you want to make. For beginners, focusing on the basic straight stitch is key, as it’s the most common and versatile stitch.
    • Stitch Width: Often represented by a zigzag symbol, this setting controls how wide your stitch is. For a straight stitch, it won’t have a width, but for a zigzag, you can adjust how broad it is.
    • Stitch Length: This setting determines how long or short your stitches will be. Shorter stitches are generally more secure and neat, while longer stitches (around 4mm) are perfect for temporary stitches like basting or gathering, as they are easier to remove. A basic stitch length of 2.5mm is often recommended.
    • Bobbin Winder: This is a small spindle on your machine used to wind thread onto your bobbin. We’ll go into detail on how to use this soon.
    • Tension Dial: This dial controls the tension of your thread, ensuring your stitches are even and smooth. For most machines, a setting around ‘4’ works well, and it’s best not to adjust it much as a beginner unless you notice problems like loose threads.
    • Presser Foot: This little foot holds your fabric firmly in place while you sew. It has a lever, usually at the back or side, that allows you to raise and lower it. Always lower the presser foot before you start sewing, otherwise your fabric won’t move forward, and you might get tangled threads.
    • Needle: This is where your upper thread passes through to meet the bobbin thread, forming your stitches. Machine needles need to be changed regularly to prevent snags and skipped stitches.
    • Backstitch Button/Lever: This function allows your machine to stitch backwards, which is crucial for securing your seams at the beginning and end of a stitching line.
    • On/Off Button: Simply put, this controls the power to your machine.
    Types of Sewing Machines (Briefly)

    While the basics are universal, sewing machines come in various types. Most home sewists use mechanical or computerised machines. Mechanical machines are typically simpler, with manual dials, while computerised ones offer more stitch options and sometimes automated features. For finishing raw edges, you might eventually explore an overlocker (also known as a serger), which trims and neatens the fabric edge very professionally.

    2. Hand Sewing Supplies

    Even with a machine, hand sewing remains an invaluable skill for delicate work, mending, or when you just don’t feel like setting up your machine. Let’s explore the essential tools for how to hand sew.

    • Needles: Hand sewing needles come in various types and sizes, each suited for different tasks. The size numbers range from 1 (coarsest) to 10 (finest).
    • Sharps: These are medium-length, slender needles with round eyes, good for general hand sewing. A number seven sharp is a good choice for beginners.
    • Betweens: Shorter than sharps, these are used for fine handiwork, such as quilting.
    • Crewel (or Embroidery) Needles: These have larger eyes, making them easier to thread, and are used for darning, embroidering, and regular sewing with thicker threads like embroidery floss.
    • Darning Needles: Longer than crewel needles with wider eyes, used for mending.
    • You’ll often find a pack of assorted needles useful. Smaller needles are better for thinner fabrics, while larger ones suit thicker materials.
    • Threads:
    • For most projects, especially as a beginner, 100% polyester thread is recommended due to its strength and smoothness. Cheaper polyester threads can be fluffier and break easily, perfect for practice projects that don’t need to last professionally. For items you want to be strong and durable, a good quality 100% polyester thread like Gutermann Sew-All is excellent. This type of thread is also typically very strong and smooth.
    • Threads come in numerous sizes and colours to match your project. When choosing polyester thread, look for spools with a cream or white top, as other colours indicate different thread types for specific uses.
    • For hand sewing, all-purpose thread is usually sufficient. The general rule is to match your thread colour as closely as possible to your fabric so it doesn’t show. If an exact match isn’t possible, choose a slightly darker shade. You can also choose a contrasting colour for decorative stitches.
    • Cotton and silk threads are also available, often chosen to match the fabric type (e.g., cotton fabric with cotton thread, silk with silk thread).
    • Scissors: Investing in good quality cutting tools is essential for a clean finish and to prevent fabric damage.
    • Fabric shears (often called dressmaking shears) are long scissors with one small ring for your thumb and a larger handle for other fingers. Always use these exclusively for fabric to keep them sharp.
    • Pinking shears have triangular teeth that create a zigzag edge, which helps prevent fabric from unravelling.
    • Smaller embroidery scissors are handy for cutting thread. Keep your scissors clean and sharp, occasionally oiling the blades with a drop of sewing machine oil.
    • Pins and Pin Cushion: Pins are incredibly helpful for holding fabric layers together, especially for beginners. A pincushion keeps your pins neat and handy, some even designed to be worn on your wrist for convenience.
    • Dressmaker or silk pins have sharp points and are good for fine fabrics.
    • For knit fabrics (stretchy materials), use ball-point pins, as their rounded points won’t snag the threads.
    • When pinning, you can place pins perpendicular or parallel to your seam line. The crucial thing is to remove pins before your needle reaches them to avoid breaking your machine needle or causing it to fly off.
    • Measuring Tools:
    • A flexible tape measure (60-inch, fabric or plastic-coated) is vital for taking body measurements and marking fabric.
    • A small measuring gauge or 6-inch ruler can help with smaller measurements like seam allowances and hems.
    • Marking Tools: To transfer pattern markings to fabric, you’ll need:
    • Tailor’s chalk or fabric pens are great for making thin lines that brush off easily.
    • A tracing wheel is also used with tracing paper to transfer markings, such as for darts and folds, to the wrong side of the fabric.
    • Seam Ripper: Affectionately known as a ‘stitch un-picker’, this tool is your best friend for correcting mistakes, and believe us, everyone makes them!
    • Thimble: A small, hard cap, usually metal, wood, or leather, worn on your middle finger to protect it from needle pricks while hand sewing. It helps you push the needle through the fabric more easily.
    • Beeswax: This may sound unusual, but running your thread over beeswax before hand sewing gives it a coating that helps prevent tangling and makes it stronger.
    • Emery Bag: Often shaped like a small strawberry, an emery bag is used to sharpen dull hand needles by pushing them back and forth through it.

    3. Fabrics and Threads: Making Informed Choices

    Choosing the right fabric is like picking the perfect canvas for your masterpiece. It significantly impacts your project’s outcome and ease of sewing.

    Beginner-Friendly Fabrics:

    For your initial projects, we highly recommend stable woven fabrics. These materials don’t stretch much and are less likely to slip around while you’re sewing, making them much easier to manage. Excellent choices include:

    • Cotton: Quilting cotton or broadcloth is fantastic for learning due to its stability and ease of handling.
    • Linen: This natural fibre is very fashionable and, when woven, is quite stable and a great beginner-friendly fabric.
    • Flannel: Soft and easy to work with, flannel is also a good option.
    • Denim: While heavier, lightweight denim can also be manageable for beginners, just ensure you have the correct needle size for thicker materials.

    It’s also crucial to pre-wash your fabric before you begin sewing. This prevents it from shrinking later and distorting your finished garment. Always check the care label for specific instructions.

    Understanding Fabric Grain:

    Fabric is made up of threads running in specific directions, and understanding these “grains” is fundamental to cutting and sewing correctly.

    • Lengthwise Grain (Warp): These threads run the length of the fabric, parallel to the selvage (the self-finished, non-fraying edge along the long side of the fabric). Fabric is typically purchased by “yardage” (or metreage in the UK) measured along this grain. Garments cut on the lengthwise grain tend to hang smoothly with minimal stretch.
    • Crosswise Grain (Weft): These threads run across the width of the fabric. They have a bit more stretch than the lengthwise grain.
    • Bias: This is the diagonal line across the fabric, running at a 45-degree angle to the lengthwise and crosswise threads. The bias has the most stretch and drape, making it ideal for creating garments with a beautiful flow, though it can be trickier for beginners to sew.
    • Raw Edge: This is the cut or torn edge of the fabric, which will typically fray if not finished.
    • Right Side and Wrong Side of Fabric: The ‘right side’ is the “pretty” side, with the print or more vibrant colour, which you want to face outwards on your finished garment. The ‘wrong side’ is the back, or inside, which is usually less vibrant. When sewing, you’ll often place right sides together so the seam is hidden on the inside.
    Thread Selection:

    As mentioned, polyester thread is a great all-rounder. The key is to match your thread to your fabric type and colour. When in doubt, a slightly darker thread colour will blend in better than a lighter one.

    Basic Sewing Techniques

    Now that your tools are ready and your fabric is chosen, let’s dive into the core techniques that will bring your sewing projects to life. We’ll start with preparing your machine, then move on to mastering its basic operations, and finally explore essential hand stitches.

    1. Preparing Your Machine: How to Thread a Sewing Machine

    Properly threading your machine is crucial for preventing common issues like tangled threads or skipped stitches. While specific diagrams may vary by machine model (always consult your manual!), the general steps are quite similar.

    Winding the Bobbin:

    The bobbin holds the lower thread, which locks with the upper thread to create a secure stitch. You’ll often need to wind your own bobbins to match your project’s thread colour.

    1. Position the Spool: Place your spool of upper thread onto the spool pin, usually horizontally or vertically. On many machines, the thread should be coming off the bottom of the spool, similar to a toilet paper roll that unwinds from underneath. Use the correct sized spool holder to keep it secure.
    2. Guide the Thread: Follow your machine’s diagram (usually on the top) to guide the thread through a tension disc or gauge. You should feel it snap or click into place, ensuring proper tension for even winding. Without proper tension, your bobbin won’t wind nicely.
    3. Thread the Bobbin: Take an empty bobbin and feed the thread from the inside to the outside through one of its small holes.
    4. Place on Bobbin Winder: Put the bobbin onto the bobbin winder spindle and push it firmly to the right to engage it.
    5. Disengage Needle: Pull the hand wheel out towards you (it might make a popping sound). This disengages the sewing mechanism, allowing the machine to only wind the bobbin without moving the needle.
    6. Start Winding: Hold onto the thread tail coming out of the bobbin tightly. Press your foot down on the pedal to start winding. Wind a few times, then cut off the excess tail close to the bobbin.
    7. Fill the Bobbin: Continue winding until the bobbin is full. Most machines have a sensor or stopper that will automatically stop the winding when the bobbin is completely filled.
    8. Remove Bobbin: Push the bobbin winder back to the left, lift the bobbin off, and trim the thread.
    Threading the Upper Thread: Detailed instructions on how to thread a sewing machine

    The upper thread is the one that goes through the needle. Again, follow your machine’s numbered guide or arrows, but here’s a general path.

    1. Position Spool: Ensure your thread spool is correctly placed on the spool pin, typically unwinding from underneath for cross-wound threads, or at a right angle for stacked threads, using a horizontal or vertical spool pin as appropriate.
    2. First Guide: Take the thread end and guide it through the first tab or hook, often marked ‘1’, ensuring it clicks in.
    3. Down the First Channel: Guide the thread down the first channel or slit, usually marked ‘2’.
    4. U-Turn at the Bottom: Make a U-turn at the bottom of the channel and bring the thread back up the second channel.
    5. The Take-Up Lever: This is a crucial step! At the top of the second channel (marked ‘3’), your thread must go through the hole in the take-up lever. If the take-up lever isn’t visible, turn the hand wheel towards you to raise it. Ensure the thread clicks into the front of the eye or slit of the lever. If this step is missed, you’ll likely encounter tangles and nests of thread on the back of your fabric.
    6. Down to the Needle: Bring the thread back down the channel towards the needle, through any remaining hooks or guides, often marked ‘4’.
    7. Thread the Needle: Now, thread the needle from front to back, either by eye or using a needle threader if your machine has one (these can be temperamental, ensure the needle is at its highest point first). Pull several inches of thread through the needle.
    8. Position Under Foot: Pass the threaded upper thread neatly under the presser foot and towards the back of the machine.
    Bringing Up the Bobbin Thread:

    This vital step connects the upper and lower threads so they can form a proper stitch.

    1. Insert the Bobbin: Open your machine’s bobbin case (usually a clear cover at the bottom). For a drop-in bobbin case, hold the bobbin so the thread unwinds counter-clockwise (like a ‘ P′ for perfect), then drop it into its spot. Feed the thread tail through the designated slit or groove until it clicks securely into place.
    2. Connect the Threads: Hold the upper thread tail loosely. Gently turn the hand wheel towards you for one full rotation. Watch as the needle goes down, catches the bobbin thread, and pulls it up through the hole in the throat plate. Continue turning until the take-up lever is in its highest position again.
    3. Pull Out Loop: You should see a loop of the bobbin thread appear. Use a scissor blade or a pointer to pull this loop fully through, bringing the bobbin thread to the top of the machine.
    4. Position Threads: Pull both the upper and bobbin threads together, place them under the presser foot, and guide them towards the back of the machine.
    5. Close Bobbin Case: Close the bobbin case cover, ensuring it clicks firmly into place. Now, your machine is ready to sew!

    2. Mastering the Machine: How to Use a Sewing Machine

    With your machine threaded and ready, let’s explore the fundamental controls for making your first stitches.

    • Foot Pedal Control: The foot pedal controls the speed of your machine, much like an accelerator in a car. Practise gently pressing and releasing it to gain control over your speed. It’s perfectly fine to start slowly; control is more important than speed, especially when learning.
    • Stitch Selection: As a beginner, you’ll primarily use two main stitches:
    • Straight Stitch: This is the most basic and frequently used stitch, forming a straight line of individual stitches. It’s ideal for joining two pieces of fabric to create a seam.
    • Zigzag Stitch: This stitch forms a “zig-zag” pattern and is excellent for finishing raw edges to prevent fraying or for sewing stretchy fabrics.
    • Seam Allowance: This is the distance between your stitching line and the raw edge of your fabric. Sewing patterns will specify the seam allowance (e.g., 5/8′′ or 15mm is common in patterns, while 21​′′ is often used in the fashion industry). Your machine’s needle plate often has guidelines to help you maintain a consistent seam allowance by aligning the edge of your fabric with the corresponding mark. Consistency is key for a well-fitting garment.
    • Backstitching: This technique involves stitching backward a few stitches at the beginning and end of a seam to lock it in place and prevent it from unravelling. It’s a fundamental step for durable sewing.
    • Pivoting: This technique allows you to stitch around corners neatly. When you reach a corner, stop with your needle down in the fabric. Lift the presser foot, rotate your fabric, lower the presser foot, and continue sewing in the new direction.
    • Practising Straight Lines and Curves: The best way to get comfortable is to practise! Use scrap fabric to simply stitch straight lines, trying to keep them even. Then try curves, lifting your presser foot and pivoting as needed for smooth turns. This builds muscle memory and confidence.
    white thread

    3. How to Hand Sew

    Even with a machine, hand sewing is an essential sewing skill for finishing details, mending, or for times when a machine isn’t practical. Let’s explore the fundamental hand sewing stitches.

    Threading a Hand Needle:
    1. Cut the Thread: Take about an arm’s length of all-purpose sewing thread. Cut the end cleanly with sharp scissors to prevent fraying, and if needed, lick or wet the end to make it stiff.
    2. Guide Through Eye: Carefully push the thread through the eye (the hole) of your needle. If you struggle, consider a needle threader or needles with larger eyes.
    3. Single or Double Threaded:
    • Single Threaded: Pull the thread through until the needle is a few inches from one end. You’ll work with one long strand.
    • Double Threaded: Pull the thread through until both ends meet, effectively doubling your thread. This creates a stronger seam.
    1. Tie a Knot: At the longer end (or both ends for double threading), tie a secure knot. A simple method is to loop the thread around your finger, slip the loop off, and pull the end through. Double or triple knotting ensures it stays secure.
    Basic Hand Sewing Stitches:

    These stitches are the building blocks of any hand-stitched project.

    • Running Stitch: This is the simplest and quickest stitch, creating a dashed-line pattern.
      • How to: Bring your needle up from the back (wrong side) of the fabric, pull until the knot catches. Go forward about ¼½ inch, push the needle down, then come up from the back the same length forward, and repeat. You can pick up several stitches on the needle before pulling the thread through to speed up the process.
      • Uses: Ideal for temporary basting (holding fabrics together before machine sewing, easily removed due to longer stitches), gathering fabric, or for seams that won’t experience much wear and tear. It looks similar on both sides of the fabric.
    • Backstitch: This is a strong and durable stitch that closely resembles machine stitching.
      • How to: Start like a running stitch, bringing the needle up and making one stitch forward. Then, bring the needle up again one stitch length ahead of your first stitch, and push the needle back into the hole where the previous stitch ended. This creates a continuous, strong line.
      • Uses: Perfect for securing seams that need to be strong, like clothing construction. It’s often used for embroidering letters.
    • Whipstitch/Overcast Stitch: This stitch connects two pieces of fabric or finishes raw edges.
      • How to: Bring your needle up through the top of a folded edge (or through both layers if joining two pieces). Then, at an angle, catch just a tiny bit of the opposing fabric, bringing the needle back up through the fold. It creates a distinct angled look.
      • Uses: Excellent for hemming (especially on jeans), closing the sides of pillows, cushions, stuffed animals, or as a decorative stitch on blankets and plushies. It helps prevent fraying.
    • Slip Stitch/Ladder Stitch: This stitch creates an almost invisible seam or hem.
      • How to: Fold in the raw edges of the fabric. Bring your needle up from inside one fold. Go directly across to the other folded edge, push the needle into that fold, and travel a short distance (about 41​ inch) inside the fold before bringing the needle back out. Repeat, going back and forth across the opening, creating tiny, barely visible stitches on the outside.
      • Uses: Ideal for closing openings in stuffed items (like toys or pillows) after turning them right side out, or for invisible hems on garments.
    • Catch Stitch: Used to help fabric stretch or for hemming. While the zigzag stitch is its machine equivalent, the catch stitch creates a flexible, invisible-like hand stitch.
      • How to: Pierce the needle through the wrong side of the fabric at a diagonal, then bring it back up through the first hole to create a point. Repeat this process, moving left to right and creating points by sliding the needle through the previous stitch’s first hole.
      • Uses: Commonly used for sewing in elastic waistbands or for flexible hems.
    Basic Embroidery Stitches:

    While our main focus is practical sewing, basic embroidery stitches can add beautiful decorative details. The running stitch and backstitch are fundamental for outlining and simple designs. The satin stitch is used to fill in designs smoothly, with stitches placed close together without overlapping. For long lines, an outline stitch (also called stem stitch) is effective.

    Altering Clothes: Practical Skills for Everyday Wear

    One of the most empowering aspects of learning to sew is the ability to alter and mend your clothes, ensuring a perfect fit and extending the life of your favourite pieces.

    1. How to Hem Pants

    Hemming trousers or skirts is a common alteration that can make a huge difference to how a garment looks and fits.

    • Measuring and Marking: First, try on the trousers (inside out if possible) and mark the desired new length. Add a seam allowance to this mark (usually around 1-2 inches, depending on the desired hem width).
    • Pressing and Pinning: Fold the raw edge up by about 41​ inch and press (this initial fold hides the raw edge and prevents fraying). Then, fold it up a second time to your desired hem width, ensuring all raw edges are hidden within this double fold. Press it flat and secure it with pins. Using an iron at this stage is highly recommended for a crisp finish.
    • Machine Hemming: You can machine stitch your hem using a straight stitch. Stitch close to the folded edge, maintaining a consistent line. Remember to backstitch at the start and end of your stitching line to secure it. Some machines also offer a blind hem stitch, which creates a nearly invisible machine-stitched hem.
    • Hand Hemming: For a truly tailored and invisible finish, the slip stitch is perfect. The whipstitch is another option, creating tiny, barely noticeable stitches on the front.

    2. How to Sew a Button

    Learning how to sew a button is a fundamental sewing skill for mending and garment construction.

    • Flat Buttons (Two-Hole and Four-Hole Methods):
    1. Mark Position: Mark the precise spot where the button needs to be sewn.
    2. Thread Needle: Use a hand sewing needle and double-threaded all-purpose thread, tying a secure knot at the end.
    3. Start Stitching: Come up from the back (wrong side) of the fabric at the marked spot, pulling the thread until the knot catches. For a two-hole button, stitch back and forth through the holes. For a four-hole button, you can create parallel lines or a cross shape. Make sure you leave a small ‘shank’ by wrapping the thread around the stitches under the button a few times for reinforcement.
    • Patching Larger Holes (How to Sew on a Patch): For bigger holes, a patch is needed.
    1. Choosing and Preparing the Patch: Select a fabric for your patch that matches or complements the garment. Cut the patch slightly larger than the hole, ensuring it has clean edges, perhaps by folding them under or using a zigzag stitch.
    2. Applying the Patch: Position the patch over the hole on the right side of the fabric. You can then machine or hand-stitch it in place for durability. Stitch around all edges of the patch, reinforcing with backstitching at the start and end.
    • Decorative Patches: Attaching iron-on or sew-on patches for aesthetic purposes is also popular. While iron-on patches offer a quick fix, sewing them on provides much greater durability. You can use a running stitch or machine stitch around the edge of the patch.

    4. How to Sew a Zipper

    Learning how to sew a zipper can seem intimidating, but with practise, it becomes a straightforward sewing skill.

    Finding Quilt Shops Near Me (Quilt Shops Near Me / Quilting Shops Near Inspiring Beginner Sewing Projects

    The best way to solidify your new skills is to apply them to a fun, tangible project. Here are a few ideas that are perfect for beginners.

    a tray of spools of thread and spools of thread

    1. How to Sew a Tote Bag

    A tote bag is a classic first project for a reason! It’s forgiving, practical, and teaches several essential sewing skills.

    • Skills Learned: Straight seams, hemming, creating a casing, and inserting a drawstring or handles.
    • Project Overview: You’ll typically cut a rectangular piece of heavy fabric (like denim or burlap). You’ll sew the side seams, create a casing at the top for a drawstring or straps, and hem the edges. This project is a great way to practise machine stitching long, straight lines.

    2. How to Sew a Pillowcase

    This project is not only useful but also a fantastic way to practise precise straight lines and explore seam finishes.

    • Skills Learned: Straight stitching, hemming, and potentially French seams (a neat, enclosed seam finish).
    • Project Overview: You’ll typically cut rectangular pieces of fabric, sew them together along straight lines, and hem the opening. It’s an ideal project for getting a feel for your machine’s feed dogs and practicing with different fabric types. It typically involves sewing a tube and twisting it.
    • Simple Pouch/Cosmetic Bag: This project introduces you to zippers on a smaller, more manageable scale before tackling larger items.
    • How to Sew Felt: Felt is a non-fraying fabric, making it very forgiving for hand sewing. You can make simple hand-sewn toys or decorations, which are excellent for practising basic stitches like the running stitch or blanket stitch.
    • How to Quilt for Beginners: An introduction to basic quilting techniques, such as piecing fabric squares together, for small projects like placemats. This focuses on precise straight stitching.
    • Cloth Napkins: A quick and satisfying project that teaches hemming and pivoting at corners. You can use quilting cotton, which tears easily for straight edges, and then iron the edges before hemming.

    Tips for Your First Projects:

    • Topstitching: A visible line of stitching on the right side of the fabric, used for decorative purposes, to flatten seams, or to add durability.
    • Start simple: Don’t pick something too complicated that might put you off.
    • Practice on scrap fabric.
    • Learn about different types of seam finishes, such as a French seam which encloses the raw edge, providing a very professional and durable finish that prevents fraying, especially useful for knit fabrics. If you don’t have an overlocker, a zigzag stitch can serve a similar purpose.
    • Edgestitching: Stitching very close to a folded edge or a seam line for decorative or reinforcing purposes.
    • Understitching: A line of stitching sewn on the facing or lining close to the seam line, which is then pressed towards the facing/lining. This helps the facing or lining stay hidden inside the garment.
    • Staystitching: A row of simple straight stitches sewn within the seam allowance on curved or bias edges of fabric (like necklines or armholes) to prevent them from stretching and distorting before the seam is sewn. It’s a foundational step for maintaining the shape of your garment.

    Essential Sewing Skills: Beyond the Basics

    As you become more comfortable, you’ll want to expand your skills. Here are some techniques and tools that will help you tackle more advanced projects.

    • Knits and Stretchy Fabrics: These fabrics require specific techniques to prevent them from stretching and getting wavy. Use fine, sharp needles to avoid snagging. Sharp scissors are crucial for clean cuts. Handle these fabrics carefully to prevent distortion. Techniques like using a walking foot or tissue paper underneath can help.
    • Heavy Fabrics: Materials like heavyweight canvas or upholstery fabrics require a robust approach. Use appropriate needles (larger sizes, e.g., 100/16 or 110/18) designed for heavy materials. Use strong thread suitable for heavy-duty projects. Adjust your machine settings for a longer stitch length if necessary and go slowly to avoid snapping needles.
    • Using a Rotary Cutter: A rotary cutter is a tool that resembles a pizza cutter, used for cutting fabric quickly and precisely.
    • Benefits: It’s excellent for cutting straight lines and curves, especially when paired with a self-healing cutting mat and rulers. This speeds up cutting time and provides very accurate pieces.
    • Safety Precautions: The blades are extremely sharp, so always remember to retract the blade after each use to protect yourself and your work surface.
    • Sewing Machine Maintenance and Troubleshooting:
    • How to Change a Needle: You should change your needle regularly, especially after every few projects or if you notice it’s getting dull or snagging the fabric. This is even more important when sewing with a special one or one with lightweight fabric. If your needle snags or puckers the fabric, it might be blunt or the wrong size.
    • How to change: Unscrew the little black screw that holds the needle in place, being careful to catch the old needle. Insert the new needle with the flat side facing the back of the machine, pushing it all the way up into the shaft. Tighten the screw firmly. Remember to rethread the machine after changing the needle.
    • General Care: Keep your machine covered when not in use to protect it from dust. Always unplug it when performing maintenance or when you’re finished sewing.
    • Sewing Machine Troubleshooting: Even with diligent maintenance, you might encounter occasional issues. Don’t panic! Many common problems have simple solutions.
    • Common Issues and Solutions:
    • Skipped Stitches: Often caused by a dull or incorrect needle (especially with knits), or improper threading (particularly the take-up lever). Try changing the needle, rethreading the entire machine, or checking the tension.
    • Tangled Threads: A ‘birds nest’ of thread on the back of your fabric is almost always due to improper threading. Rethread the entire machine, ensuring the presser foot is up when you do this. Also, ensure the bobbin is inserted correctly.
    • Broken Needles: This can happen if you pull on the fabric while sewing, if your needle is the wrong size for the fabric, or if you hit a pin. Always remove pins before you sew over them.
    • When to Seek Professional Help: If you’ve tried troubleshooting common issues and your machine still isn’t performing correctly, or if you suspect a deeper mechanical problem, it’s best to seek assistance from a qualified sewing machine technician. They can diagnose and repair issues safely.

    Non-Sewing Related Keywords

    We understand that you might search for a wide range of topics related to your home and environment. However, some search terms, such as “How to Get Rid of Sewer Gnats” or “How to Get Rid of Sewer Flies,” relate to household pests and plumbing issues, which are entirely unrelated to the craft of sewing. For these queries, we recommend consulting resources specifically dedicated to home maintenance or pest control, as they fall outside the scope of sewing techniques and fabric arts.

    Conclusion: Your Journey into Sewing

    Congratulations on embarking on or continuing your sewing journey! We hope this comprehensive guide has provided you with fundamental knowledge and practical sewing skills to empower you to create and alter clothes with confidence. From understanding the essential tools and mastering basic machine and hand sewing stitches, to tackling practical alterations and exciting beginner sewing projects, you now have a solid foundation. Learning to sew offers so much more than just functional skills. It’s a wonderful creative outlet that allows for self-expression, a way to mend and extend the life of your garments, and a deeply satisfying pursuit. The joy of wearing something you’ve made yourself, or the satisfaction of expertly repairing a beloved item, is truly unparalleled. As Shaelynn Haning, a professional tailor, wisely advises, committing to doing each step right leads to better sewing outcomes.

    Remember, sewing is a continuous learning process. Mistakes will happen, even to experienced sewists, but each one is an opportunity to learn and improve. Don’t be afraid to unpick a seam and try again; it’s all part of the journey. We encourage you to continue exploring more advanced sewing techniques, experiment with different fabrics, and challenge yourself with new patterns. Join online sewing communities, or even consider taking local classes – a fantastic way to connect with fellow sewists, share knowledge, and further develop your skills.

    The world of sewing is vast and wonderful, and your creative potential is limitless! We look forward to seeing the amazing things you’ll create. Happy stitching.

    About the Author: Grace, Founder of London Sewing Courses

    Grace is the heart and hands behind London Sewing Courses. A passionate and experienced sewing instructor, she founded the studio with a unique mission: to create a calm, friendly space for adults to learn and connect, while using the profits to fund free sewing classes for local children in need. Her personal expertise and commitment to community building are at the core of every class and every stitch.

  • Top 5 Dress Design Classes

    Top 5 Dress Design Classes

    Introduction: The World of Dress Design Education

    Have you ever looked at a beautifully tailored dress and wondered about the magic behind its creation? Dress design is a fascinating blend of artistic vision and technical precision, a craft that turns a flat piece of fabric into a three-dimensional work of wearable art. The world of fashion is more accessible than ever, and with a growing interest in creative expression and customisation, more people are looking for a formal pathway to develop their skills. For those in the UK with a passion for fashion, the good news is that there are numerous brilliant options for a range of dress design classes available to help you on your journey.

    This comprehensive guide is designed to help you navigate the rich landscape of fashion education. We’ll explore what dress design classes encompass, why they are so important for aspiring designers, and we’ll highlight five key types of courses that can help you cultivate your creativity and master the skills needed to bring your sartorial dreams to life.

    Overview of Dress Design Classes

    Before we dive into our top five, let’s define what dress design education entails and why it’s such a valuable pursuit.

    Defining Dress Design Education

    Dress design classes are far more than just basic sewing instruction. They are structured programmes that guide you through the entire creative process, from initial concept to the finished garment. This includes:

    • Concept and Sketching: Learning to translate your ideas from your mind to paper through fashion sketching and illustration.
    • Pattern Making: The technical process of creating a pattern, which is the blueprint for your garment.
    • Fabric Selection: Understanding textiles, their properties, and which ones are suitable for a particular design.
    • Garment Construction: The hands-on process of cutting and sewing the garment together with professional finishes.

    This blend of artistic vision and practical skill acquisition is what distinguishes a dedicated dress design programme from a general sewing class.

    Importance of Dress Design Education

    Enrolling in dress design classes offers a number of key benefits for any aspiring designer:

    • Building a Portfolio: Coursework provides the perfect opportunity to build a strong professional portfolio, which is essential for showcasing your skills to potential employers or clients.
    • Cultivating Creativity: A structured course provides a framework for exploring and developing your creative ideas. Tutors guide you through brainstorming, mood boarding, and thematic development, fostering innovative thinking.
    • Mastering Technical Skills: A well-structured course is essential for learning precise pattern cutting, accurate garment construction, and beautiful finishing techniques. These are the skills that make the difference between a handmade garment and a professional-looking one.
    • Understanding Materials: You’ll learn about the properties of different fabrics, their drape, their weight, and their suitability for various designs. This is crucial for making informed choices that will make your designs successful.
    • Industry Knowledge: Many courses provide insights into fashion history, current trends, and the business of fashion, giving you a broader context for your work.

    Types of Dress Design Classes

    The world of fashion education is vast, with courses catering to all levels and interests. You can find everything from a beginner’s workshop to a full university degree.

    Categorisation by Level and Format

    • Specialised Training: Niche areas like bridalwear or costume design classes offer targeted training for specific career paths.
    • Beginner Courses: These are the perfect starting point. A good beginner class will focus on foundational sewing classes for beginners, basic garment construction, and simple pattern interpretation.
    • Intermediate Courses: These courses build on the basics, moving on to more complex patterns, advanced construction techniques, and an introduction to fitting and alterations.
    • Advanced/Professional Courses: For those serious about a career in fashion, these courses offer deep dives into couture techniques, advanced pattern drafting, tailoring, and conceptual design.
    • Short Courses and Workshops: Fashion design workshops are a brilliant way to learn a specific skill, such as corset making or advanced draping, without committing to a long-term programme.
    • Diplomas and Degree Programmes: For a comprehensive, career-focused education, look for accredited diplomas (like those offered by City & Guilds) or degree programmes at universities.

    Top 5 Dress Design Classes (Illustrative Examples and Their UK Equivalents)

    To give you a better sense of what’s available, let’s explore five types of popular dress design classes.

    1. Dress Design Classes in Montana (Illustrative Focus on Specialisation)

    While a physical location like Montana may seem far away, it helps us illustrate a point about the specialisation of some design programmes. Programmes in such regions might focus on niche aesthetics, such as sustainable design, ethical production, or crafts-based design, often drawing from the local landscape and culture.

    • Curriculum Characteristics: Such courses typically cover core design principles, sustainable material sourcing, and a strong emphasis on hands-on making.
    • UK Equivalents and Focus: The UK fashion scene is a global leader in sustainable design and textile innovation. Many UK art and design universities and independent schools offer modules or entire programmes dedicated to sustainable fashion practices, blending technical skills with conceptual development and ethical sourcing. A search for a dress design class in the UK will reveal many options that have a strong focus on these modern values.

    2. Dress Designing Classes in Pune (Illustrative Focus on Cultural/Commercial Design)

    Similarly, programmes in a city like Pune might focus on traditional textiles, elaborate embellishment techniques, or fast-paced commercial fashion for a large market.

    • UK Equivalents and Focus: UK fashion programmes, particularly those in London, offer a brilliant balance of commercial and creative education. Modules in global fashion contexts, textile innovation, and a strong emphasis on industry relevance, provide a well-rounded and versatile education. A search for a dress designing class will show a variety of options that are both creative and business-minded.

    3. Costume Design Classes (Costume Design Classes)

    This is a fantastic specialisation for those with a love of theatre, film, or history. Costume design classes are distinct from general dress design.

    • Comparison with Dress Design: While both require sewing skills, costume design is about conveying character and narrative, whereas dress design is focused on creating a beautiful, wearable item.
    • Specific Skills Taught: A costume design course will teach you:
      • Historical Accuracy: The crucial role of historical research and period-specific construction.
      • Character Development: How costumes are designed to convey a character’s personality, status, and emotional journey.
      • Wearability for Performance: Considerations for movement, durability, and quick changes.
    • UK Institutions: The UK has numerous world-class universities and drama schools that offer excellent costume design programmes, making it a brilliant place to pursue this specialisation.

    4. Wedding Dress Design Classes (Wedding Dress Design Classes)

    Designing for bridalwear is a beautiful and highly specialised niche. A class focused on this area will teach you the specific skills required to create a perfect wedding dress.

    • Techniques and Styles: You’ll learn to work with delicate fabrics like silks, satins, and intricate laces. Embellishment is key, so you’ll master hand embroidery, beading, and appliqué techniques.
    • Structure and Support: You’ll also learn how to create internal structures using boning, corsetry, and linings to give a dress its shape and drape.
    • High-Class Wedding Dress Designers: The work of high class wedding dress designers is characterised by meticulous attention to detail, luxurious materials, and a focus on perfect fit. A wedding dress design class will give you the foundational skills to aspire to this level of craftsmanship.
    • UK Offerings: Many UK independent schools and advanced fashion courses include modules on bridalwear or offer dedicated workshops.

    5. Fashion Illustration Classes (Fashion Illustration Classes)

    For any aspiring designer, fashion illustration is a foundational skill. These classes are an essential part of a comprehensive fashion education.

    • UK Institutions: These classes are widely available as standalone courses or integrated into broader fashion design programmes at UK art schools and colleges.
    • Visual Communication: Illustration is how you translate your design ideas from concept to paper. It’s the first step in the design process.
    • Figure Drawing and Garment Representation: You’ll learn to draw the human form accurately and to depict fabric drape, texture, and silhouette effectively.
    • Integration with Dress Design: Fashion illustration classes are a critical tool throughout the design process, from initial sketches to professional presentation boards.

    Finding Quilt Shops Near Me

    (Quilt Shops Near Me / Quilting Shops Near Me / Course Content and Structure (Comprehensive Curriculum)

    A strong curriculum is a key indicator of a valuable course. Here is an overview of what you should expect from a good dress design class.

    Foundational Skills

    • Sewing Machine Proficiency: Beyond basic sewing, you should learn advanced techniques, including how to use industrial machines and specialised attachments.
    • Hand Sewing and Finishing: Meticulous hand stitches are a hallmark of haute couture and are essential for a professional finish.
    • Draping on the Stand: This is a crucial skill for understanding form and flow, where you create patterns directly on a dress form.

    Pattern Making and Drafting

    • Flat Pattern Drafting: You’ll learn to create patterns from measurements or basic blocks, understanding dart manipulation and pattern adjustments.
    • Digital Pattern Making: Many modern courses introduce you to CAD software for pattern creation and grading.
    • Pattern Grading: This is the process of adapting a pattern for different sizes.

    Garment Construction Courses

    • Advanced Seam Finishes: Learn how to create professional seam finishes like French seams, bound seams, and Hong Kong finishes.
    • Lining and Interfacing: You’ll learn the techniques for using linings and interfacing to give your garments structure.
    • Specific Garment Components: You’ll learn how to construct collars, cuffs, pockets, plackets, and complex closures.

    Textile and Material Studies

    Fabric Manipulation Workshops: These are fun and creative workshops where you explore techniques like pleating, smocking, and ruffles.

    Fabric Properties: An in-depth analysis of different fabric types and their appropriate uses.

    Fibre Science: Understanding the origins and properties of natural and synthetic fibres.

    Choosing the Right Course

    With so many options available, how do you choose the right one for you?

    Factors to Consider: Making an Informed Decision

    • Your Learning Objectives: Are you seeking a hobby, vocational training, or a full degree? This will determine the type of course you choose.
    • Accreditation and Reputation: For professional pathways, look for recognised qualifications (e.g., City & Guilds) or degrees from reputable institutions.
    • Instructor Experience: Assess the faculty’s expertise and professional networks. Are they well-respected in the industry?
    • Course Curriculum Depth: Does the course cover all the areas you wish to learn comprehensively?
    • Facilities and Equipment: Check if you’ll have access to industrial machines, specialised studios, and other resources.
    • Cost and Funding: Consider tuition fees, material costs, and potential for scholarships or grants.
    • Location: If you’re looking for in-person learning, a key consideration will be finding “dress designing classes near me.” Major cities like London are hubs for fashion education.

    Conclusion

    Additional Resources: Expanding Your Learning Horizons

    The journey of a designer is one of continuous learning. Even after a formal course, there are many resources to help you continue to grow.

    • Online Platforms for Learning: Websites like Coursera and The University of Fashion offer structured courses that you can take from home. These are brilliant for their flexibility and global access to instructors. A search for online seamstress courses or virtual sewing classes will provide many options.
    • Local Institutions Offering Classes: In the UK, art colleges and adult education centres offer a range of courses. A search for “dress design classes near me” will reveal many options in your area, from local community centres to independent sewing schools.
    • Industry Organisations: UK-based fashion organisations or guilds can also offer educational resources and networking opportunities.

    Final Thoughts on Pursuing Dress Design

    Learning dress design is a rewarding journey that blends artistry with technical skill. It is a brilliant way to express your creativity, learn a valuable skill, and create a wardrobe that is truly and uniquely yours. The UK offers a diverse and vibrant landscape of learning opportunities, catering to various aspirations and skill levels. With the right course, you can unlock a world of creative possibilities and take your first steps towards becoming a skilled designer. Happy designing!

    About the Author: Grace, Founder of London Sewing Courses

    Grace is the heart and hands behind London Sewing Courses. A passionate and experienced sewing instructor, she founded the studio with a unique mission: to create a calm, friendly space for adults to learn and connect, while using the profits to fund free sewing classes for local children in need. Her personal expertise and commitment to community building are at the core of every class and every stitch.

  • Guide to Beginner Seamstress Courses

    Guide to Beginner Seamstress Courses

    Introduction to Seamstress Courses: Unlocking Your Sewing Potential

    There’s a unique charm and enduring appeal to sewing and dressmaking that has captivated hearts for centuries. From the practical necessity of creating and mending clothes in ancient times to the artistic expression of haute couture today, sewing has always been a vital craft. In a world increasingly dominated by fast fashion, the desire to reconnect with our creative spirit and embrace sustainability has led to a wonderful resurgence in the art of sewing. You might already be familiar with the therapeutic rhythm of needle and thread, but have you considered turning that passion into a fulfilling hobby or even a career?

    So, what exactly does a seamstress course entail? At its heart, a seamstress course is designed to guide you through the intricate world of textile arts, offering everything from foundational skills to advanced garment creation. These courses move far beyond basic mending, teaching you how to transform flat pieces of fabric into beautifully constructed, three-dimensional garments. You’ll delve into the nuances of various fabrics, learn to master your sewing machine, and understand the art of fitting and finishing. The goal is to equip you with the knowledge and techniques to craft bespoke couture garments, whether it’s for your own wardrobe or for others.

    The benefits of structured learning are immense for both hobbyists and those considering a professional career path. While self-teaching through online tutorials and videos is certainly possible, a structured environment, whether in-person or online, ensures you build a strong foundation, learn proper techniques, and avoid developing bad habits. It’s like building a house: you wouldn’t start by picking out the paint; you’d focus on laying a strong foundation first. A well-designed seamstress course will provide that robust framework, leading to successful projects and growing confidence. This guide aims to be your compass in navigating the wide array of seamstress courses UK offers, helping you identify the perfect fit for your aspirations. We’ll cover everything from beginner-friendly options to more specialised and professional programmes, ensuring you find the right support for every step of your creative journey.

    Overview of Sewing Classes for Beginners

    Embarking on your stitching journey is an exciting prospect, and choosing the right entry point is crucial. Sewing classes for beginners are specifically designed to demystify the craft, breaking down complex processes into manageable, bite-sized lessons. These introductory courses are perfect for those just starting their sewing adventure or returning to the craft after a long break.

    Starting Your Stitching Journey: Why Formal Instruction Matters

    Many beginners might feel overwhelmed by the sheer volume of information available, from countless YouTube tutorials to an array of unfamiliar terminology in sewing books. This abundance can lead to confusion, frustration, or the feeling of being stuck. This is precisely why formal instruction matters. In a structured sewing classes for beginners environment, you receive expert guidance that prevents bad habits from forming and instils proper technique from the outset. This foundational knowledge is invaluable, allowing you to build confidence with each stitch and truly master the essential skills.

    These courses move beyond basic mending, teaching you the principles of actual garment creation and design. While knowing how to sew a button or fix a hem is incredibly useful, seamstress courses expand your capabilities to drafting patterns, understanding fabric properties, and constructing entire pieces from scratch. They address the common misconception that sewing is overly complicated or exclusively for professionals, demonstrating its accessibility to anyone with enthusiasm and a willingness to learn. As Dressmaking Academy notes, their courses are designed to support everyone, from beginners to seasoned professionals, empowering you to create stunning couture with confidence. Similarly, Sew It Academy prides itself on helping absolute beginners master essential skills and build confidence, even making complex techniques manageable through step-by-step video instructions.

    Importance of Seamstress Skills: A Valuable Craft

    The skills gained through seamstress courses are not just practical; they are a valuable craft that offers numerous personal and potential professional benefits.

    Personal Benefits: Creativity, Customisation, and Well-being

    On a personal level, learning to sew allows for incredible creative expression. You gain the power to create unique garments that reflect your personal style, free from the limitations of mass-produced clothing. Imagine building an all-linen wardrobe or crafting pieces in a particular colour palette that truly strikes your fancy – it’s all possible when you’re the one making the decisions. You can customise clothing to achieve a perfect fit, which is especially beneficial for those who struggle with ready-to-wear sizes. This ability to tailor garments to your body ensures comfort and confidence. Beyond clothing, you can explore creative projects like bags, home decor, and accessories, infusing your personal touch into your surroundings.

    Furthermore, sewing can be a deeply therapeutic and relaxing activity. The mindful act of working with your hands, focusing on each stitch, can be incredibly calming and a wonderful creative outlet away from the demands of a 9-5 job. Many find immense satisfaction in seeing a project come to life, from the first stitch to the final embellishment.

    Potential Professional Avenues: Building a Sewing Career

    For those with entrepreneurial aspirations, seamstress courses can open doors to exciting professional avenues. You could pursue opportunities in:

    • Alterations: Becoming a skilled seamstress or tailor involves meticulously transforming fabrics into perfectly fitted garments. This includes mending, resizing, and customising clothes, a much-needed service for ensuring clothes fit impeccably.
    • Bespoke Dressmaking: Specialising in crafting unique pieces like wedding dresses, suits, or costumes allows you to showcase creative talents in the fashion world. Dressmaking Academy, for instance, focuses specifically on bridal and formal couture.
    • Costume Design: If you have a flair for storytelling through apparel, costume design for theatre, film, or television is an exciting path, involving research, sketching, and overseeing costume fittings.
    • Fashion Production: This can range from operating industrial sewing machines for mass production in factories to becoming an upholsterer, restoring and enhancing furniture.
    • Sewing Instruction: If you love to teach, becoming a sewing instructor allows you to share your passion and skills with new generations of sewists.
    • Embroidery Specialist: Bringing decorative and intricate designs to life on fabrics using specialised machines or hand techniques.
    • Sewing Blogger/Influencer: Leveraging your sewing expertise to create online content, tutorials, and reviews, potentially monetising through collaborations and sales.

    Stratford Career Institute’s Sewing & Dressmaking course, for example, explicitly covers “sewing for profit,” indicating its potential as a stepping stone towards a new career. The U.S. Department of Labor notes that the median annual salary for tailors, dressmakers, and custom sewers can be around $37,230, with higher earnings for those with specific expertise or a loyal clientele.

    Sustainability Aspect: Contributing to a More Sustainable Wardrobe

    In an era of growing environmental consciousness, learning to sew also contributes to a more sustainable wardrobe by enabling you to make, mend, and upcycle. Instead of discarding clothes, you can repair them, adapt them, or transform them into new items, reducing textile waste and promoting a more mindful consumption. This aligns with the wider movement against fast fashion, empowering you to create durable, cherished pieces.

    Types of Seamstress Courses Available

    The learning landscape for sewing is wonderfully diverse, offering options to suit every preference, schedule, and budget. Whether you prefer the direct interaction of an in-person class or the flexibility of learning from home, there’s a seamstress course for you.

    In-Person Seamstress Courses

    Many learners thrive in an environment where they can receive direct, hands-on guidance. In-person seamstress courses offer this invaluable benefit, fostering a collaborative and supportive atmosphere.

    Benefits of Hands-On Learning

    The advantages of in-person instruction are numerous. You receive direct feedback from instructors on your technique, helping to correct mistakes in real-time and refine your skills instantly. This immediate troubleshooting is incredibly beneficial, as a teacher can identify and rectify errors as soon as they occur, which is a powerful learning tool. You often gain access to studio equipment, including industrial machines or specialised tools that might be too costly or impractical for home use. The collaborative environment of a group class can be incredibly motivating, allowing you to meet like-minded individuals, share ideas, and learn from more experienced sewists.

    Typical Structure

    In-person courses come in various formats:

    • Group classes: These are a popular choice for sewing classes for beginners, providing a shared learning experience and the opportunity to interact with peers.
    • One-to-one private lessons: For highly personalised instruction, private tutors offer tailored guidance, focusing on your specific needs and pace. Websites like Superprof allow you to find private sewing teachers who offer both online and face-to-face lessons at a reasonable price, often with a free first lesson to ensure a good fit.
    • Intensive workshops: These focused sessions delve deep into a single technique or project, offering concentrated skill-building over a shorter period.
    Finding Local Options

    If you’re searching for seamstress courses near me, there are several avenues to explore. You can begin by searching online by city or region, for example, “seamstress courses London,” “seamstress course Milton Keynes,” or “seamstress course Peterborough”. Local community centres often host a variety of hobby classes, including sewing. Independent sewing schools, such as those mentioned in the brief like Bristol Sewing School or The Stitch Sisters, are dedicated to teaching the craft. Many fabric shops also offer classes, providing a convenient way to learn where you purchase your materials.

    Considerations for In-Person Courses

    While highly beneficial, in-person courses do come with considerations. You’ll need to factor in travel time to and from the venue and adhere to fixed schedules, which may not always align with a busy lifestyle. Class sizes can vary, and while smaller classes often mean more individual attention, larger ones can offer a broader peer group for interaction. Remember to weigh these factors against the invaluable benefits of direct, in-person interaction and hands-on guidance.

    Online Seamstress Courses

    For many, the flexibility and accessibility of online seamstress courses make them an ideal choice. These virtual sewing classes allow you to learn at your own pace, from anywhere in the UK or indeed, globally.

    Benefits of Flexibility

    The primary advantage of online seamstress courses is their incredible flexibility. You can learn from the comfort of your own home, eliminating travel time and allowing you to fit lessons around your existing commitments. This self-paced approach means you can start, pause, or rewatch lessons as often as you like, ensuring thorough understanding before moving on. Dressmaking Academy offers unlimited access to their bite-sized lessons, watchable on a computer, phone, or tablet. Sew It Academy operates on a similar model, offering access to over 90 courses with new content added monthly, available for as long as you maintain your membership.

    Variety of Platforms

    The range of online platforms offering seamstress online courses is vast. You can find:

    • Dedicated online sewing schools: Platforms like Dressmaking Academy and Sew It Academy specialise purely in sewing and fashion design, offering comprehensive curricula. Dressmaking Academy, for instance, focuses on high-end fashion design, bridal and formal couture, with over 50 sewing and design classes. Sew It Academy boasts over 800,000 students and 100+ hours of content.
    • Craft learning platforms: Larger platforms often host a variety of craft courses, including sewing. While not explicitly mentioned in the sources as “Craftsy” or “Skillshare,” Alison is an example of a platform offering free online courses, including sewing, with CPD accredited certificates.
    • YouTube tutorials: While useful for quick tips or specific techniques, YouTube can also be overwhelming for beginners due to the sheer volume and lack of structured progression. However, some channels offer excellent, detailed guides.
    • Online clubs and memberships: Many platforms, like Seamwork and Sew It Academy, offer membership plans that provide unlimited access to a library of courses, patterns, and community support.
    Key Features of Online Courses

    Look for online courses that provide helpful resources to enhance your learning. This often includes pre-recorded video lessons, which allow for repeated viewing. Many platforms offer downloadable patterns and resources in PDF format, optimised for easy printing, ensuring you have tangible materials to work with. Crucially, access to online community forums for support can be a game-changer. Platforms like Dressmaking Academy offer an exclusive community and personal support, while Seamwork members can ask questions and get expert help. Stratford Career Institute offers a distance learning course with a comprehensive outline.

    Considerations for Online Courses

    While the flexibility is a major draw, online learning does require self-discipline. You are in charge of your learning pace, which requires dedication to stay on track. A reliable internet connection is essential for streaming video lessons. While many platforms offer community support, there can sometimes be less immediate feedback compared to in-person classes. However, some, like Seamwork, provide direct access to expert help for members.

    Hybrid Models

    Some courses combine the best of both worlds, offering hybrid models that blend online learning with occasional in-person sessions or workshops. This can be a fantastic option for those who appreciate the flexibility of online access but also benefit from periodic face-to-face interaction and hands-on guidance. These models are not explicitly detailed in the provided sources, but the concept of combining self-paced learning with occasional structured support aligns with the benefits of both in-person and online approaches.

    Course Content and Structure

    A good seamstress course will guide you through a logical progression of skills, building your abilities from the ground up. Let’s delve into the core techniques and specialised areas you can expect to learn.

    Core Sewing Techniques

    Mastering fundamental sewing techniques forms the bedrock of your abilities. These are the “80/20 skills” – the core group of skills you’ll use repeatedly, no matter the project.

    Machine Mastery

    This is often the starting point for sewing classes for beginners. You’ll learn how to thread your sewing machine, wind the bobbin, and select basic stitches like straight and zigzag. Understanding tension adjustment is key to achieving even and balanced stitches, and courses will also cover troubleshooting common machine issues. It’s about becoming comfortable with your machine, treating it as an indispensable tool for your craft. Stratford’s course, for example, starts with “Your Sewing Machine” and “Sewing Machine Operation”. Sew It Academy’s free mini-course dives into conquering the sewing machine in its first few lessons, even recommending sewing machines as low as $149.

    Fabric Knowledge

    A deep understanding of fabrics is a lifelong journey in sewing, but courses will introduce you to the essentials. You’ll learn about different fabric types, broadly classified as woven and knits. Woven fabrics (like lawn, twill, double gauze) are generally more beginner-friendly, while knits (with their stretchy quality) are often best tackled after gaining some experience. Crucially, you’ll learn about grainlines – the direction of the threads – and how they influence fabric drape and how to orient your pattern pieces correctly. Understanding fabric weight and material (e.g., lightweight cotton batiste for linings, medium-weight chambray for tops, or hard-wearing denim for jackets) is also vital for choosing the right fabric for your projects. Dressmaking Academy offers a “Guide to Fabrics and Materials” class.

    Seam Finishes

    Once you start sewing, you’ll quickly learn that the edges of your fabric need attention to prevent fraying and ensure longevity. Courses will teach you various seam finishes, such as French seams (where edges are sewn twice and enclosed for a polished look), flat-felled seams, and zigzag stitches (a basic machine setting that helps prevent unravelling). You may also be introduced to overlocking or serging basics, although a serger is a separate machine used for cutting and enclosing edges speedily. The importance of neat finishes for a professional result cannot be overstated.

    Pressing Techniques

    Often overlooked by beginners, the crucial role of pressing for professional results is emphasised in good courses. Pressing, distinct from ironing, involves lifting and placing the iron to set seams and shape garments as you sew. Essential pressing aids like a seam roll or tailor’s ham help in shaping curved seams and specific garment areas. The Good Trade article highlights the importance of giving fabric a quick press if it wrinkles after washing, using appropriate settings on your iron.

    Basic Hand Stitches

    While a sewing machine is efficient for most tasks, basic hand stitches remain essential for closures, hems, and fine detailing. Learning hand-sewing stitches like the backstitch, running stitch, or buttonhole stitch can elevate the quality of your finished garments.

    Zippers and Closures

    Adding functional and aesthetic closures is a significant skill. You’ll learn to install various types of zippers (such as concealed or lapped), sew buttonholes, and attach buttons, snaps, and hooks and eyes. These elements are crucial for making wearable garments that fit well and look professional. Dressmaking Academy includes “Belts and Zippers” and “Buttonholes and Button Selection” in its course outline.

    Hemming Techniques

    Finishing the raw edges of your garment, particularly at the bottom, is vital. You’ll explore different hemming techniques suitable for various fabric types and garment styles, from simple turned hems to more elaborate finishes. This is part of giving your garment a clean, professional look.

    Couture Sewing Techniques

    For those who aspire to create high-end, exquisitely crafted garments, couture sewing techniques offer a deep dive into meticulous handwork and internal construction.

    Introduction to High-End Finishes

    Couture sewing techniques are defined by their meticulous handwork, internal construction, and often invisible finishes. This level of sewing prioritises precision and artistry, resulting in garments that are beautiful both inside and out. These are typically advanced topics, often introduced in intermediate or specialist courses. Dressmaking Academy focuses on “bespoke couture garments” and has a “Bespoke Couture Accelerator” learning path. Tailor Academy’s “Perfect Fit Mastery” and “Sewing Masterclass” also suggest a focus on high-quality tailoring.

    Underlining and Interlining

    These techniques involve adding extra layers of fabric to give structure, body, and opacity to garments. Understanding how to incorporate underlining (a foundational layer sewn to the fashion fabric) and interlining (a layer for warmth or additional support) is key to achieving a professional, tailored finish.

    Tailoring Methods

    Traditional tailoring involves specific methods like hand-pad stitching (used to shape collars and lapels), working with horsehair canvas for structure, and precise pressing for tailored garments. These skills are essential for creating structured pieces like jackets and coats.

    Bound Buttonholes and Bespoke Details

    Bound buttonholes are an example of advanced closures that demonstrate a high level of skill, creating a clean, finished opening without visible stitching. Learning these and other bespoke details elevates a garment from ready-to-wear to truly custom-made.

    Garment Construction Courses

    Once you have a handle on core techniques, garment construction courses focus on bringing various components together to create specific types of clothing. This is often taught through project-based learning, where you create items like skirts, trousers, blouses, dresses, or jackets.

    Pattern Interpretation

    A crucial part of garment construction is learning to read commercial patterns. These patterns, often printed on large tissue paper, come with a wealth of information: tiny symbols, jargon, and instructions that can be puzzling until you learn their meaning. A good course will teach you how to interpret these symbols, understand sizing, and follow the instructions confidently. Companies like Simplicity, Butterick, McCall’s, Vogue, and Burda are popular sources for home sewing patterns.

    Fitting and Alterations

    No two bodies are exactly alike, so learning basic pattern adjustments for a better fit is incredibly valuable. Courses will teach you how to lengthen or shorten patterns, add or remove fullness (using techniques like darts, gathers, tucks, and easing), and adjust seams to achieve a custom fit. You might also learn simple garment alterations for ready-made clothing. Seamwork offers a class called “How to Fit With Confidence,” which teaches how to diagnose fit issues and make adjustments.

    Order of Construction

    Learning the logical steps to assemble a garment is essential for efficiency and a professional finish. This involves understanding the sequence in which different pattern pieces are sewn together, from preparing the fabric to adding closures and finishing edges.

    Specialised Classes

    Beyond general garment construction, many seamstress courses offer specialised training in niche areas, allowing you to explore specific interests or deepen your expertise.

    Pattern Making Classes

    For those who want to move beyond commercial patterns and create their own designs, pattern making classes are indispensable.

    • Fundamentals: These courses typically start with creating basic blocks (also known as slopers) for bodice, skirt, and trousers. These are foundational patterns from which many other designs can be derived.
    • Pattern Manipulation: You’ll learn how to alter existing patterns and draft new designs from scratch. This includes understanding techniques like dart manipulation, slash and spread, and pivot methods to create different silhouettes and styles. Dressmaking Academy offers courses specifically on “Pattern Making” and “How to draft custom patterns,” including “Corset Pattern Making” parts 1 and 2. Sew It Academy also covers patternmaking.
    • Computer-Aided Design (CAD): Some advanced sewing pattern drafting courses may offer a brief introduction to digital pattern drafting software like CLO3D, Marvelous Designer, or Optitex, which allow sewists to draft patterns on a computer and visualise designs virtually.
    Quilt Making Classes

    Quilt-making classes venture beyond garments, focusing on the art of piecing together fabric to create decorative and functional textiles like quilts.

    • Techniques: These classes cover techniques such as piecing (joining fabric shapes), appliqué (attaching fabric pieces to a background), layering, basting, and quilting (stitching through layers, either by hand or machine).
    • Fabric Selection for Quilting: Specific considerations for quilting cottons are also usually taught, as the fabric choice is crucial for the success and durability of a quilt. Stratford Career Institute’s course covers “Patchwork and Quilting.”
    Textile Art Courses

    For those with an artistic inclination, textile art courses focus on using fabric and thread as a medium for creative exploration, often less focused on functional garments.

    • Creative Exploration: These courses encourage experimentation with fabric and thread to create unique artistic pieces.
    • Techniques: You might learn about fabric manipulation, embellishment (such as embroidery), dyeing, printing, and mixed media applications. Dressmaking Academy offers “Embroidery and Finishes” classes, including “Beaded Embroidery Dress” and “Luneville (Tambour) Embroidery,” and “Professional Decorations and Finishes.”
    Accessory Making

    Many schools offer courses dedicated to making accessories like bags, hats, or soft furnishings for the home. These can be excellent project-based classes for building skills with achievable outcomes. Stratford’s course includes “Home Accessories” and “Window Treatments, Curtains and Draperies,” and “Slipcovers.”

    Workshops and Short Courses

    Workshops and short courses provide intensive skill-building opportunities, often focusing on a single technique or a mini-project.

    Trial Sessions: These can be a fantastic way to experience a teacher’s style or a school’s approach before committing to a longer course.

    Intensive Skill Building: Examples include workshops on zipper insertion, specific collar construction, or fabric manipulation workshops exploring techniques like pleating, gathering, ruching, or smocking to add texture and form to fabric. Seamwork offers “Mini-Classes” on specific skills like “Hemming Knits Skills Workshop” and “Invisible Zippers Skills Workshop.”

    Choosing the Right Course

    With so many options available, finding the best seamstress courses UK for you can feel like a daunting task. However, by considering a few key factors, you can confidently choose a class that matches your learning style and goals.

    Factors to Consider: Your Perfect Fit

    Matching your learning style to an online or in-person class is essential for a rewarding experience.

    Your Current Skill Level

    The first step is to honestly assess your current skill level. Are you a complete beginner needing sewing classes for beginners, or do you have some experience? Classes are often tailored to specific levels:

    • Beginner: Perfect for learning the absolute basics, like threading your machine, understanding basic fabric types, sewing straight stitches, and simple shaping methods such as darts and gathers. Dressmaking Academy caters to beginners, offering courses like “Sewing 101: The Ultimate Beginners Guide”. Sew It Academy was specifically founded for beginners with little to no experience.
    • Advanced Beginner: Expands on foundational skills, building confidence and range. This level might introduce simple knitwear, bias tape finishing, and basic closures.
    • Intermediate: Focuses on more precision sewing, specialty closures (like zippers), and skills needed for more complex garments like simple lingerie or athletic wear.
    • Advanced: For those who want to refine their expertise, exploring advanced fitting techniques, pattern making, or couture sewing techniques.

    It’s important to remember that skill level ratings aren’t standardised across platforms, so focus on the skills the class offers and how they relate to what you want to learn.

    Learning Style

    Think about the format that works best for you. Do you thrive in a hands-on, in-person environment where you get direct feedback and can collaborate with others? Or do you prefer the flexibility of online learning, where you can revisit lessons at your own pace and learn from anywhere?

    Course Objectives

    Clearly define what you want to achieve with your sewing. Are you aiming to:

    • Learn the basics? Do you want to master your machine and straight stitches before attempting a dress, or prefer a beginner’s class specifically for making garments?
    • Learn new skills? Look for technique-focused classes, such as how to sew buttonholes or insert elastic.
    • Explore creative projects? Perhaps fun, one-off projects like bags, home decor, or accessories appeal to you.
    • Work on specific patterns? Many pattern companies offer sew-alongs tailored to popular patterns.
    • Build a handmade wardrobe? Focus on garment construction courses, broader fitting techniques, and skills like planning your sewing.
    • Become a professional? Consider courses that offer formal accreditations or focus on “sewing for profit”.
    Instructor Credentials and Experience

    Researching the teacher’s background, qualifications, and teaching style is crucial. Look for instructors with a passion for teaching and deep knowledge of sewing techniques. Reviews and testimonials from past students can offer valuable insights into the clarity of instructions, quality of materials, and overall teaching approach. For example, Sew It Academy highlights its founder Mimi G’s 30+ years of experience and background as a mentor on Project Runway Junior. Tailor Academy boasts “270 years”.

    Location and Accessibility (for in-person)

    For in-person classes, proximity, transport links, and parking can be important factors. If you’re looking for a seamstress course near me in a specific city, like seamstress course London, these practicalities are key.

    Student Support (for online)

    For online seamstress courses, check the availability of community forums, direct messaging with instructors, or live Q&A sessions. This support can be crucial when you run into questions or challenges.

    Recommendations for Beginners

    If you’re a complete beginner, here are some tailored recommendations to help you start your sewing journey:

    • Start with a “seamstress course near me” or a structured “online seamstress course” that covers machine basics and simple projects. This foundational approach will help you understand essential tools and techniques before tackling more complex garments. Seamwork’s “Learn to Sew Clothing For Absolute Beginners” course teaches how to use a machine, work with.

    The Indispensable Sewing Machine

    While it is possible to sew by hand, a sewing machine is highly efficient for beginners and essential for most garment creation. Learning to use a sewing machine correctly takes practice.

    • Machine Operation: You’ll learn about threading, bobbin winding, and adjusting tension to achieve balanced stitches.
    • Needles: Understanding that you need a new needle of the appropriate size for the weight of fabric you’re using is crucial.
    • Stitch Types: Familiarise yourself with essential machine stitches like the straight stitch and zigzag stitch. A zigzag stitch, for instance, is excellent for finishing edges to prevent fraying.
    • Specialised Machines: As you advance, you might encounter other machines like sergers (also known as overlockers), which cut and enclose fabric edges very quickly, or heavy-duty machines for thicker fabrics like leather. Computerised machines can even handle embroidery.

    Hand Tools for Precision and Detail

    Even with a machine,

    • Rotary Cutter and Cutting Mat: Often used for cutting fabric, especially for quilting, as they provide clean, precise cuts.
    • Dress Form/Mannequin: Aids in fitting and draping garments, essential for tailoring and design.

    Understanding and Working with Patterns

    Your sewing pattern is your map, guiding you through the construction process.

    Finding and Interpreting Patterns

    For your first garment, always choose a simple, beginner-friendly pattern. Many indie pattern companies offer excellent options.

    • Taking Measurements: Use a soft measuring tape to measure your chest, waist, and hips. Compare these to the pattern’s sizing. Don’t fret if you’re in between sizes; you can make simple adjustments by tracing the pattern onto paper and modifying it.
    • Pattern Markings: Learn to identify and understand pattern markings like fold lines, grainline arrows, and the number of pieces to cut. The grainline arrow, in particular, indicates how to orient the pattern piece in relation to the.
    • Seam Allowance: Pay close attention to the seam allowance, the specific distance a seam should be from the fabric edge, as stated in your pattern instructions. Getting this right is crucial for accurate sizing; too wide and the garment will be too small, too narrow and it will be too big. Most machines have lines on the stitch plate or seam guides to help you maintain a consistent seam allowance. Using a strip of washi tape on your machine can also act as a visual guide.

    Adding Fullness and Form

    Transforming two-dimensional fabric into a three-dimensional garment involves adding fullness. This is one of the most important concepts in fitting clothes to your body.

    Equipment Needed: A high-quality sewing machine, sharp fabric scissors, measuring tools, pins, needles, diverse threads, iron, ironing board, seam ripper, tailor’s chalk, marking tools, thimbles, and potentially a serger/overlocker and dress form. A dedicated, organised workspace with a changing room and large mirror is crucial for the self-employed.

    Darts: Tapered folds sewn into fabric to give shape and contour, commonly found at the bust, waist, and hips.

    Gathers: Fabric is gathered to create fullness, often used at waistlines or sleeve caps.

    Tucks and Easing: Other techniques to control and distribute fullness, allowing fabric to drape and move with the.

    Education Requirements: Typically, formal education beyond high school isn’t required, but a keen eye for detail, patience, and a passion for the craft are essential. Many start as apprentices or gain experience through seamstress courses and workshops. Continuous practice and learning from experienced mentors are invaluable.

    Salary Range: Annual salaries for seamstresses and tailors can range from $25,000 to $60,000, influenced by whether you are self-employed or work for a company, client volume, location, and expertise.

    Fashion Designer: Creating Trends and Timeless Pieces

    If your passion for sewing extends to conceptualising.

    • Salary Range: Annual salaries can range from $40,000 to $80,000 in theatre, and $60,000 to $120,000 or more in film/television, with a median of $56,000.
    • Equipment Needed: Sketchbooks, design software, knowledge of textiles, fabric swatches, historical references, patternmaking tools, sewing machines, cutting tables, dress forms, and strong communication skills.

    Sewing Instructor: Sharing the Art and Skill of Sewing

    If you have a passion for both sewing and teaching, becoming a sewing instructor is a fulfilling career.

    • What They Do: Sewing instructors teach individuals of all skill levels, designing and delivering sewing classes or workshops. They provide step-by-step guidance, demonstrate techniques, and offer hands-on support, fostering creativity and confidence in their students. They might teach in schools, community centres, fabric stores, or offer private lessons.
    • Education Requirements: A high school diploma is sufficient, but a passion for sewing and teaching is.

    Upholsterer: Crafting and Restoring Furniture

    Furniture enthusiasts might find joy in upholstery, breathing new life into worn pieces.

    • What They Do: Upholsterers restore and enhance furniture by applying fabric, padding, and springs, and performing structural repairs. They advise clients on fabric selection, considering aesthetics and durability.
    • Education Requirements: Formal education isn’t usually required, but specialised training or apprenticeships are highly beneficial, teaching upholstery techniques and furniture restoration.
    • Salary Range: Annual salaries range from $28,000 to $60,000, with higher earnings for those with expertise in antique restoration or custom work. Self-employed upholsterers can set their own rates.
    • Equipment Needed: Mallets, staple removers, shears, specialised sewing machines and heavy-duty needles, upholstery needles, pliers, webbing stretchers, and a range of materials like foam, batting, and springs.

    Embroidery Specialist: Bringing Designs to Life

    Embroidery, as a full-time career, a.

    • Salary Range: As a relatively new field, data varies. Average influencer earnings are around $45,000 annually, but this depends on niche and follower count. Earnings can grow from modest affiliate marketing to substantial incomes through brand partnerships.
    • Equipment Needed: Sewing machines, notions, attractive workspace, high-quality photography/video equipment (digital camera/smartphone, tripods, lighting, microphones), editing software, and potentially inventory management and shipping supplies for online sales.

    Specialised Courses to Become a Seamstress or Tailor

    Many institutions offer more formal pathways if you’re looking for a structured education to become a professional.

    • Formalised Accreditations: Some dressmaking schools offer formalised accreditations or diplomas. For example, Milner’s Fashion House in Pretoria offers an “introduction to fashion design course” covering basics like research, mood boards, and textiles, followed by advanced courses like “pattern gr”.
    • It’s a skill that builds confidence, provides a therapeutic outlet, and empowers you to bring your sartorial visions to life. As the proverb says, “Beautiful things come together one stitch at a time,” and with patience and consistent practice, you too can create stunning pieces.

    Conclusion

    Final Thoughts on Starting Your Sewing Journey: The Thread of Creativity. The world of sewing and dressmaking is a vibrant, creative canvas awaiting your unique touch.

    As we’ve explored, there’s a vast array of seamstress courses available, catering to every level and interest, whether you’re searching for sewing classes for beginners or advanced pattern making classes.

    From the precise art of sewing pattern drafting to the intricate beauty of couture sewing techniques and the communal joy of quilt-making classes or textile art courses, there’s truly something for everyone. Learning to sew offers profound personal rewards, from the sheer joy of creative expression and crafting unique garments to the practical satisfaction of customising your wardrobe and contributing to a more sustainable lifestyle.

    It’s a skill that builds confidence, provides a therapeutic outlet, and empowers you to bring your sartorial visions to life. As the proverb says, “Beautiful things come together one stitch at a time,” and with patience and consistent practice, you too can create stunning pieces.

    Encouragement to Enrol in a Seamstress Course

    If you’ve felt that spark of curiosity, we wholeheartedly encourage you to take the first step. Research local and online seamstress courses, visit schools, and speak to instructors. Many tutors, like those on Superprof, offer a free introductory session, giving you a risk-free opportunity to find the right teacher and ensure a good fit. Enrolling in a seamstress course is an investment – not just in a rewarding and lifelong hobby, but potentially in a fulfilling career. Remember, high fashion and the joy of creating are accessible to all, empowering you to craft with confidence. So, grab your enthusiasm, find your perfect course, and begin weaving your own.

    About the Author: Grace, Founder of London Sewing Courses

    Grace is the heart and hands behind London Sewing Courses. A passionate and experienced sewing instructor, she founded the studio with a unique mission: to create a calm, friendly space for adults to learn and connect, while using the profits to fund free sewing classes for local children in need. Her personal expertise and commitment to community building are at the core of every class and every stitch.

  • Quilting Near Me: Get Creative

    Quilting Near Me: Get Creative

    Introduction: The Enduring Art of Quilting

    Quilting is an art form that beautifully marries creativity with practicality, blending rich history with modern design. From humble beginnings born out of a need for warmth, it has evolved into a global community of artists and crafters who find joy in turning fabric into beautiful, lasting heirlooms. Whether you’re captivated by the intricate patterns of a traditional patchwork quilt or the vibrant colours of a modern design, the journey of quilting offers a profound sense of accomplishment and a wonderful therapeutic escape.

    For those in the UK, a thriving community of quilters, shops, and classes is waiting to be discovered. If you’ve ever found yourself searching for “quilting near me,” this guide is your first step into a world of colour, texture, and connection. We’ll explore everything from finding the perfect supplies to joining a local guild, helping you get creative and connect with fellow enthusiasts.

    What is Quilting?

    A Deeper Dive into the Craft

    Before we explore the local resources available, let’s clarify some fundamental concepts of quilting.

    Tools and Materials: To get started, you’ll need some essential tools. The basics include quilting cotton fabric, wadding (the middle layer), thread, a rotary cutter, a cutting mat, a ruler, and a sewing machine. Finding these is made easy by searching for a quilt store near me or a quilting store near me.

    Definition: A quilt is essentially a stitched sandwich of three layers: a decorative top, a middle layer of wadding (or batting), and a backing fabric. The process of stitching these layers together is what gives the quilt its name and its durability.

    Patchwork vs. Quilting: It’s a common point of confusion for beginners. Patchwork refers specifically to the process of piecing together small pieces of fabric to create the decorative top layer. Quilting is the overarching term for the entire craft, but it also specifically refers to the act of stitching all three layers together, often in a decorative pattern. Therefore, a quilt can have a patchwork top, but it can also have a single piece of fabric for the top layer. Courses on patchwork classes near me are often the perfect starting point for learning how to piece a top.

    Historical Context: Quilting has a rich history in the UK, with its roots in both necessity and artistry. Quilts were historically made to provide warmth, often from scraps of worn-out clothing. Over time, this necessity evolved into a beautiful art form, with intricate designs and patterns being passed down through generations.

    The Benefits of Quilting

    More Than Just Stitching

    Quilting offers a wealth of benefits that go far beyond the finished product.

    • Sustainability: Quilting is an inherently sustainable craft. It encourages using up fabric scraps and upcycling materials, giving them a second life and creating lasting heirlooms instead of contributing to textile waste.
    • Creative Expression: Quilting is a deeply personal art form that allows you to play with colour, pattern, and design. Every fabric choice and stitch tells a story, turning a pile of materials into a unique, artistic statement.
    • Mindfulness and Stress Relief: The repetitive motion of stitching is incredibly meditative. It provides a peaceful escape from the busyness of modern life, fostering mindfulness and helping to reduce stress and anxiety.
    • Practical Outputs: The end result of your hard work is often a beautiful, functional item. Whether it’s a cosy blanket, a decorative wall hanging, or a set of placemats, your creation can be used and cherished.
    • Sense of Accomplishment: Completing a quilt, especially a complex one, provides an immense sense of pride and accomplishment. It’s a tangible record of your skill, patience, and creativity.
    • Community and Connection: As you’ll discover, the quilting community is warm and welcoming. Sharing your hobby with others provides support, inspiration, and lasting friendships.

    Why Finding Local Resources Matters

    In the world of quilting, proximity is incredibly important. While online shopping and learning are wonderful, finding local resources offers unique benefits.

    • Supporting the Local Economy: By purchasing from a local quilting supplies near me store, you are directly contributing to the small businesses that are the heart of our communities.
    • Accessibility: Having a quilt shop near me or a quilt store near me means you can easily see and feel fabrics, test out notions, and get what you need without waiting for a delivery.
    • Hands-on Experience: There’s no substitute for being able to touch a fabric before you buy it, to feel the weight of different waddings, and to get in-person advice from a knowledgeable expert.
    • Building a Local Network: Visiting a local quilting shop near me or taking a class is the best way to meet fellow quilters and begin building your local creative network.

    Finding Quilt Shops Near Me

    (Quilt Shops Near Me / Quilting Shops Near Me / Quilt Shop Near Me / Quilt Stores Near Me / Quilting Stores Near Me / Quilt Store Near Me / Quilting Store Near Me)

    Your local fabric shops are your treasure chests, full of inspiration and the materials you need to bring your creations to life.

    Types of Quilt Shops: Your Material Hub

    • Specialised Quilt Fabric Stores: These are the dream destinations for any quilter. A top quilt shop near me will have an extensive range of quilting cottons, often organised by colour or designer collection. They are also a great place to find pre-cut fabrics like fat quarters, jelly rolls, and charm packs. The staff are usually experienced quilters themselves, offering invaluable advice on colour theory and fabric choices. Examples of stock you might find include designer batiks, reproduction prints, and an array of solids. Many also offer a longarm quilting service. A search for quilting shops near me will bring up these brilliant specialised stores.
    • General Fabric Stores: While not solely focused on quilting, many larger fabric stores near me will have a dedicated quilting section with a good selection of cottons and basic notions. You might also find a fabric discount stores near me that has great value options for backing fabric or practice projects.
    • Haberdasheries with Quilting Sections: Don’t forget to check out smaller, local haberdasheries. They may not have a huge selection of quilting fabric but are often a great source for essential notions like specific threads, needles, and cutting tools. A search for quilting stores near me should include these smaller shops, as they are often a hub of local information.

    Longarm Quilting Services (Longarm Quilter Near Me)

    • Explanation: A longarm quilting machine is a specialised machine used to stitch the three layers of a quilt together. It’s a brilliant option for those who enjoy the creative process of piecing a quilt top but don’t want to spend the time doing the quilting themselves or who have a quilt that is too large for a domestic machine.
    • Benefits: It provides a professional, even finish, often with intricate quilting patterns. A longarm quilter near me can help you turn your finished top into a beautiful finished quilt.
    • How to Find: Many dedicated longarm businesses advertise their services online. A search for a “longarm quilter near me” or checking at your local quilt shop near me should point you in the right direction.

    How to Search for Local Quilt Shops

    Social Media: Use hashtags on Instagram like #[yourtown]quilts or #[yourtown]sews to discover local businesses and communities.

    Online Directories: Use specific search terms like “quilting near me” or “quilt stores near me” to find local shops.

    Community Recommendations: Ask for recommendations in local Facebook groups or craft forums.

    Specialised Websites: The Quilters’ Guild of the British Isles and other craft directories often have lists of member shops.

    Sewing Classes Near Me

    (Sewing Classes Near Me / Quilting Classes Near Me / Quilt Classes Near Me / Quilting Class Near Me / Quilt Making Classes Near Me / Hand Quilting Classes Near Me / Patchwork Classes Near Me)

    Learning from an experienced teacher is one of the best ways to get started.

    Overview of Available Classes: Learning the Craft

    • Beginner Classes: These are the perfect starting point for anyone new to quilting. A quilting class near me for beginners will cover the essentials: rotary cutting safety, accurate piecing, and how to sandwich and baste a quilt. They are often project-based, giving you a finished item to take home.
    • Intermediate Classes: Once you’ve mastered the basics, you can move on to more complex techniques. A class might focus on curved piecing, appliqué, or introduce you to free motion quilting on a domestic machine.
    • Advanced Classes: These are for the more experienced quilter. A quilting class near me for advanced learners might cover techniques like paper piecing, foundation piecing, or complex colour theory.
    • Hand Quilting Classes Near Me: For those who prefer the traditional, meditative process of hand quilting, there are dedicated classes available to teach you the perfect stitch.
    • Patchwork Classes Near Me: If you’re a complete novice, a class focused on patchwork is often a brilliant starting point. A search for quilt making classes near me will bring up a wide variety of these options.

    Benefits of Taking Sewing Classes

    • Structured Learning: A good teacher will guide you through a logical progression of skills.
    • Correct Technique: Learning from an expert from the start helps you avoid developing bad habits.
    • Access to Equipment: Many classes will have specialist machines, rulers, and templates for you to use.
    • Community Building: It’s a brilliant way to meet fellow beginners and make new friends.

    How to Choose the Right Class

    • Skill Level: Make sure the class is appropriate for your skill level. Don’t be afraid to ask if you’re unsure.
    • Instructor Experience: Research the teacher’s background and reviews.
    • Course Content: Read the class description carefully to see what you will learn and what the final project will be.

    Engaging with the Quilting Community

    blue and white butterfly print heart shaped pillow on brown dried leaves

    (Quilting Community Near Me / Local Quilt Guilds / Quilting Circles Near Me / Quilting Bees Near Me)

    The quilting community is one of the most generous and welcoming you’ll find.

    Finding Local Quilt Guilds (Quilt Guilds Near Me)

    • The Quilters’ Guild of the British Isles: This national organisation is a fantastic resource for all things quilting. They have local branches across the UK, and their website (quiltersguild.org.uk/find-a-group) is the best place to search for a quilt guild near me.
    • Guild Activities: Guilds often hold monthly meetings with guest speakers, “show and tell” sessions where members share their finished projects, and workshops. It’s a brilliant way to access a vast amount of knowledge and resources.

    Joining Quilting Circles and Bees (Quilting Circles Near Me / Quilting Bees Near Me)

    • Informal Gatherings: These are smaller, less formal groups that often meet in homes or community venues. A search for a quilting community near me may well lead you to one of these groups.
    • “Sew-in” Sessions: Members bring their projects to work on, sharing ideas, fabrics, and conversations. A quilting bee near me is a brilliant way to get your questions answered and get inspired by others.

    Participating in Local Quilt Shows (Quilt Shows Near Me / Quilting Events Near Me)

    • Exhibitions and Competitions: Quilt shows near me are a chance to see beautiful quilts up close, enter your own work into a competition, and learn from others.
    • Vendor Stalls: These events are a fantastic opportunity to buy specialist supplies and fabric from a huge range of vendors, all in one place.
    • Demonstrations and Talks: Many shows feature demonstrations from experts, allowing you to learn new techniques in a different environment.

    Upcoming Events (Quilting Events Near Me / Quilting Workshops Near Me / Quilting Retreats Near Me)

    • Local Quilt Shop Events: Keep an eye on your local quilt shop near me for upcoming sales, trunk shows, or special events. A search for quilting events near me should include a look at the events pages of your local shops.
    • Quilting Retreats Near Me: For an immersive experience, consider a quilting retreat. These multi-day events offer focused sewing time, skill-building workshops, and a brilliant social experience, often in picturesque locations.

    Conclusion

    Summary of Local Resources: Your Quilting Journey Begins Here

    The world of quilting is a vibrant and welcoming one, and a search for “quilting near me” opens the door to a wealth of opportunities. From finding the perfect fabric at a local quilt store near me to taking a beginner-friendly quilting class near me or joining a local guild, your quilting journey can be supported by a wonderful community. This guide has hopefully shown you that a local quilting community is a rich tapestry of specialised shops, diverse learning opportunities, and supportive connections.

    Encouragement to Get Involved: Take the First Stitch

    We encourage you to take that first stitch. Visit a local quilt shop near me, ask about classes, or attend a guild meeting. The quilting community is eager to share its passion and help you on your creative journey. The only thing standing between you and a beautiful handmade quilt is a bit of courage and a whole lot of creative fun.

    Final Thoughts on Quilting Near Me

    The joy of quilting is in the process, the community, and the finished product. Finding your local quilting community is the key to unlocking this rich and rewarding craft. Happy stitching!

    About the Author: Grace, Founder of London Sewing Courses

    Grace is the heart and hands behind London Sewing Courses. A passionate and experienced sewing instructor, she founded the studio with a unique mission: to create a calm, friendly space for adults to learn and connect, while using the profits to fund free sewing classes for local children in need. Her personal expertise and commitment to community building are at the core of every class and every stitch.

  • 5 Top Embroidery London UK Trends

    5 Top Embroidery London UK Trends

    Introduction to Embroidery in London: A Stitch in Time

    London has long been revered as a global hub of creativity, where tradition and innovation converge. This is particularly true in the world of textiles and fashion. From the historic elegance of Savile Row to the cutting-edge designs found in Shoreditch, the capital city is a melting pot of sartorial expression. Within this vibrant scene, embroidery London UK has emerged as a powerful force, captivating artists, designers, and hobbyists alike.

    This guide will take you through the five most influential trends shaping the embroidery scene in London, UK. We’ll explore how modern technology is revolutionising the craft, how traditional techniques are finding new life, and where you can find the very best in custom services and community initiatives. Whether you’re a seasoned stitcher or a curious beginner, London offers a rich and dynamic landscape for all things embroidery.

    Brief History of Embroidery in the UK

    From Ancient Roots to Royal Garments: The Legacy of British Stitchery

    The story of embroidery London UK is a tale woven through centuries of British history, from ancient roots to royal garments.

    • Early Beginnings: The practice of decorating fabric with needle and thread can be traced back to Anglo-Saxon times, with archaeological finds revealing intricate stitched details on clothing from as early as the 7th century. Monastic communities were often the epicentres of this early craft, creating beautiful vestments and hangings for religious purposes.
    • Medieval Splendour: The pinnacle of English embroidery came in the Middle Ages with Opus Anglicanum, or “English work.” This exquisite form of needlework, often using fine silk and gold threads on religious garments, was so highly prized across Europe that it became a major export. We can also see the power of embroidery as a narrative tool in the Bayeux Tapestry, a monumental piece of stitched history.
    • Tudor and Stuart Eras: During these periods, embroidery became a significant status symbol. Elaborate designs adorned the clothing of nobility and the furnishings of grand homes. It was during this time that samplers became a popular way for young women to demonstrate their proficiency in a range of hand embroidery stitches and designs. Figures like Mary Queen of Scots and Queen Elizabeth I were known to be avid embroiderers, underscoring its place in royal life.
    • Industrial Revolution Impact: With the advent of machine looms and factory production in the 18th and 19th centuries, the demand for hand embroidery declined. Mass-produced textiles became more affordable and widely available, leading to a temporary downturn in traditional craftsmanship.
    • Victorian Revival and Arts & Crafts Movement: A renewed appreciation for handmade items and traditional skills led to a revival in the Victorian era. Institutions like the Royal School of Needlework (RSN), founded in London in 1872, were established with a dual mission: to revive the art of hand embroidery and to provide dignified employment for women. This movement laid the groundwork for the thriving embroidery scene we see in London today.

    The Cultural Significance of Embroidery in London

    Beyond Decoration: Weaving Identity and Innovation

    Embroidery in London has always been more than just decoration; it’s a powerful medium for reflecting identity and driving innovation.

    • Historical Role: Throughout London’s history, embroidery has reflected social status, religious devotion, and national identity. The rich tapestries in royal palaces and the beautifully adorned garments of the wealthy all tell a story about the city’s social fabric.
    • Royal Connections: The enduring relationship between embroidery and the British Monarchy is a testament to its significance. The Royal School of Needlework has been involved in countless royal projects, from coronation robes to the intricate lace panels on the Duchess of Cambridge’s wedding dress, showcasing London’s legacy of excellence.
    • Contribution to Fashion: As a global fashion capital, London’s sartorial landscape has been shaped by both historical and contemporary embroidery. The city’s designers, both established and emerging, frequently incorporate intricate needlework into their collections, from haute couture to ready-to-wear.
    • Community and Heritage: London’s museums, most notably the Victoria and Albert (V&A) Museum, hold world-class collections of textiles and embroidery. Alongside guilds and schools, these institutions play a crucial role in preserving and promoting the city’s rich embroidery heritage.

    Trend #1: Custom Embroidery Services

    (Custom Embroidery London UK / Embroidery Service London UK)

    Popularity of Personalisation: Making Your Mark in Thread

    In an era of mass production, the desire for unique, individualised items has led to a boom in custom embroidery London UK. This trend is all about making your mark, whether for personal expression or professional branding.

    • Driving Factors: People are increasingly seeking products that tell a story, that are a one-off, and that feel special. Custom embroidery allows for exactly this, turning a simple garment into a cherished piece.
    • Applications: The scope of customisation is vast. It’s used for personalising clothing like denim jackets, t-shirts, and caps, adding a bespoke touch to accessories like bags and hats, and creating unique home décor like cushions and linens. It’s also a popular choice for thoughtful gifts.
    • Corporate Branding: Businesses across London are using an embroidery service London UK for professional, long-lasting branding. It’s a great way to create a polished look for uniforms, workwear, and promotional merchandise, providing a high-quality alternative to printing.
    • Event Memorabilia: For special occasions like weddings, anniversaries, and corporate events, custom embroidery is used to create unique and memorable keepsakes, from embroidered napkins to bespoke patches.

    Notable Custom Embroidery Shops in London (Embroidery Shop London UK / Embroidery Shops London UK)

    London has a fantastic range of studios and businesses that specialise in custom embroidery.

    • Hawthorne & Heaney / London Hand Embroidery: This renowned studio is celebrated for its bespoke, high-quality work. They excel at both intricate hand embroidery and digital projects, catering to high-end fashion, military uniforms, and artistic commissions. They are a great example of a top-tier embroidery shop London UK.
    • The London Embroidery Studio: Known for its state-of-the-art machinery and digital expertise, this studio provides bespoke work for fashion, stage, screen, and interiors. Their investment in technology allows them to handle complex and large-scale projects with precision.
    • Norules Embroidery: This company offers a reliable embroidery service London UK for workwear, polo shirts, and general garment customisation. They are a popular choice for small businesses and individuals looking for a professional finish on their apparel.
    • Initially London: As the name suggests, this business specialises in monogramming and personalised gifts, offering a beautiful range of items that can be customised with initials or names.
    • Stitch to Stitch: This is another excellent example of an embroidery shop London UK that offers a range of customisation services, from personalised workwear and school uniforms to fashion embroidery.

    Trend #2: Machine Embroidery Innovations

    (Machine Embroidery London)

    Advances in Technology: Precision and Efficiency

    Modern machine embroidery London has revolutionised the craft, offering a level of precision, speed, and efficiency that was once unimaginable.

    • Modern Machine Capabilities: Today’s machines, particularly the multi-head industrial models, can handle high stitch counts and larger projects with ease. Their speed and consistency make them perfect for commercial orders that require a quick turnaround without sacrificing quality.
    • Digitisation Software: The heart of machine embroidery London lies in its advanced digitisation software. These powerful programs allow designers to translate intricate digital designs into stitch files, enabling the creation of complex patterns and fine details that would be incredibly time-consuming to produce by hand.
    • Automation and Speed: For businesses, modern embroidery machines are a game-changer. They can produce high volumes of consistent quality, which is ideal for corporate branding, sportswear, and fashion production.
    • Specialised Machine Techniques: Technology has expanded the creative possibilities of machine embroidery. We can now see 3D puff embroidery, where foam is used to create raised designs, as well as machine appliqué, cording, and even the automated attachment of sequins, beads, and gems.
    • Sustainability in Machine Embroidery: Many studios are also looking at ways to be more sustainable in their processes, using eco-friendly threads and minimising waste in their designs.

    Leading Machine Embroidery Studios in London

    London is home to some of the UK’s leading machine embroidery studios, equipped with cutting-edge technology.

    • The London Embroidery Studio: As mentioned previously, their investment in digital and machine embroidery technology allows them to undertake complex fashion, textile, and interior projects, showcasing a wide range of specialised techniques.
    • Embroidery by Design (Perivale/West London): This studio is known for its capability for extra-large embroidery and diverse applications, catering to large-scale projects and corporate clients.

    Trend #3: Hand Embroidery Resurgence

    The Appeal of Craftsmanship: Slow Stitching in a Fast City

    In a world dominated by digital screens and fast-paced living, the quiet, meditative craft of hand embroidery is experiencing a significant resurgence in popularity. This trend is a deliberate move towards slow, mindful making.

    • Mindfulness and Well-being: The repetitive, rhythmic action of hand stitching is a powerful antidote to digital overload. It’s a therapeutic activity that promotes focus and reduces stress, offering a peaceful escape from the busyness of city life.
    • Value of the Handmade: There is a growing appreciation for unique, one-of-a-kind items that are made with care and time. A piece of hand embroidery holds the story of its creation, giving it a value that a mass-produced item can never have.
    • Artistic Expression: Hand embroidery is no longer just seen as a craft; it’s a recognised medium for fine art and personal storytelling. Artists are using needle and thread to create stunning textile art, political statements, and deeply personal narratives.
    • Sustainability and Upcycling: The rise of visible mending, where repairs are celebrated rather than hidden, has been a key factor in this trend. Hand embroidery is a beautiful way to mend and customise existing garments, extending their lifespan and reducing fashion waste.
    • Historical Connection: For many, learning hand embroidery is a way to connect with traditional skills and heritage, a link to the past that feels particularly special in a city steeped in history.

    Hand Embroidery Classes in London UK (Embroidery Classes London UK / Hand Embroidery Classes London)

    London offers a fantastic range of opportunities to learn hand embroidery from the experts.

    • Royal School of Needlework: As a global centre of excellence, the RSN offers an incredible array of courses, from taster workshops for beginners to long-term certificate and degree programmes. They are a cornerstone of embroidery classes London UK, teaching a huge variety of traditional and contemporary techniques at Hampton Court Palace and other venues.
    • Hand & Lock School: This renowned company, with a history dating back to 1767, offers brilliant in-person hand embroidery classes London. Their courses cover a wide range of techniques, including goldwork, tambour beading, and silk shading, catering to all skill levels.
    • London Embroidery School: This school provides clear, friendly, and informative classes that are perfect for beginners and improvers. They offer a great range of projects and also have virtual options for those who prefer to learn from home.
    • Independent Studios and Teachers: Across London, a thriving community of independent artisans and teachers offers small, intimate workshops and tailored tuition, providing a personal and focused learning experience.

    Trend #4: Incorporation of Modern Design

    a row of hats sitting on top of a table

    Fusion of Traditional and Contemporary Styles: Pushing Creative Boundaries

    The fourth major trend is the fusion of traditional embroidery techniques with modern design aesthetics, resulting in work that is both beautiful and innovative.

    • Abstract and Geometric Designs: A new wave of embroiderers is moving beyond classic floral or narrative motifs, creating bold, abstract, and geometric patterns that feel fresh and contemporary.
    • Mixed Media Embroidery: Artists are pushing creative boundaries by combining hand embroidery with other art forms like painting, collage, and digital prints. This creates a rich, multi-layered texture and visual interest.
    • Subversive and Humorous Embroidery: A very popular trend, particularly in online communities, is the use of embroidery to convey witty or provocative messages. This playful use of a traditional craft on unexpected items like old handkerchiefs or denim jackets subverts expectations and adds a modern twist.
    • Nature-Inspired Modernism: While floral motifs have always been popular, contemporary embroiderers are giving them a fresh spin. They use modern colours, abstract shapes, and unique stitches to create artful, nature-inspired pieces.
    • Embroidered Apparel and Accessories: Modern designers in London are integrating embroidery into ready-to-wear fashion and accessories in new and exciting ways, from beautifully embroidered denim to artful patches.
    • Textural Experimentation: The use of different threads, beads, and techniques to create tactile, 3D effects is a key part of this trend. Techniques like thread painting and modern stumpwork are being used to create incredibly realistic and textured pieces.

    Examples from Local Designers and Institutions

    This trend is particularly visible in London’s creative ecosystem. You can find examples of this work in small galleries, at degree shows from art schools like Central Saint Martins and the Royal College of Art, and in the portfolios of London-based textile artists. The V&A Museum also frequently holds exhibitions that showcase both historical and modern embroidery, highlighting this fascinating evolution.

    Trend #5: Community and Learning Initiatives

    Embroidery Guild London UK Events: Fostering Connection and Skill

    The final trend is the strength of the embroidery community in London, which is kept vibrant through various learning and social initiatives.

    • The Embroiderers’ Guild: This national organisation plays a vital role in educating and promoting stitch and textile art. They have local branches all across the UK, including many in London, which act as hubs for local stitchers. A search for embroidery guild london uk will show a huge range of active, welcoming branches.
    • Local Branch Activities: London branches of the Embroiderers’ Guild hold regular monthly meetings, workshops, and stitching groups. These are wonderful opportunities to meet fellow embroiderers, share your work, and learn new skills in a supportive environment.
    • Benefits of Membership: Being a member of the guild gives you access to a wealth of resources, including a library of books and patterns, invitations to exhibitions, and a supportive network of fellow stitchers.

    Importance of Classes and Workshops: The Learning Journey Continues

    The availability of high-quality classes is a huge part of the embroidery London UK scene.

    • Accessibility: From the RSN’s beginner workshops to smaller, independent classes, there is something for every skill level. Many classes cater to all ages and abilities, making the craft accessible to everyone.
    • Skill Development: Classes provide a structured learning pathway for mastering various stitches and techniques, which is often difficult to achieve through self-teaching alone.
    • Inspiration and Creativity: Learning in a group environment exposes you to new ideas, different materials, and the insights of a skilled instructor, sparking your own creativity.
    • Social Aspect: Perhaps most importantly, classes and workshops offer a wonderful opportunity to meet like-minded individuals, share passions, and build a creative community. Many great friendships have started over a shared love of stitch.

    The availability of embroidery supplies London UK is another benefit of this thriving community. Many shops and studios that offer classes also sell materials, ensuring you have access to everything you need to continue your stitching journey.

    Conclusion

    Future of Embroidery Trends in London: A Stitch in Time

    The world of embroidery London UK is a dynamic and exciting one, perfectly balancing respect for its rich history with a passion for innovation. The trends we’ve explored—from the rise of bespoke services and the precision of modern machinery to the mindful appeal of hand embroidery and the fusion of traditional and contemporary design—show that this ancient craft is more relevant than ever.

    London will undoubtedly continue to be a leading city for embroidery, with its prestigious institutions, innovative designers, and vibrant community. The future of embroidery in the capital is a story that will continue to be told, one stitch at a time.

    Encouragement to Explore Local Embroidery Resources

    Whether you’re looking for an embroidery service London UK to create a personalised gift, want to take embroidery classes London UK to learn a new skill, or simply want to find a community of fellow stitchers, the city has a wealth of resources waiting for you. We encourage you to visit the studios, explore the shops, and engage with the guilds. Discover the perfect trend for you and begin your own creative journey in London’s inspiring world of embroidery.

    About the Author: Grace, Founder of London Sewing Courses

    Grace is the heart and hands behind London Sewing Courses. A passionate and experienced sewing instructor, she founded the studio with a unique mission: to create a calm, friendly space for adults to learn and connect, while using the profits to fund free sewing classes for local children in need. Her personal expertise and commitment to community building are at the core of every class and every stitch.

  • 7 Must-Have Novice Sewing Machine Features

    7 Must-Have Novice Sewing Machine Features

    ntroduction: Beginning Your Sewing Journey with the Right Machine

    The decision to learn to sew is an exciting one. It opens up a world of creativity, from mending your own clothes to crafting unique garments and home décor. But before you can take your first stitch, there’s a crucial first step: choosing the right machine. For a beginner, this can feel overwhelming. The sheer number of models, brands, and features can be a lot to navigate. That’s why choosing the right novice sewing machine or beginner sewing machine is so important. A well-chosen machine will make your learning process smooth, enjoyable, and free from unnecessary frustration.

    Many people think a “simple” machine means a less capable one. This is a myth. The perfect novice sewing machine isn’t about having a thousand decorative stitches; it’s about having the right features that empower you to learn and grow. In this guide, we’ll debunk the common misconceptions and outline the seven key features you should look for to find the best novice sewing machine for you. By the end, you’ll feel confident and ready to take your first step into the wonderful world of sewing.

    Understanding Novice Sewing Machines

    Before we get into the features, let’s clarify what a novice sewing machine actually is and what makes it ideal for a new sewer.

    What Defines a Beginner Sewing Machine?

    A beginner sewing machine isn’t necessarily the cheapest model on the shelf. Instead, it’s defined by its user-friendliness. The ideal machine for a sewing machine for novices focuses on core functionality and reliability. It has a straightforward design, clear instructions, and is built to withstand the bumps and learning curves of a new sewer. An overly complicated machine with dozens of buttons and dials can be overwhelming, causing you to lose confidence before you’ve even sewn your first seam. A novice sewing machine should feel like a patient tutor, not a confusing puzzle.

    Importance of User-Friendly Design (Easy-to-Use Sewing Machines)

    Simplicity is the most important feature of an easy-to-use sewing machine.

    Manual vs. Computerised: For many beginners, a mechanical (manual) machine is a great choice because of its robust simplicity and ease of troubleshooting. However, some basic computerised models offer wonderful features like automatic needle threading and a start/stop button that can significantly reduce frustration.

    Simplicity in Operation: Look for a machine with fewer dials and buttons. Clear, well-labelled controls are a huge plus.

    Intuitive Threading: An easy-to-follow thread path is essential. Many good beginner machines have numbered diagrams printed directly on the body, guiding you step-by-step.

    Clear Bobbin Access: Top drop-in bobbins are generally considered easier for beginners to use than front-loading ones. They allow you to see exactly how much thread you have left and are less prone to jamming if installed incorrectly.

    7 Essential Features for Novice Sewing Machines (Sewing Machine Features for Beginners)

    When you’re shopping for your first machine, these are the seven non-negotiable features that will make your sewing journey easier and more enjoyable.

    1. Straightforward Stitch Selection

    The most important stitches you’ll ever use are the straight stitch and the zigzag stitch.

    • Basic Stitches: A good novice sewing machine should have a reliable, consistent straight stitch for piecing seams and a zigzag stitch for finishing raw edges to prevent fraying.
    • Limited but Useful Options: Don’t be swayed by a machine that boasts hundreds of decorative stitches. For a beginner, these are largely unnecessary and often add to the cost. A few basic utility stitches are all you need to get started.
    • Clear Stitch Dial/Buttons: The stitch selection mechanism should be simple to use, with a clear dial or easily identifiable buttons.

    2. Adjustable Stitch Length and Width

    Even as a beginner, you’ll need to adjust your stitch length and width.

    • Why these adjustments are crucial: A longer stitch is great for gathering fabric, while a shorter stitch is ideal for reinforcing seams at the beginning and end. You’ll need to adjust the zigzag width for different seam finishes.
    • How to adjust: Look for clear dials or buttons that allow you to easily change these settings.

    3. Easy Threading System

    Threading your machine can be one of the most frustrating parts of learning to sew. The right features can make a huge difference.

    • Clearly Marked Thread Path: As mentioned before, a numbered diagram on the machine is a fantastic feature.
    • Top-Loading Bobbin System: This system is not only easy to access but also makes it simple to see if your bobbin is running low.
    • Automatic Needle Threader: This feature is a game-changer for beginners and can save you from a lot of eye strain and frustration. While not on every budget model, it’s a definite plus to look for.

    4. Adjustable Presser Foot Pressure (if available)

    While often a feature on more expensive models, it’s worth noting. The presser foot holds the fabric down while you sew.

    • Why this is important: This feature allows you to adjust the pressure for different fabric thicknesses. Lower pressure is great for delicate fabrics, while higher pressure is needed for thicker materials like denim. If a machine has it, it’s a sign of a high-quality beginner sewing machine.

    5. Free Arm Capability

    This is an essential feature for a versatile machine.

    • Essential for a variety of projects: A free arm is a narrow extension of the sewing bed. You access it by removing the accessory tray. It’s crucial for sewing small, tubular items like trouser hems, cuffs, and children’s clothing.

    6. LED Lighting

    Good lighting is more important than you might think.

    • Visibility is key: Good illumination of the needle area helps with visibility, especially when you’re working on detailed seams or with darker fabrics. Many modern machines come with bright LED lights, which are a vast improvement over older, dimmer bulbs.

    7. Reverse Lever/Button

    This is a fundamental feature for securing your stitches.

    • Crucial for durability: A reverse lever or button allows you to sew backwards a few stitches at the beginning and end of each seam. This locks the stitches in place and prevents your work from unravelling.

    Bonus Feature: Speed Control Slider (Sewing Machine Tips for Beginners)

    This is a brilliant feature for building confidence.

    Start/Stop Button: On some computerised models, a start/stop button is also available, which can be very helpful for beginners who aren’t yet comfortable with a foot pedal.

    Allows for control: A speed control slider allows you to set a maximum speed for your machine, regardless of how hard you press the foot pedal. This enables you to sew at a slower, more controlled pace, reducing mistakes and helping you master a consistent seam.

    Budget-Friendly Sewing Machines for Beginners (Budget Sewing Machines for Beginners)

    You don’t need to spend a fortune to get a great first machine. There are many reliable, affordable sewing machine options on the market.

    Finding Value in a Novice Machine

    • Reasonable price ranges: For a solid beginner sewing machine, a price range of £150-£300 is a good starting point. This range often includes machines with a metal internal frame and the key features we’ve outlined.
    • Affordable doesn’t mean low quality: An affordable sewing machine can still be a reliable one if you focus on build quality and essential features.

    Best Budget Sewing Machines for Beginners

    When it comes to finding a novice sewing machine, there are a few brands and models that consistently get good feedback in the UK market.

    • General Recommendations: Look at trusted brands like Brother, Singer, and Janome. Hobbycraft’s own brand also offers popular entry-level models.
    • Where to Buy: You can find these machines at specialist sewing machine shops like The Sewing Studio and Direct Sewing Machines, as well as department stores like John Lewis and Argos. Online retailers like Amazon UK and Singer Outlet also have a huge selection.

    Value for Money Recommendations

    Look for a Good Warranty: Check for a good warranty and see if spare parts and servicing are readily available in the UK. This is crucial for maintaining your novice sewing machine over time.

    Prioritise Durability: A machine with a strong metal frame is a better long-term investment than an all-plastic one. It will be a more durable sewing machine in the long run.

    User Reviews and Feedback (Sewing Machine Reviews for Beginners)

    Before you make your final decision, take some time to read sewing machine reviews for beginners from other users. Their real-world experience can be invaluable.

    The Importance of Real-World Experience

    • What to look for: Look for comments on the machine’s ease of threading, stitch quality, noise level, and customer support. You’ll find honest insights that a product description might not provide.
    • Community insights: Forums like Reddit can be a great place to ask “what is the best sewing machine for a novice?”. You’ll often find a community of experienced sewers who are happy to share their recommendations.

    What Users Say About Their Novice Machines

    Addressing frustrations: Common frustrations, such as thread jamming or tension issues, can often be solved with the right machine features or simple sewing machine tips for beginners. For example, a top-loading bobbin system can help prevent a lot of common bobbin-related frustrations.

    Common positive feedback: Beginners often praise machines that are “easy to learn,” “great for simple repairs,” and “reliable for my first few projects.”

    Setup and Initial Use Tips (Sewing Machine Tips for Beginners)

    Once you’ve chosen your novice sewing machine, it’s time to get it set up.

    Unboxing and First Steps

    • Read the manual: Don’t skip this step! The manual is your best friend. It will show you exactly how to thread your specific machine and what each dial does.
    • Practice, practice, practice: Start by practising on scrap fabric. Sew straight lines, turn corners, and get a feel for the foot pedal and speed.

    Basic Maintenance for Longevity

    • Simple cleaning: Regularly remove lint and thread build-up from the bobbin area and under the needle plate.
    • Needle changes: Change your needle regularly, especially after a big project. A fresh, sharp needle makes a huge difference to your stitch quality.
    • Proper storage: Keep your beginner sewing machine covered when not in use to protect it from dust.

    Final Thoughts on Choosing the Best Novice Sewing Machine

    Your first sewing machine is the foundation of your creative journey. Choosing the right one can make all the difference in whether sewing becomes a lifelong passion or a short-lived frustration.

    Summary of Key Features

    Remember to prioritise ease of use, essential stitches, a clear threading system, and a robust build. The best novice sewing machine for you will be the one that feels intuitive and encourages you to keep stitching.

    Empowerment for New Sewers

    Don’t be afraid to take your time and do your research. The right beginner sewing machine will make the learning process enjoyable and rewarding, giving you the confidence to tackle more and more ambitious projects. This foundational choice paves the way for a rich and creative sewing hobby. Happy sewing!

    About the Author: Grace, Founder of London Sewing Courses

    Grace is the heart and hands behind London Sewing Courses. A passionate and experienced sewing instructor, she founded the studio with a unique mission: to create a calm, friendly space for adults to learn and connect, while using the profits to fund free sewing classes for local children in need. Her personal expertise and commitment to community building are at the core of every class and every stitch.