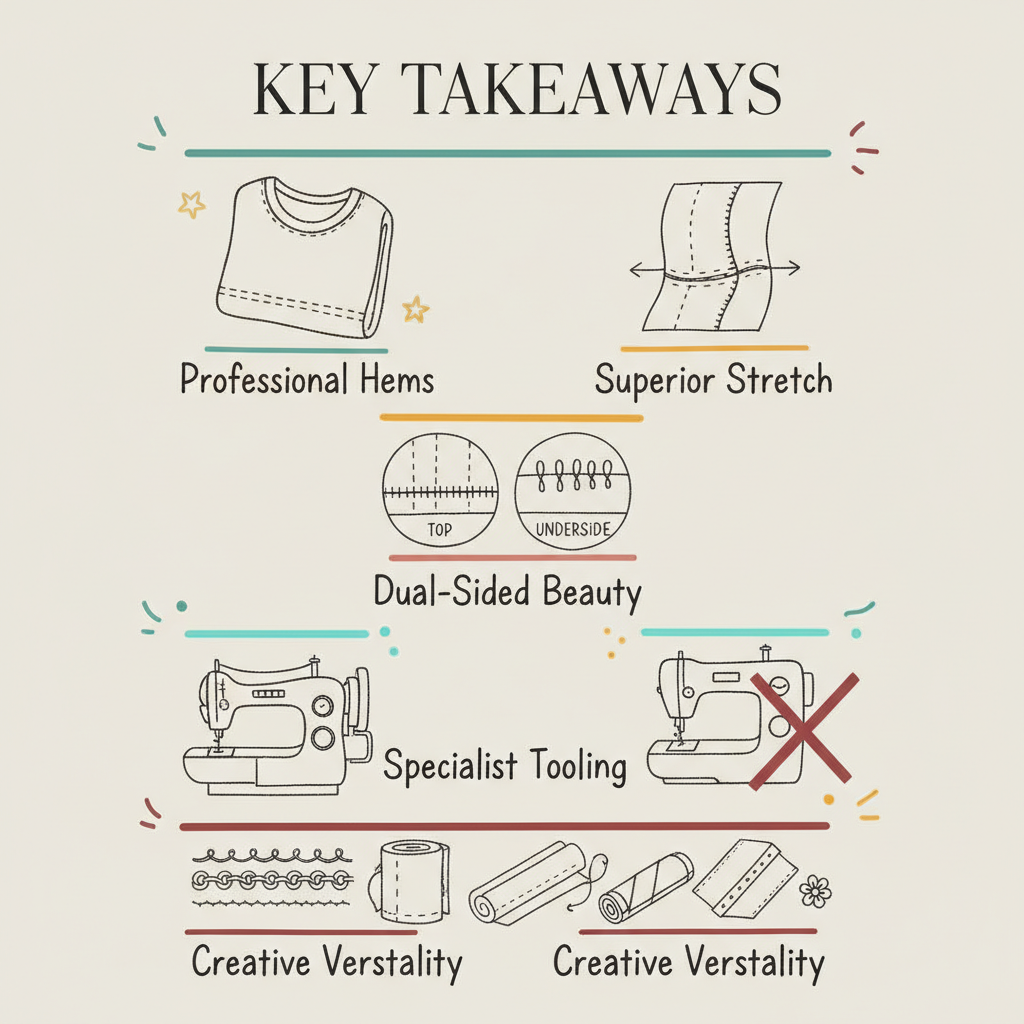
Tag: sewing tips

  • The Entry Point to Embroidery: Best Beginner Machines and Software

    The Entry Point to Embroidery: Best Beginner Machines and Software

    Key Takeaways

    • Versatility over Specialisation: Combo machines are often the best sewing and embroidery machine for beginners as they handle both garment construction and decorative stitching in one footprint.
    • Hoop Size Matters: Check the maximum embroidery area before buying; a 4×4 inch hoop is common for a cheap embroidery machine but can feel restrictive quickly.
    • Software Integration: Modern systems like mySewnet allow for wireless design transfers, making the transition from computer screen to fabric seamless.
    • UK Support: Choosing brands with strong UK presence ensures you can easily find local sewing classes north London for hands-on help.
    Key takeaways infographic for what is the best sewing and embroidery machine for beginners what is the best cheap embroidery machine

    Our Unique Insight: The “Growth Potential” Filter

    When you first start, you might be tempted to look exclusively for the best affordable embroidery machine. However, in my years of teaching, I have seen many students “outgrow” their first machine within six months. The true “best” machine isn’t just the one that fits your current budget; it is the one that offers a path for your developing skills. Look for a machine that allows for “multi-hooping” or has a library of compatible presser feet. Investing 20% more today on a machine with a slightly larger screen or faster stitching speed can save you hundreds in trade-in costs next year.

    Infographic about what is the best sewing and embroidery machine for beginners for London Sewing Courses

    Actionable Strategy: Your First 48 Hours with Embroidery

    Once your machine arrives, follow this sequence to avoid the common “beginner’s overwhelm”:

    1. The Stabilizer Sandwich: Don’t stitch on scrap fabric alone. Always use a tear-away or cut-away stabilizer. It is the secret to professional, pucker-free results.
    2. Thread Logic: Use specific 40-weight embroidery thread for the top and a dedicated bobbin thread (usually 60-weight or 90-weight) for the bottom.
    3. The “Slow Down” Rule: Even if your machine can stitch at 800 stitches per minute, keep it at a medium speed for your first five projects to monitor thread tension and avoid “bird’s nesting.”

    The journey into machine embroidery is one of the most rewarding ways to build a creative career or hobby. It is an opportunity to nurture your artistic voice—to cultivate a plain piece of fabric from a “hesitant seed” into a strong, established masterpiece of personal expression.

    Unlike traditional hand-stitching, a journey into machine embroidery starts with a single, crucial asset: your choice of technology. The UK market is currently robust, offering a range of machines that cater to those who have a deep passion for textiles and the desire to create high-impact, professional-looking designs.

    What is the Best Sewing and Embroidery Machine for Beginners?

    If you are searching for what is the best sewing and embroidery machine for beginners, you are likely looking for a “combination” or “combo” model. These clever machines function as a standard sewing machine for dressmaking and home decor but transform into an embroidery powerhouse when you attach the embroidery arm.

    For many of my students at our London sewing courses, the Brother Innov-is M380D is a frequent favourite. It is widely considered one of the best sewing and embroidery machine for beginners because it balances a user-friendly interface with built-in Disney designs that make the learning process fun. It features a colour LCD screen that allows you to edit designs directly on the machine, which is a fantastic “filtering process” for those not yet ready to dive into complex computer software.

    Finding the Best Affordable Embroidery Machine

    Budget is a significant factor for many new hobbyists. When asking what is the best affordable embroidery machine, you must consider the “total cost of ownership,” including hoops, stabilizers, and thread.

    The Singer SE9185 has recently gained traction as a strong contender for the best affordable embroidery machine in the UK. It offers a larger-than-average embroidery area for its price point and includes Wi-Fi connectivity. If you are looking for something even more entry-level, the Brother Skitch PP1 is often cited as the best cheap embroidery machine for those who primarily want to do small, quick customisations via a tablet or smartphone app.

    What is the Use of Embroidery Machine Technology?

    To truly master your craft, you must understand what is the use of embroidery machine features beyond the basics. These machines are essentially precision tools that allow you to “paint” with thread.

    Typical uses include:

    • Branding: Creating professional logos for small businesses or uniforms.
    • Upcycling: Breathing new life into old denim jackets or tote bags with floral patterns.
    • Home Decor: Personalising linens, napkins, and cushions with intricate lace or satin-stitch designs.
    • Quilting: Using “in-the-hoop” quilting designs to join layers of fabric with perfect geometric patterns.

    For those interested in professional development, mastering these machines can lead to a seamstress courses path where you can offer bespoke embroidery as a premium service.

    What is Monogramming on a Sewing Machine?

    A common point of confusion for novices is what is monogramming on a sewing machine. In the sewing world, “monogramming” can refer to two different things. Many high-end sewing machines have built-in “lettering” stitches. These are simple alphabets that the machine sews in a straight line using the standard feed dogs.

    However, true “embroidery monogramming” is done in a hoop. This allows for much larger, decorative initials with borders and multi-colour fills. If you want your projects to have that high-end, professional feel, you will want a machine that offers hoop-based embroidery rather than just decorative lettering stitches.

    Mastering the Digital Side: What is mySewnet?

    As you progress, you will inevitably encounter the question: what is mySewnet? This is a sophisticated, cloud-based ecosystem designed specifically for modern embroidery enthusiasts.

    Key benefits of mySewnet include:

    • Wireless Transfer: You can send designs from your computer or phone directly to your machine without needing a USB stick.
    • Design Library: Access thousands of high-quality, pre-made designs.
    • Basic Digitising: Some versions allow you to turn your own drawings or photos into embroidery files.

    Using mySewnet is like having a digital mentor. It helps you manage your projects and ensures that your machine’s firmware is always up-to-date, which is crucial for maintaining “safeguarding” against technical glitches during a long stitch-out.

    What is the New Husqvarna Viking Sewing Machine?

    For those looking for the latest innovations, what is the new Husqvarna Viking sewing machine for this season? The brand has recently launched the Onyx series, including the Onyx 25. While the Onyx is a mechanical sewing machine perfect for those who want to learn to use a sewing machine with tactile controls, their “Designer” line remains the gold standard for embroidery.

    The Husqvarna Viking Designer Sapphire 85 is a top-tier choice for beginners who want to “buy their second machine first.” It features the “JoyOS Advisor,” which acts like a built-in tutor, showing you exactly how to set up for different fabric types and techniques.

    How to Find Your Style: Tutoring and Classes

    Even with the best machine, the learning curve can be steep. Many people find that private sewing lessons london are the most direct way to build confidence. A dedicated tutor can show you the “hidden” tricks of the trade, from choosing the right needle for metallic threads to troubleshooting tension issues that the manual doesn’t cover.

    If you prefer a group environment, searching for sewing classes London for beginners will connect you with a community of like-minded creators. Seeing how others use their machines is often the best way to spark your own “Unique Insight” for future projects.

    Frequently Asked Questions (FAQ)

    Can I turn my own drawings into embroidery?

    Yes, but you will need digitising software to do this effectively. While some machines have basic “auto-digitising” features, professional results usually require software like mySewnet or PE-Design. This process involves “mapping” your drawing into specific stitch types (like satin or fill stitches) that the machine can understand. It is a vocational skill that is highly valued in the custom garment industry.

    What is the difference between a 4×4 and a 5×7 hoop?

    The numbers refer to the maximum embroidery area in inches. A 4×4 (approx. 100mm x 100mm) hoop is standard for a cheap embroidery machine and is perfect for pocket logos or small monograms. A 5×7 (approx. 130mm x 180mm) hoop allows for much larger designs, such as those you might see on the back of a jacket or a large cushion cover.

    Is an online tutorial as effective as an in-person class?

    Online tutorials are excellent for quick fixes or learning a specific software feature. However, for hands-on tasks like how to sew or learning machine threading and tension, in-person sewing classes north London are often more effective. An instructor can see exactly what your hands are doing and correct minor errors in real-time before they become bad habits.

    Do I need special thread for my embroidery machine?

    Yes. You should always use dedicated embroidery thread, which is usually a 40-weight polyester or rayon. Regular sewing thread is too thick and has a different twist, which can cause bird’s nesting or break the delicate needles used in embroidery. Using the correct “trust signals”—like high-quality thread and the right stabilizer—is the secret to a professional finish.

    Conclusion

    Choosing the best sewing and embroidery machine for beginners is about finding a balance between current ease of use and future creative freedom. Whether you start with a budget-friendly model or invest in a high-tech system like a Husqvarna Viking with mySewnet, the goal is to make the technology work for you. By focusing on your passion and seeking out expert guidance—perhaps through sewing classes London for adults—you can ensure your embroidery journey is both successful and deeply satisfying.

    About the Author

    This article was written by Grace Barrett, the founder of London Sewing Courses. Grace is a passionate advocate for textile arts and has spent years teaching students of all levels, from absolute beginners to professional seamstresses. Her approach is rooted in clear, patient communication and a genuine desire to see every student’s creativity “take root and flourish.” When she isn’t teaching, Grace can be found experimenting with the latest embroidery software or designing bespoke garments in her North London studio.

    Sources

  • What is a Twin Needle Used for in Sewing? A Masterclass

    What is a Twin Needle Used for in Sewing? A Masterclass

    Key Takeaways

    • Professional Finishes: A twin needle creates two perfectly parallel rows of stitching on the top of the fabric, mimicking the look of an industrial coverstitch machine.
    • Elasticity for Knits: The bobbin thread creates a zig-zag pattern on the reverse, allowing the seam to stretch without the thread snapping.
    • Size Matters: An 80/12 needle is the ‘goldilocks’ of sizes, perfect for medium-weight fabrics like cotton lawn or linen.
    • Point Protection: Using a ball point or stretch needle prevents permanent damage to knit fibres by sliding between them rather than piercing them.
    • Brand Compatibility: Organ needles are a world-leading standard, known for their precision and compatibility with most domestic sewing machines.
    Key takeaways infographic for what is a twin needle used for what is a stretch needle

    Every creative journey begins with a single step, and in the world of dressmaking, that step is often threading your first needle. As you grow in confidence, you may find yourself looking at the internal seams of your favourite shop-bought T-shirt and wondering how to replicate that sleek, parallel finish at home. The answer lies in a small but mighty tool that transforms the capability of your domestic machine.

    Understanding the nuances of needle technology is more than just technical trivia; it is the foundation of professional-standard garments. Whether you are attending our workshops tailored for grown-ups or experimenting in your own creative space, knowing which needle to reach for will save you from the frustration of skipped stitches and puckered fabric. Let us embark on this deep dive into the delicate world of sewing machine needles together.

    Exploring the Versatility: What is a Twin Needle Used For?

    The most common question I receive from students ready to tackle jersey projects is, “What is a twin needle used for?” At its most basic, a twin needle (often called a double needle) consists of two separate needles mounted onto a single plastic crossbar. This bar fits into your machine’s needle bar just like a single needle would.

    When you sew with a twin needle, your machine uses two upper spools of thread and one bobbin. As the needles move up and down, they create two parallel rows of straight stitching on the right side of the fabric. Meanwhile, the bobbin thread catches both upper threads, creating a zig-zag pattern on the underside. This clever mechanical dance is what gives the stitch its incredible flexibility.

    While most people use it for hemming T-shirts, its utility extends far beyond simple knits. You can use it for decorative topstitching on denim, creating beautiful pintucks on heirloom blouses, or even for utility stitching on elasticated waistbands. It is the secret weapon for anyone who wants their handmade wardrobe to look indistinguishable from high-end retail pieces. If you are exploring garment modification techniques, mastering the twin needle is a significant milestone in your development.

    Deciphering the Numbers: What is an 80 12 Needle Used For?

    When you look at a pack of needles, you will see two numbers separated by a slash, such as 80/12. This can feel like a secret code, but it is actually a very simple sizing system. The first number (80) is the European metric size, representing the diameter of the needle shaft in hundredths of a millimetre. The second number (12) is the American sizing system.

    So, what is an 80 12 needle used for? This size is essentially the ‘universal’ choice for the modern sewist. It is sturdy enough to handle the thickness of a standard cotton or linen, yet fine enough not to leave gaping holes in the weave. It is the needle you will likely use for the vast majority of your projects, from constructing summer dresses to sewing structured cushion covers.

    In our curriculum for aspiring dressmakers, we emphasize that an 80/12 needle is your reliable companion. However, precision is key. If you move to a very fine silk, you would drop down to a 70/10. For heavy denim or canvas, you would move up to a 90/14 or 100/16. Always remember that the needle should be as fine as possible for the fabric while remaining strong enough to pierce the layers without bending.

    Mastering the Stretch: What is a Stretch Needle?

    Jersey, Lycra, and modern performance fabrics are delightful to wear but can be a nightmare to sew if you use the wrong equipment. You might find your machine skipping stitches or the thread snapping as soon as you pull the garment on. This is where the stretch needle becomes essential.

    What is a stretch needle, exactly? While it looks similar to a universal needle, it has a specifically engineered ‘scarf’ (the indentation above the eye) and a slightly rounded tip. This design allows the bobbin hook to catch the thread loop more easily, even when the fabric is flexing and bouncing under the presser foot.

    The stretch needle is designed specifically for highly elasticated fabrics with a high Lycra or Spandex content. If you are sewing swimwear, leggings, or very stretchy athletic gear, this is the tool for the job. Using a universal needle on these fabrics often results in a ‘popping’ sound as the needle forces its way through the elastic fibres, which can eventually lead to small holes or ‘runs’ in your fabric.

    Protecting Your Knits: What is Ball Point Needle Used For?

    It is easy to confuse a stretch needle with a ball point needle, as both are used for knit fabrics. However, they serve slightly different purposes in your sewing journey. If you are wondering what is ball point needle used for, think of standard knits like T-shirt jersey, interlock, or sweatshirt fleece.

    A ball point needle has a tip that is rounded rather than sharp. Instead of piercing the yarns of the knit fabric, the rounded tip gently pushes the fibres aside and slides between them. This prevents the needle from cutting the threads that make up the fabric. If you have ever noticed tiny holes appearing along the seams of a knitted garment after a few washes, it is almost certainly because a sharp needle was used during construction, damaging the integrity of the knit.

    For students joining our North London sewing community, we often recommend keeping a variety of ball point sizes in your kit. A size 70/10 ball point is perfect for lightweight jerseys, while a 90/14 is ideal for heavy ribbing or thick winter knits. It is all about preserving the life of your creations through thoughtful tool selection.

    The Specialist’s Touch: What is a Wool Needle?

    As we move into heavier textiles and hand-finishing, we encounter the wool needle. In the context of sewing machines, a ‘wool needle’ often refers to a Topstitch or Embroidery needle with an extra-large eye and a deep groove. However, in the wider world of needlework, it usually refers to a large-eyed hand needle, often called a tapestry or darning needle.

    What is a wool needle used for in a professional setting? It is designed to accommodate thick, fuzzy yarns without shredding them. If you are sewing a heavy woollen coat and need to do decorative topstitching with a thicker silk or wool thread, a specialized topstitch needle on your machine will prevent thread breakage.

    For hand-finishing, a wool needle is essential for weaving in loose ends on knitted garments or joining knitted panels together. The blunt tip ensures you don’t split the yarn as you work. This attention to detail is what separates a hobbyist from a true artisan. Whether you are using a machine or working by hand, matching the needle to the weight and texture of your wool is a mark of a skilled maker.

    Quality and Precision: What is an Organ Needle for a Sewing Machine?

    When you invest in a high-quality sewing machine, the needles you use act as the direct interface between your creative vision and the fabric. One brand you will frequently encounter in professional circles is Organ. But what is an organ needle for a sewing machine in terms of its reputation?

    Organ is a Japanese company that has been manufacturing needles for over a century. They are the preferred choice for many industrial garment factories and high-end domestic machine manufacturers. When we talk about an ‘Organ needle’, we are talking about a standard of manufacturing that ensures the needle is perfectly straight, the eye is polished to prevent thread fraying, and the heat treatment ensures the perfect balance of flexibility and strength.

    Using high-quality needles like these reduces the risk of machine timing issues. A cheap, poorly made needle can have slight imperfections that cause it to strike the bobbin case or skip stitches. If you are currently mastering your first device, starting with premium needles is one of the best habits you can form. It ensures that any issues you encounter are likely due to technique rather than equipment failure.

    Our Unique Insight: The Philosophy of the Point

    In my years as a tutor, I have realised that the needle is not just a tool; it is a bridge. There is a philosophy to needle selection that goes beyond the technical manuals. We often think of sewing as ‘joining’ things, but at a microscopic level, sewing is about ‘negotiating’ space within the fabric’s structure.

    The unique insight I share with my intermediate students is that the needle’s point is a silent communicator. A sharp point ‘demands’ entry, which is perfect for woven fabrics where the threads are locked in a grid. A ball point ‘asks’ for entry, gently nudging aside the loops of a knit. When you start to view your fabric as a living structure rather than a flat surface, your needle choice becomes intuitive.

    This intuitive connection is what we foster in our archive of creative tutorials. Instead of just following a chart, ask yourself: “How does this fabric want to be treated?” A delicate silk chiffon needs a tiny, sharp needle to avoid snagging. A rugged denim needs a heavy, reinforced needle to punch through the indigo-dyed walls of the weave. Listen to your fabric, and the needle choice will follow.

    Actionable Strategy: The Stitch Portfolio

    To truly master the use of specialized needles, I encourage every student to create what I call a ‘Stitch Portfolio’. This is a physical record of your experiments and will become your most valuable reference guide.

    • Create Sample Swatches: Take a 10cm square of jersey and use a twin needle to hem it. Staple or sew this into a notebook.
    • Document the Data: Next to the swatch, write down the needle type (e.g., Twin Stretch 2.5/75), the thread brand, and the tension settings on your machine.
    • Test the Tension: If your twin needle hem is ‘tunnelling’ (forming a ridge between the two lines), note down how you adjusted the bobbin or top tension to fix it.
    • Compare Points: Sew a line with a universal needle and a line with a ball point needle on the same knit scrap. Pull the fabric hard. Note which one causes the thread to snap or the fabric to develop holes.

    By building this portfolio, you are not just learning; you are collecting evidence of your own growth. This strategy turns a theoretical understanding of “what is an 80 12 needle used for” into a practical, hands-on skill that you can rely on for years to come.

    The Practical Path: Transitioning to Advanced Needles

    Once you are comfortable with the basics, moving into advanced needlework requires a shift in how you manage your workspace. It is easy to lose track of which needle is currently in your machine, especially since the markings are so small they are nearly impossible to read once the needle is installed.

    Needle Management Systems

    I always recommend a simple ‘needle pin cushion’ system. Divide a small pincushion into sections using a fabric marker. Label the sections: Universal, Stretch, Ball Point, Denim, and Twin. When you remove a needle that still has life in it, place it in the correct section. This prevents you from accidentally using a sharp needle on a delicate knit later in the day.

    The Life Cycle of a Needle

    Many beginners make the mistake of using the same needle for months. In a professional studio, we change the needle after every eight hours of sewing time, or at the start of every new project. A dull needle works your machine’s motor harder, creates more noise, and damages your fabric. If you hear a ‘thudding’ sound as the needle enters the fabric, it is time for a change.

    Building Your Confidence in the Studio

    The jump from basic straight stitching to using a twin needle or a size 100 denim needle can feel intimidating. The machine sounds different, the threading is more complex, and the stakes feel higher. However, this is exactly where the most rewarding learning happens.

    If you find yourself hesitating, remember that every expert was once a beginner who wasn’t afraid to break a needle or two. In our studio, we celebrate the ‘oops’ moments because they are the fastest way to learn how the machine’s mechanics truly function. Whether you are aiming to sew your own wedding dress or simply want to repair a pair of favourite trousers, your willingness to experiment with different needles is what will get you there.

    Frequently Asked Questions (FAQ)

    What is a twin needle used for most effectively?

    A twin needle is most effectively used for hemming knit garments, such as T-shirts or leggings. Because the bobbin thread creates a zig-zag pattern on the back, the stitch is naturally elastic. This allows the hem to stretch as the wearer moves or pulls the garment on, preventing the thread from snapping. It is also excellent for decorative pintucks on lightweight woven fabrics like linen or cotton lawn.

    Can I use an 80/12 needle for all my projects?

    While an 80/12 needle is a fantastic universal choice for medium-weight fabrics, it is not suitable for everything. If you are working with very fine fabrics like silk or chiffon, you should switch to a 60/8 or 70/10 to avoid leaving large holes. Conversely, for heavy denim or multiple layers of canvas, you will need a 90/14 or 100/16 to ensure the needle doesn’t bend or break under the pressure.

    What is the main difference between a stretch needle and a ball point?

    The main difference lies in the design of the needle’s scarf and point. A ball point needle has a rounded tip designed to slide between the loops of standard knit fabrics like jersey. A stretch needle has a specialized scarf and a slightly less rounded tip, specifically engineered to prevent skipped stitches on high-stretch fabrics like Lycra, Spandex, or elasticated swimwear. Choosing the right one depends on the elastane content of your fabric.

    Conclusion

    Understanding the intricate details of needle selection is a vital part of your evolution as a sewist. From knowing what is a twin needle used for to appreciating the precision of an Organ needle for a sewing machine, these small choices culminate in a garment that is durable, comfortable, and beautiful. The world of textiles is vast and varied, and your needles are the guides that help you navigate every new fabric you encounter.

    As you continue your journey, keep your curiosity alive. Don’t be afraid to try a new needle size or experiment with a decorative twin-stitch hem. Every project is a lesson, and every stitch is a step toward mastery. Whether you are joining us for sewing classes London for beginners or taking on an advanced tailoring project, your expertise will flourish through practice and patience.

    About the Author: Grace, Founder of London Sewing Courses

    Grace is the heart and hands behind London Sewing Courses. A passionate and experienced sewing instructor, she founded the studio with a unique mission: to create a calm, friendly space for adults to learn and connect, while using the profits to fund free sewing classes for local children in need. Her personal expertise and commitment to community building are at the core of every class and every stitch.

    Sources

  • What Does E5 Mean on a Brother Sewing Machine?

    What Does E5 Mean on a Brother Sewing Machine?

    Key Takeaways

    • Safety Protocols: Error codes like E5 and E6 are protective mechanisms, often indicating a conflict between controls (like the foot pedal and Start/Stop button) or a physical jam protecting the motor.
    • E5 Specifics: This code typically signals a procedural error, such as pressing the foot controller while the machine is in a mode that doesn’t expect it, or a motor overload protection trigger.
    • The Tangle of E6: E6 usually points to a “thread nest” or motor lock, requiring you to check the bobbin area and re-thread the upper path.
    • Upper Thread Issues (E3): This code often relates to the needle bar position or the upper thread being broken or unthreaded.
    • The Function of SS: On mechanical models, “SS” stands for Stretch Stitch, a setting required to access flexible stitches for knit fabrics.
    what does e5 mean on a brother sewing machine

    There is a particular sinking feeling that every sewist, whether a novice or a seasoned tailor, knows all too well. You are in the flow, the fabric is feeding beautifully, and the rhythm of the needle is hypnotic. Then, suddenly—beep, beep, beep. The machine stops, and a cryptic combination of letters and numbers flashes on the LCD screen. It can feel like your creative partner has suddenly decided to speak a foreign language.

    If you are currently staring at a blinking display asking what does e5 mean on a brother sewing machine, take a deep breath. Your machine is not broken; it is simply communicating with you. As a tutor who has guided countless students through their first “technological tantrums” in our sewing classes North London, I can assure you that these codes are helpful guardians. They are there to prevent damage to the delicate internal mechanics of your machine—and to your masterpiece.

    In this guide, we will decode the language of Brother sewing machines. We will explore not just the specific meaning of E5, but also the common companions E3 and E6, and unravel the mystery of the “SS” setting. Think of this as a translation guide for your sewing journey, ensuring you can get back to what matters most: creating.

    what does e5 mean on a brother sewing machine

    The Language of Machines: Why Error Codes Exist

    Before we dive into the specific fix for the E5 error, it is helpful to understand the “psychology” of your sewing machine. Modern computerized machines are equipped with sensors that monitor tension, needle position, and motor resistance. When a code appears, the machine is essentially saying, “I have detected a condition that makes it unsafe or impossible to continue stitching.”

    This is actually a positive feature. In the days of purely mechanical vintage machines, a motor might keep running against a jam until a belt snapped or a gear stripped. Your modern Brother machine is smart enough to stop before that happens. So, rather than viewing the code as a failure, view it as a safety pause.

    Decoding the Primary Error: What Does E5 Mean on a Brother Sewing Machine?

    The E5 error is one of the most common interruptions, and interestingly, it is often caused by a simple misunderstanding between the user and the machine’s controls.

    The Conflict of Controls

    In most cases, answering what does e5 mean on a brother sewing machine brings us to the foot controller. On many computerized Brother models, E5 appears when the foot controller is pressed while the Start/Stop button is also being utilized, or if the machine is in a specific mode (like winding a bobbin or an automatic buttonhole sequence) where the foot pedal should be dormant.

    Essentially, the machine is confused. It is receiving input from two different sources—the automated button and your foot—and it doesn’t know which one to obey. To prevent erratic stitching, it halts and displays E5.

    The “Motor Overload” Scenario

    In some specific models, or if the control conflict isn’t the issue, E5 can indicate that the motor has locked due to a safety device activating. This happens if the fabric is too thick for the needle to penetrate, causing the motor to strain, or if a thread jam has physically stopped the mechanism from turning.

    Step-by-Step Recovery Strategy

    If E5 flashes on your screen, follow this gentle protocol:

    1. Release Everything: Take your foot off the pedal and stop pressing any buttons.
    2. Check Connections: If you intend to use the Start/Stop button (sewing without the pedal), ensure the foot controller is unplugged from the machine entirely. Most machines will not allow the button to function if the pedal is jacked in.
    3. Restart: Turn the machine off at the power switch. Wait for ten seconds to allow the internal computer to reset. Turn it back on.
    4. Test: Try to sew slowly on a scrap piece of fabric. If the error persists, check for a physical jam (see the section on E6 below).

    Our Unique Insight: The “User Error” Myth

    We often label these moments as “user error,” a phrase that carries a lot of blame. At our studio, we prefer to call them “workflow conflicts.” The E5 error often appears when a student is transitioning from one technique to another—perhaps moving from winding a bobbin back to sewing seams. The machine is simply reminding you to reset your physical setup. It is a prompt for mindfulness in your process, asking you to ensure your tools are aligned with your intent.

    The Tangle Below: What Does E6 Mean on a Brother Sewing Machine?

    If E5 is a communication error, E6 is almost always a physical one. When students ask what does e6 mean on a brother sewing machine, the answer usually involves the dreaded “bird’s nest.”

    The Anatomy of an E6 Error

    The E6 code signifies that the motor has locked because the thread is tangled. This usually happens in the bobbin area. You might not see it from above, but underneath the throat plate, the upper thread may have failed to complete its loop around the bobbin case, creating a snarl of thread that physically prevents the hook from rotating.

    How to clear an E6 Error safely

    Force is your enemy here. Never pull hard on the fabric if the machine is locked.

    1. Power Down: Turn the machine off immediately.
    2. Raise the Needle: Use the handwheel (turning it towards you) to lift the needle. If it won’t move, do not force it. You may need to cut the threads first.
    3. Access the Bobbin: Remove the plastic bobbin cover and the bobbin itself.
    4. Inspect the Race: You may need to unscrew the needle plate (the metal plate under the foot). Look for a clump of thread jammed in the “race” (the area where the bobbin case sits).
    5. Clean and Re-thread: Remove all stray threads. It is vital to re-thread the upper thread completely. A tangle below is often caused by the upper thread slipping out of the take-up lever.

    Actionable Strategy: The “Floss” Technique

    To prevent E6 errors, ensure your upper thread is “flossing” through the tension discs. When threading the machine, raise the presser foot first. This opens the tension discs. Pass the thread through, then lower the foot. You should feel a significant increase in resistance when you pull the thread. If you don’t feel that “hug” on the thread, the tension is loose, and an E6 tangle is inevitable.

    The Upper Path: What Does E3 Mean on Brother Sewing Machine?

    The E3 error is less dramatic than the E6 but equally frustrating. When you search for what does e3 mean on brother sewing machine, you are looking at an issue with the needle bar or the upper thread.

    The Broken Thread Sensor

    On many models, E3 indicates that the machine simply cannot detect the upper thread. This could mean:

    • The upper thread has snapped.
    • The spool is empty.
    • The thread has slipped out of the needle eye.

    The Needle Bar Position

    E3 can also trigger if you try to wind a bobbin or start a specific function while the needle is not in the correct “up” position. Modern machines need the needle to be at its highest point to begin a stitch cycle safely.

    The Fix

    1. Check the Needle: Is it bent? A slightly bent needle can rub against the foot or plate, triggering a safety stop. Replace the needle if you are unsure.
    2. Re-thread: As with the E6 error, completely re-thread the top path.
    3. Needle Up: Press the “Needle Up/Down” button to ensure the mechanism is reset to the starting position.

    Decoding the Dial: What Does SS Mean on Brother Sewing Machine?

    Moving away from digital error codes, we often encounter confusion regarding the physical dials on mechanical Brother machines. Students frequently ask what does ss mean on brother sewing machine when looking at the stitch length dial.

    The Realm of Stretch Stitches

    SS stands for Stretch Stitch. On mechanical machines, you will often see the stitch length dial numbered 0 to 4, and then a marking for “SS” (often coloured green or orange).

    When you turn the dial to SS, you are not changing the length of the standard stitches. Instead, you are unlocking a secondary bank of stitch patterns. If you look at your machine’s stitch chart, you will likely see two rows of diagrams. The top row is the standard stitch (accessed by lengths 1-4). The bottom row, often matching the colour of the “SS” on the dial, represents the stretch stitches.

    When to Use SS

    You should use the SS setting when sewing:

    • Knits and Jerseys: These stitches are designed to move with the fabric, preventing the seams from popping when the garment is stretched.
    • Reinforced Seams: The “Triple Straight Stitch” (found in the SS mode) sews two stitches forward and one back, creating an incredibly strong seam for crotches or armholes.
    • Decorative Effects: Many of the “vine” or “feather” stitches live in the SS bank.

    General Machine Health: Prevention is Better than Cure

    Understanding what does e5 mean on a brother sewing machine is useful, but avoiding the error entirely is better. In our sewing classes London for beginners, we teach that 90% of machine issues are caused by three things:

    1. Old Needles: Change your needle every 8-10 hours of sewing. A blunt needle pushes fabric into the machine rather than piercing it, causing jams (E6).
    2. Cheap Thread: Low-quality thread sheds lint, which clogs the sensors and tension discs.
    3. Lack of Dusting: Sewing creates “fluff.” If you don’t brush out the bobbin case regularly, that fluff builds up and triggers safety sensors.

    When to Seek Professional Help

    While clearing an E5 or E3 error is usually a home-fix, there are times when you need an expert. If your machine is making a loud clanking noise, smells hot, or if the error code persists despite a full reset and cleaning, it is time to stop.

    If you are based in the capital, looking into private sewing lessons London can be a great way to have a professional look at your machine usage. Sometimes, the issue isn’t the machine, but a subtle habit in how the fabric is being handled. For more serious mechanical failures, a certified Brother technician is required.

    Expanding Your Skills

    Once you have conquered the fear of error codes, the world of sewing opens up. You stop worrying about breaking the machine and start focusing on the art of construction. Whether you are looking to refine your tailoring with Intermediate London Sewing Courses for Adults or just want to understand the basics of how to sew and alter clothes, knowing your equipment is the first step.

    For those truly starting from scratch, reading a guide to beginner seamstress courses can help you choose the right learning environment. And remember, every expert was once a beginner who didn’t know what does e5 mean on a brother sewing machine.

    Frequently Asked Questions (FAQ)

    What does E5 mean on a Brother sewing machine?

    The E5 error code on a Brother sewing machine usually indicates a safety stop because the foot controller was pressed while the machine was in a mode that doesn’t allow it (like winding a bobbin), or the Start/Stop button was used while the foot pedal was connected. It can also signify a motor overload if the machine is struggling to pierce thick fabric. To fix it, stop sewing, unplug the foot pedal if you wish to use the button, or turn the machine off and on again to reset the sensor.

    What does E6 mean on a Brother sewing machine?

    E6 signifies a motor lock due to a thread tangle. This is often caused by the upper thread not being properly tensioned, leading to a “bird’s nest” of thread in the bobbin area. The machine stops to prevent the motor from burning out. You must turn off the machine, raise the needle, remove the bobbin case, and clear any jammed threads from the race area before re-threading carefully.

    What does E3 mean on a Brother sewing machine?

    E3 indicates an issue with the upper thread or needle bar position. It typically appears if the upper thread breaks, runs out, or slips from the needle eye. It can also happen if the needle is not fully raised when you try to start a new function. Re-thread the upper path ensuring the thread passes through the take-up lever, and use the handwheel to ensure the needle is in the highest position.

    What does SS mean on a Brother sewing machine dial?

    SS stands for “Stretch Stitch.” It is a setting on the stitch length dial of mechanical Brother machines. When you turn the dial to SS, the machine’s feed dogs move the fabric back and forth to create flexible stitches (like the triple straight stitch or honeycomb stitch) that are suitable for stretchy knit fabrics or decorative patterns.

    How often should I service my Brother sewing machine?

    You should clean the bobbin area (remove lint) after every major project. A full professional service is recommended every 12 to 24 months, depending on usage. If you are sewing daily or using heavy fabrics, an annual service ensures the timing remains perfect and prevents persistent error codes.

    Can I reset the machine to clear an error code?

    Yes, a “soft reset” often clears glitchy codes. Simply turn the power switch off, wait for at least 60 seconds to allow the capacitors to discharge, and then turn it back on. If the error was due to a temporary sensor confusion (like E5), this will often clear it. If the error is mechanical (like a jam causing E6), a reset won’t work until the physical obstruction is removed.

    Conclusion

    Navigating the digital alerts of a modern sewing machine can feel like learning a new dialect, but the answer to what does e5 mean on a brother sewing machine is simply a request for clarity. Your machine is asking you to choose between the foot pedal and the button, or to check that the path is clear for the needle to do its work.

    By understanding the distinctions between the procedural check of E5, the physical tangle of E6, and the setup requirements of E3 and SS, you transform from a passive operator into a master of your tools. Sewing is a partnership between you and the machine. Treat it with patience, keep it clean, and it will reward you with years of beautiful, uninterrupted stitching.

    If you are ready to take your skills beyond troubleshooting and into true garment creation, we would love to welcome you to our sewing classes London for adults. Until then, may your bobbins be full and your error codes be few.

    About the Author: Grace, Founder of London Sewing Courses

    Grace is the heart and hands behind London Sewing Courses. A passionate and experienced sewing instructor, she founded the studio with a unique mission: to create a calm, friendly space for adults to learn and connect, while using the profits to fund free sewing classes for local children in need. Her personal expertise and commitment to community building are at the core of every class and every stitch.

    Sources

  • What Embroidery Machine Can I Upload Own Design To?

    What Embroidery Machine Can I Upload Own Design To?

    Key Takeaways

    • Modern Compatibility: Most modern computerized embroidery machines from brands like Brother, Janome, and Bernina allow custom design uploads via USB or Wi-Fi.
    • Specialised Tooling: Understanding specific equipment, such as a merrow machine or a lockstitch machine, is vital for professional-grade garment finishing.
    • Functional Feet: Accessories like the hemmer foot and cording foot extend the capability of your domestic setup for decorative and functional edges.
    • Machine Scale: Choosing between a mid-arm quilting machine and a standard domestic model depends on the physical scale of your projects.
    what embroidery machine can i upload own design

    The transition from manual stitching to digital artistry often begins with one specific question: what embroidery machine can i upload own design to? For the modern maker, the ability to translate a digital illustration or a hand-drawn logo into a tactile piece of embroidery is the ultimate creative freedom. In the past, hobbyists were limited to the built-in patterns that came with their equipment. Today, the landscape has shifted entirely. Whether you are looking to monogram personal gifts or launch a small boutique, the UK market offers a wealth of “open” systems that welcome your unique files.

    Choosing the right equipment involves more than just looking at a screen; it requires understanding the ecosystem of sewing technology. From the precision of a lockstitch machine to the niche finish of a merrow machine, each tool serves a distinct purpose in your atelier. If you have ever wondered what does embroidery machine do beyond the basics, or how a mid arm quilting machine differs from your everyday setup, you are in the right place. Let us explore the technical marvels that turn fabric into a professional masterpiece.

    what embroidery machine can i upload own design

    The Simple Answer: Uploading Your Vision

    When asking what embroidery machine can i upload own design to, the answer lies in the connectivity features. Most mid-range to high-end computerized models now feature USB ports or wireless connectivity. Machines such as the Brother Innov-is series or the Janome Memory Craft range are specifically designed for this. You simply save your digitised design—usually in a format like .PES or .JEF—onto a memory stick, plug it into the machine, and select it from the touch-screen interface.

    However, the hardware is only half of the equation. To truly upload your own designs, you must first “digitise” them using software. This process converts an image file (like a PNG or JPEG) into a series of coordinates and stitch commands that the machine can read. Without this step, even the most expensive machine cannot interpret your artwork. For those just starting out, many seamstress courses now include modules on digital design to bridge this gap.

    Specialized Sewing Equipment: A Glossary for the Modern Maker

    To build a professional wardrobe or a successful craft business, you must look beyond the standard zig-zag stitch. The world of industrial and semi-industrial machinery can seem daunting, but each machine is a specialist that excels at a single, crucial task.

    What is a Lockstitch Machine Used For?

    The lockstitch is the most common mechanical stitch made by a sewing machine. So, what is a lockstitch machine used for exactly? It uses two threads, an upper and a lower (bobbin) thread, which lock together within the fabric. This creates a secure, flat, and durable seam that does not unravel easily. While your domestic machine does this, a dedicated industrial lockstitch machine provides incredible speed and the power to penetrate heavy denim or leather without skipping a beat. It is the backbone of garment construction.

    What is a Merrow Machine?

    If you have ever looked at the edge of a scout badge or a high-end patch, you have seen the work of a merrowing unit. What is a merrow machine? It is a specialized overlock machine used to create a “merrowed” edge—a very dense, narrow, and decorative overlock stitch. Unlike a standard serger which trims and finishes a seam inside a garment, the merrow machine is often used for external edges where the stitch itself is a design feature.

    What is a Mid Arm Quilting Machine?

    For those who find the throat space of a domestic machine too restrictive for large blankets, the question arises: what is a mid arm quilting machine? These machines sit in the sweet spot between a standard sewing machine and a massive 12-foot long-arm frame. They typically offer 16 to 18 inches of throat space, allowing you to manipulate large quilts much more easily. They are often mounted on a table but can sometimes be used on a frame, providing a significant upgrade for serious hobbyists.

    Actionable Strategy: Mastering Your Machine Today

    If you are feeling overwhelmed by the technical jargon, focus on these three small steps to improve your craft right now:

    1. Test Your File Compatibility: Before buying an embroidery machine, download a free trial of digitising software and see if you can export a file in the format your dream machine requires.
    2. Organise Your Feet: Identify every foot in your accessory box. If you find a hemmer foot, practice creating a 3mm rolled hem on a scrap of silk tonight.
    3. Audit Your Tension: Spend ten minutes adjusting your bobbin tension on your lockstitch machine. A perfectly balanced stitch is the difference between “homemade” and “handmade.”

    Our Unique Insight: The “Hidden” Versatility of Embroidery

    Most beginners ask what does embroidery machine do, assuming it is only for floral patterns or names on towels. Our unique perspective is that an embroidery machine is actually a precision placement tool for functional sewing. You can use custom designs to create “In-the-Hoop” (ITH) projects, where the machine stitches entire items—like pouches, keyrings, or even doll parts—automatically. By uploading your own “construction” designs rather than just “decorative” ones, you turn your embroidery unit into a miniature automated factory.

    Enhancing Your Finish with Specialist Feet

    Even a basic machine can perform advanced tasks if you use the right attachments. Two of the most misunderstood tools are the cording and hemmer feet.

    What Does Cording Foot Used For?

    When you want to add texture or a decorative braid to a garment, you need to know what does cording foot used for. This foot has grooves on the underside or holes on the top that guide thin cords, yarns, or embroidery floss under the needle. It holds the cords perfectly parallel so you can zig-zag over them. This is an elegant way to add “couture” details to cushions or the cuffs of a blouse.

    What is a Hemmer Foot?

    Fiddling with tiny, folded hems on lightweight fabrics can be frustrating. What is a hemmer foot? Also known as a rolled hem foot, it features a scroll-shaped metal guide that automatically folds the raw edge of your fabric twice as you sew. It produces a tiny, professional-grade hem that is nearly impossible to achieve by hand. Mastering this foot is a rite of passage for anyone attending London sewing courses for adults.

    The Practical Path: How to Learn to Use a Sewing Machine

    Deciding to invest in an embroidery or industrial machine is a big step. If you are a beginner, the most effective route is to learn to use a sewing machine on a high-quality domestic model first. Understanding the relationship between needle, thread, and tension is universal. Once you can confidently handle a standard machine, the transition to a computerized embroidery unit or a specialized lockstitch machine becomes intuitive.

    Choosing Online vs. In-Person Learning

    • In-Person Benefits: You get immediate feedback on your handling of the fabric and can try out different industrial machines without the upfront cost. Locations offering sewing classes North London provide access to expert tutors who can troubleshoot your specific machine issues.
    • Online Benefits: Perfect for learning the software side of “uploading your own designs.” You can pause and rewind tutorials on digitising at your own pace.

    Understanding the Investment: Is Specialized Gear Worth It?

    From a student’s perspective, the question isn’t just about the cost, but the “return on creativity.”

    • Efficiency: A lockstitch machine will save you hours of frustration when working on bulk projects.
    • Precision: Using a merrow machine for patches provides a finish that a domestic zig-zag simply cannot replicate.
    • Expansion: Knowing what embroidery machine can i upload own design to allows you to offer custom services, potentially turning a hobby into a side hustle.

    For many, starting with sewing classes london for beginners is the best way to test these machines before purchasing. It allows you to feel the power of an industrial motor and the precision of a digital screen under the guidance of a professional like Grace Barrett.

    Frequently Asked Questions (FAQ)

    What embroidery machine can I upload my own design to?

    Most modern computerized embroidery machines allow you to upload designs. Look for models with a USB port or Wi-Fi connectivity. Popular choices include the Brother PE800, Janome 500E, and Bernina 500. Ensure you have digitising software to convert your images into the specific file format required by your machine brand, such as .pes or .jef. This capability allows for total creative freedom in your projects.

    What is a lockstitch machine used for in garment making?

    A lockstitch machine is the primary tool for creating strong, straight seams. It uses two threads—one from the needle and one from the bobbin—to “lock” together inside the fabric layers. This makes it ideal for construction tasks like joining side seams, attaching waistbands, or topstitching. Industrial versions are highly valued for their incredible speed, durability, and ability to handle various fabric weights with consistent tension and precision.

    What does a cording foot do for decorative sewing?

    A cording foot is designed to hold and guide decorative cords, yarns, or threads as you sew over them. It features specific grooves that keep multiple strands of cord perfectly aligned and taut. This allows you to use a decorative or zig-zag stitch to secure the cords to your fabric surface. It is a fantastic tool for adding intricate textures, custom braiding, or piping effects to garments and home decor items.

    Should I get a mid-arm quilting machine or a long-arm?

    A mid-arm quilting machine is perfect for hobbyists who have limited space but want more room than a domestic machine offers. It typically provides 16–18 inches of throat space, allowing you to quilt larger projects with ease. A long-arm machine requires a large dedicated frame and much more floor space. For most home-based sewists, a mid-arm offers the best balance of increased capability without requiring a complete studio renovation.

    Is an online sewing course as effective as in-person?

    Online courses are excellent for learning technical software skills, such as digitising for embroidery machines. However, for physical tasks like learning to use a specialized lockstitch machine or mastering a hemmer foot, in-person classes are often superior. They provide tactile feedback and real-time corrections from a tutor. Combining both—online for theory and digital design, and in-person for hands-on machine mastery—usually yields the best results for developing students.

    Conclusion

    The answer to what embroidery machine can i upload own design to is just the beginning of a much larger journey into the world of textile technology. Whether you are exploring the rugged reliability of a lockstitch machine, the niche elegance of a merrow machine, or the expansive freedom of a mid arm quilting machine, your tools define the boundaries of your craft.

    By understanding what does embroidery machine do and mastering simple attachments like the hemmer foot or cording foot, you transform from a casual hobbyist into a skilled creator. The UK’s sewing community is vibrant and welcoming, offering everything from private sewing lessons London to community sewing blogs. If you have the passion to how to sew, the right machine is waiting to help your ideas take root and flourish.

    About the Author: Grace, Founder of London Sewing Courses

    Grace is the heart and hands behind London Sewing Courses. A passionate and experienced sewing instructor, she founded the studio with a unique mission: to create a calm, friendly space for adults to learn and connect, while using the profits to fund free sewing classes for local children in need. Her personal expertise and commitment to community building are at the core of every class and every stitch.

    Sources

  • Coverstitch Mastery: What Is a Coverstitch Machine Used For?

    Coverstitch Mastery: What Is a Coverstitch Machine Used For?

    Key Takeaways

    • The Professional Hem: A coverstitch machine creates the twin-needle look seen on store-bought t-shirts, but with far superior elasticity.
    • Stretch is Key: Understanding what is a coverstitch helps you realise why your standard sewing machine hems snap on activewear, while coverstitch hems do not.
    • Not an Overlocker: Distinguishing what does coverstitch machine do versus a serger is vital; one finishes edges, the other hems and decorates.
    • Versatility in Design: Learning what is a coverstitch used for opens doors to binding necklines, attaching elastic, and creating decorative chainstitches.
    • Hybrids Exist: Knowing what is a coverstitch on a serger helps you decide between buying two separate machines or one “combi” machine.
    what is a coverstitch machine used for

    The Quest for the Perfect Finish

    There is a familiar milestone in every dressmaker’s journey. You have successfully sewn a beautiful jersey dress or a pair of leggings using your overlocker (serger). The seams are neat, the fit is perfect, and you feel a swell of pride. Then, you reach the hem. You switch to your standard sewing machine, perhaps using a twin needle, and carefully stitch the bottom edge.

    It looks fine—until you stretch it. Snap. Or perhaps you wash it once, and the hem starts to tunnel, creating a ridge that looks distinctly “homemade.”

    This is the moment many of my students in our sewing classes North London ask me: “Grace, how do I get that shop-bought finish?” The answer lies in a specific, often misunderstood piece of equipment. If you want to elevate your garments from “crafted” to “couture,” you need to understand exactly what is a coverstitch machine used for. It is the secret weapon of the professional seamstress, designed to handle the modern wardrobe’s reliance on stretch fabrics with elegance and durability.

    what is a coverstitch machine used for

    What is a Coverstitch?

    Before we look at the machine, we must understand the stitch itself. So, what is a coverstitch?

    If you look at the hem of the t-shirt you are wearing right now, you will likely see two (or sometimes three) perfectly parallel rows of straight stitching on the outside. This looks deceptively simple, like a standard twin-needle stitch. However, if you turn the hem inside out, you will see a complex grid of interlocking thread that looks like a ladder or a chain.

    This is the looper thread. Unlike a lockstitch made by a domestic machine, which ties a top thread to a bobbin thread in a rigid knot, a coverstitch loops the threads together. This looping action gives the stitch an incredible amount of “slack.” It allows the fabric to stretch significantly without breaking the thread, snapping back into shape perfectly when released.

    Unpacking the Tool: What Does Coverstitch Machine Do?

    To the uninitiated, this machine looks remarkably like an overlocker. It has multiple thread cones (usually three or four) and looks “industrial.” But what does coverstitch machine do that makes it so unique?

    The primary function of a coverstitch machine is to hem knit fabrics while retaining their stretch. It covers the raw edge of the fabric on the underside (inside the hem) with that looper thread, protecting it from fraying, while simultaneously creating a topstitch on the outside.

    In my sewing classes London for beginners, I often explain it this way: An overlocker constructs the garment (seams), but a coverstitch finishes it (hems). It does not have a cutting blade like an overlocker, meaning you can stitch in the middle of a fabric piece without fear of slicing a hole in your work. This capability is what makes it indispensable for professional-looking activewear, swimwear, and lingerie.

    Beyond Hemming: What is a Coverstitch Used For?

    Once you have mastered the basic hem, you might wonder what is a coverstitch used for regarding creative design. It is far more than just a “hemmer.”

    • Binding Necklines: With a binder attachment, you can fold and stitch a strip of fabric over a raw neckline edge in one smooth pass. This is the standard finish for bodysuits and vest tops.
    • Attaching Elastic: You can sew elastic directly onto fabric (like a waistband) using a coverstitch. The stitch stretches with the elastic, preventing that tight, restricting feeling you often get with rigid stitching.
    • Decorative Chainstitching: If you use only one needle, the machine produces a strong, beautiful chainstitch. This is often used for decorative jeans stitching or for basting (temporarily holding fabric together) because it is very secure but easy to unravel if you pull the correct thread tail.
    • Flat Seams: You can create flat, athletic-style seams (often seen on yoga pants) by stitching over a seam allowance to flatten it, reducing bulk and friction against the skin.

    Hybrid Machines: What is a Coverstitch on a Serger?

    This is where terminology can get a little “fuzzy” for students looking to buy their first machine. You might see machines advertised as “Combi” or “Hybrid” models. So, what is a coverstitch on a serger?

    Some manufacturers combine both functions into one unit. These machines can be converted from an overlocker (which cuts and seams) to a coverstitch (which hems). You typically have to deactivate the cutting blade, change the needle plate, and re-thread the entire machine.

    While these save space, I often advise students in our London sewing courses for adults to be cautious. The conversion process can be fiddly and time-consuming. If you are switching back and forth five times during one project, it can kill your “sewing mojo.” However, for those with limited space in their London flats, a high-quality combination machine is a powerful solution.

    Clarifying Terminology: What is a Coverstitch Serger?

    You may hear the term “coverstitch serger” thrown around in forums or online shops. Strictly speaking, what is a coverstitch serger? It is often a misnomer or a shorthand for the combination machines mentioned above.

    In the industry, we keep them distinct:

    • Serger (Overlocker): Cuts and seams edges. Uses 2 loopers.
    • Coverstitch: Hems and topstitches. Uses 1 looper (usually).

    If you see a machine labelled as a “Coverstitch Serger,” it is almost certainly a combination machine. Always check the specifications to see if it requires a conversion process.

    Our Unique Insight: The “End-of-Stitch” Dance

    The most common frustration I see during private sewing lessons London is removing the fabric from the machine. Unlike a regular sewing machine, you cannot just pull the fabric to the back and cut. If you do, the stitches will unravel instantly.

    I teach a specific “dance” to end your coverstitch cleanly:

    1. Raise the needles to their highest position.
    2. Lift the presser foot.
    3. Sweep tool: Take a thin tool (like tweezers or an allen key) and sweep it behind the needle threads, pulling them forward towards you to create slack.
    4. Cut the top threads: Snip these loops you have pulled forward.
    5. Pull back: Firmly pull the fabric straight back behind the machine. This action pulls the cut top threads through to the underside and locks them with the looper thread.

    Mastering this small manoeuvre is the difference between a secure hem and one that unravels in the wash.

    Actionable Strategy: The “Test Drive” Protocol

    Before you invest in a coverstitch machine, or if you have one gathering dust, try this strategy to build confidence.

    1. Fabric Match: Gather scraps of jersey, fleece, and Lycra.
    2. The Differential Feed: Locate the differential feed dial on the machine. This controls how the feed dogs move.
      • Set it to 1.0 for standard fabric.
      • Set it to 1.5 or higher if your fabric is stretching out and looking “wavy” (common with thin knits).
      • Set it to 0.7 if you want to create a “lettuce edge” ruffle effect.
    3. The Twin Needle Comparison: Sew a hem on a scrap with your sewing machine’s twin needle, and another with the coverstitch. Stretch them both to their limit. You will instantly feel the difference in resistance. The coverstitch will yield; the twin needle will likely “lock” or snap.

    Frequently Asked Questions (FAQ)

    Is a coverstitch machine difficult to thread?

    It can be intimidating at first because of the looper system, which requires a specific path. However, unlike an overlocker, the looper on a coverstitch machine is much easier to access. Most modern machines have colour-coded guides. Once you have done it three times, it becomes muscle memory. I always recommend tying your new thread to the old thread and pulling it through to save time.

    Can I just use a twin needle instead?

    You can, and for woven fabrics or loose knits, a twin needle is perfectly adequate. However, for high-stretch garments like gym leggings or swimwear, a twin needle stitch often lacks the necessary elasticity. It is also more prone to “tunnelling,” where the fabric creates a raised ridge between the stitches. A coverstitch machine solves both of these mechanical issues.

    Does a coverstitch machine cut the fabric?

    No, it does not. This is the primary difference between it and a serger (overlocker). Because it has no blade, you can use it in the middle of a garment for decorative stitching or pocket attachment. If you are hemming, you usually fold the hem up, stitch, and then trim away any excess fabric on the underside afterwards with sharp scissors.

    Do I need special thread for a coverstitch machine?

    You can use standard sewing thread in the needles, but for the looper (the bottom thread), many professional seamstresses recommend “woollie nylon” or textured nylon thread. This thread spreads out like yarn, providing even better coverage and softness against the skin, which is particularly nice for children’s clothing or underwear.

    Conclusion

    Deciding to introduce a coverstitch machine into your studio is a significant step. It signals a move from “making clothes” to “engineering garments.” By understanding exactly what is a coverstitch machine used for, you empower yourself to tackle fabrics that might have previously intimidated you.

    Whether you are looking to master these skills in our London sewing courses for adults or are simply reading our sewing blog to refine your technique, remember that every machine is just a tool waiting for your creativity to guide it. The coverstitch might seem complex, but its purpose is simple: to give your hard work the professional, durable finish it deserves.

    About the Author

    Grace Barrett is the founder and lead tutor at London Sewing Courses. With a background in professional tailoring and a passion for teaching, Grace specialises in demystifying complex sewing techniques for her students. From her welcoming studio in North London, she runs everything from sewing classes London for beginners to advanced seamstress courses. She believes that with the right patience and the right tools, anyone can how to sew and alter clothes to a professional standard.

    Sources

  • The Advanced Finisher: When and Why to Get a Coverstitch Machine

    The Advanced Finisher: When and Why to Get a Coverstitch Machine

    Key Takeaways

    • Professional Hems: Understanding what does a coverstitch do reveals the secret to store-quality finishes on t-shirts and activewear.
    • Superior Stretch: A coverstitch provides essential elasticity, ensuring seams do not pop when the fabric is pulled or worn.
    • Dual-Sided Beauty: Learning what does a coverstitch look like helps you identify the distinctive parallel topstitching and looper underside.
    • Specialist Tooling: Knowing what does a coverstitch sewing machine do distinguishes it from a standard overlocker or domestic machine.
    • Creative Versatility: Beyond basics, exploring what can you do with a coverstitch machine opens doors to decorative chainstitching and binding.
    what can a coverstitch machine do

    The Journey to Professional Perfection

    There is a specific moment in every sewist’s journey—perhaps while you are attending sewing classes London for beginners or finishing your first jersey dress at home—where you look at your hem and notice it doesn’t quite match the clothes in your wardrobe. You might have used a twin needle or a zig-zag stitch, but the finish lacks that crisp, industrial “bounce.” This is the moment you begin to wonder: what can a coverstitch machine do to elevate my work?

    As your tutor, I often see students reach this crossroads. You have mastered the basics of how to sew, and your confidence is growing. You are no longer just making “home-made” clothes; you are crafting a bespoke wardrobe. To bridge that final gap between amateur and professional, we must look at specialist machinery. While a standard sewing machine is your versatile workhorse, a coverstitch machine is your specialist finisher.

    In our sewing classes North London, we celebrate the “finished” look. It is the difference between a garment that looks like a craft project and one that looks like a high-end boutique find. Let us explore the magic of this machine together, with the patience and detail your creative journey deserves.

    what can a coverstitch machine do

    Defining the Finish: What Does a Coverstitch Do?

    To understand the value of this investment, we must first ask: what does a coverstitch do that my other machines cannot? In its simplest form, a coverstitch machine is designed to hem knit fabrics while maintaining their stretch.

    Unlike a standard lockstitch from a domestic machine, which is rigid, a coverstitch creates a loop of thread on the underside. This looper thread allows the seam to expand and contract along with the fabric. If you have ever put on a t-shirt and heard the “pop” of a hem snapping, it is likely because it was sewn with a non-stretchy stitch. The coverstitch eliminates this frustration, providing a professional, durable, and flexible finish that moves with your body.

    The Secret to Longevity

    Beyond just aesthetics, what does a coverstitch machine do for the lifespan of your clothes? It encapsulates the raw edge of the fabric on the underside while simultaneously stitching the hem in place. This prevents fraying and ensures that even after dozens of washes, your hems remain flat, secure, and looking brand new.

    Visual Identity: What Does a Coverstitch Look Like?

    If you were to walk into a high-street shop and turn a t-shirt hem inside out, you would see exactly what does a coverstitch look like. On the “right” side (the front of the garment), it typically appears as two or three perfectly parallel rows of straight stitching. These rows are impeccably spaced and look much cleaner than the slight wobbles often produced by a twin needle on a domestic machine.

    On the “wrong” side (the inside), the magic happens. You will see a grid-like or “laddered” pattern of interlocking threads. This is the looper thread. It covers the raw edge of the fabric—hence the name “coverstitch.” If you are curious about what does a coverstitch sewing machine do differently, look at the underside; it provides a comprehensive “overlocked” finish that a standard sewing machine simply cannot replicate.

    Understanding the Tool: What Does a Coverstitch Machine Do?

    It is common for those in London sewing courses for adults to confuse a coverstitch machine with an overlocker (serger). While they look similar, their functions are distinct. So, what does a coverstitch sewing machine do that an overlocker doesn’t?

    An overlocker is designed to join two pieces of fabric together while cutting off the seam allowance. A coverstitch machine, however, does not have a blade. It is used primarily on a single layer of fabric that has been folded over to create a hem. It creates a professional finish on the edge without cutting anything away.

    In our intermediate London sewing courses for adults, we often use both in tandem. You might construct the garment on the overlocker and then move to the coverstitch for the neckline, sleeve cuffs, and bottom hem. It is the ultimate duo for anyone serious about working with jerseys, sweatshirt fabrics, or athletic wear.

    Creative Potential: What Can You Do with a Coverstitch Machine?

    Once you have mastered the basics, you will begin to ask: what can you do with a coverstitch machine beyond just hemming? The versatility of this machine is often underestimated.

    • Decorative Chainstitching: By using only one needle, you can create a beautiful chainstitch. This is perfect for decorative topstitching on denim or for creating removable “basting” lines.
    • Attaching Binding: With a binder attachment, your machine can wrap a strip of fabric around a raw edge (like a neckline) and stitch it down perfectly in one pass.
    • Flat-felled Seams: You can use the machine to create decorative flat seams on the outside of garments, a popular look in activewear and “athleisure.”
    • Elastic Attachment: It is excellent for sewing elastic directly onto fabric, as the stitch will stretch perfectly with the elastic without snapping.

    When you learn to use a sewing machine, you start with the “how.” When you move to a coverstitch, you start with the “why”—why do I want this finish, and how can I make this garment look truly world-class?

    Our Unique Insight: The “Tension Harmony” Technique

    In my years of providing private sewing lessons London, I have noticed that the biggest hurdle with coverstitch machines isn’t the threading—it’s the tension. Most students treat tension as a set-it-and-forget-it dial. However, at our sewing classes North London, I teach the “Tension Harmony” technique.

    Because a coverstitch uses so much thread in its looper, the balance between the top needles and the bottom looper is delicate. My unique insight is this: always “over-thread.” If you feel the stitch is too tight, don’t just turn the dial; check that the thread is seated deeply in the tension discs. Often, a “bad” stitch is simply a thread that hasn’t “clicked” into place. By learning to feel the resistance of the thread as you pull it through, you gain a sense of control that no manual can provide. It is this tactile intuition that transforms a student into a master.

    Actionable Strategy: The Pro-Hem Checklist

    If you are ready to experiment with professional finishes today, follow this actionable strategy. You don’t need a coverstitch machine to start thinking like a pro; you can apply these rules to your current seamstress courses work:

    1. The Pressing Rule: Never hem a knit fabric without pressing the fold first. Use a hem gauge to ensure it is perfectly even (usually 2cm or 2.5cm for t-shirts).
    2. The Stabiliser Secret: If your fabric is very fine or “slinky,” use a wash-away stabiliser or a hem tape. This prevents the “tunnelling” (the ridge between the two lines of stitching) that can occur on coverstitch machines.
    3. The Tail-End Technique: When finishing a coverstitch, you cannot simply backstitch. You must pull the top threads through to the back and tie them off manually to prevent the chain from unraveling.
    4. Test Your Stretch: Before sewing your final garment, sew a 10cm test strip. Pull it hard. If the thread breaks, your tension is too tight or your stitch length is too short.

    Enhancing Your Skills: Different Types of Sewing Machine

    As you broaden your horizons, you will realise that your sewing room can become a sanctuary of specialist tools. When students ask what are different types of sewing machine, they are often looking for the next step in their education.

    • The Domestic Machine: Your starting point for all sewing classes London for beginners. Great for buttonholes and woven fabrics.
    • The Overlocker: The next step for anyone who loves making clothes. It finishes seams and handles knits beautifully.
    • The Coverstitch: The final piece of the puzzle for professional garment finishing.
    • The Heavy-Duty Machine: Essential if you want to how to sew and alter clothes made of leather, denim, or heavy canvas.

    Each machine has a personality. In our private sewing lessons London, we help you find the machine that matches your creative voice.

    Frequently Asked Questions (FAQ)

    What does a coverstitch machine do that a twin needle can’t?

    While a twin needle on a standard machine mimics the look of a coverstitch, it lacks the looper thread on the back. A twin needle creates a zig-zag on the underside which often results in “tunnelling”—where the fabric bunches up into a ridge. A coverstitch machine remains flat and provides much more “give” or stretch, ensuring the hem doesn’t snap when the garment is under tension.

    Do I really need a coverstitch machine for my sewing blog projects?

    If you primarily sew woven fabrics like cotton or linen, a coverstitch isn’t necessary. However, if your sewing blog focuses on modern wardrobes, t-shirts, leggings, or swimwear, a coverstitch machine is a game-changer. It significantly reduces the time spent hemming and provides a finish that is indistinguishable from professional ready-to-wear clothing, which is vital for high-quality content.

    What does a coverstitch look like on different fabrics?

    On lightweight jerseys, it looks like two delicate, flat rows of stitching. On thicker fabrics like fleece or French Terry, you can use a three-needle “wide” coverstitch for a sportier, more robust look. You can also flip the fabric and sew with the looper side facing up for a decorative, industrial “flatlock” effect often seen on high-end sweatshirts and gym gear.

    Is it difficult to learn how to use a coverstitch sewing machine?

    It requires a bit more patience than a standard machine, especially regarding threading and tension. However, in our sewing classes London for adults, we find that once a student understands the “path” of the thread, it becomes second nature. The key is to practice on scraps and learn how to secure the ends of the stitches, as they do not backstitch like regular sewing machines.

    Conclusion

    The transition from beginner to intermediate sewist is marked by a growing appreciation for the “unseen” details. Understanding what does a coverstitch do is a vital part of that growth. It represents a commitment to quality, durability, and professional standards. Whether you are browsing a sewing blog for inspiration or looking to enrol in intermediate London sewing courses for adults, remember that your tools are there to support your vision.

    A coverstitch machine is more than just a hemming tool; it is an invitation to explore the world of high-stretch fabrics and professional tailoring. As you continue your creative journey, stay curious, stay patient, and never be afraid to invest in the skills and tools that make your handmade wardrobe shine.

    About the Author: Grace, Founder of London Sewing Courses

    Grace is the heart and hands behind London Sewing Courses. A passionate and experienced sewing instructor, she founded the studio with a unique mission: to create a calm, friendly space for adults to learn and connect, while using the profits to fund free sewing classes for local children in need. Her personal expertise and commitment to community building are at the core of every class and every stitch.

    Sources