Key Takeaways
- Understanding your tools reduces frustration and helps your creative skills take root.
- Matching the size of your device to the eye of your needle prevents accidental breakages.
- Cutting your cotton on a sharp angle helps it slip cleanly through the mechanism.
- Sturdier tools with hidden hooks offer wonderful stability for those with tired hands.
- Proper lighting and a calm environment are essential for a successful stitching session.

Welcome to your creative journey. Threading a tiny metallic eye can often feel like trying to plant a delicate seed in a stubborn patch of dry soil. You might squint your eyes, adjust your bright lamp, and still find the task deeply frustrating. We completely understand this very common struggle. Learning how to use a needle threader for hand sewing truly transforms this tricky chore into a joyful, effortless moment.
This simple device acts as a gentle support system. It helps your beautiful hobby blossom without any unnecessary stress. When you remove the initial barrier of preparation, your mind is free to focus purely on the joy of creating. We are here to guide you patiently through every single step. Together, we will explore the different varieties available and discover the perfect method for your unique needs. Let us nurture your confidence and watch your wonderful skills grow. If you wish to build a strong foundation, you can always explore structured guidance with our friendly team.
Understanding the Basics: How Do Needle Threaders Work?
Before we explore the specific varieties, we must first understand the core principle. You might frequently wonder, how do needle threaders work? The concept is beautifully simple and incredibly clever. Most devices feature a highly flexible loop or a tiny, rigid hook. This fine element easily slips through the incredibly narrow opening of your metal tool. It creates a much larger, temporary target for you to use.
A needle threader is a small device that helps pull yarn through the eye of a needle. You simply slip your delicate fibre through this spacious new opening. Then, you gently pull the device back out, bringing the soft fibre completely with it. It is a wonderfully elegant solution to a very old, frustrating problem. It acts like a wide funnel, guiding the fragile strands safely to their destination.
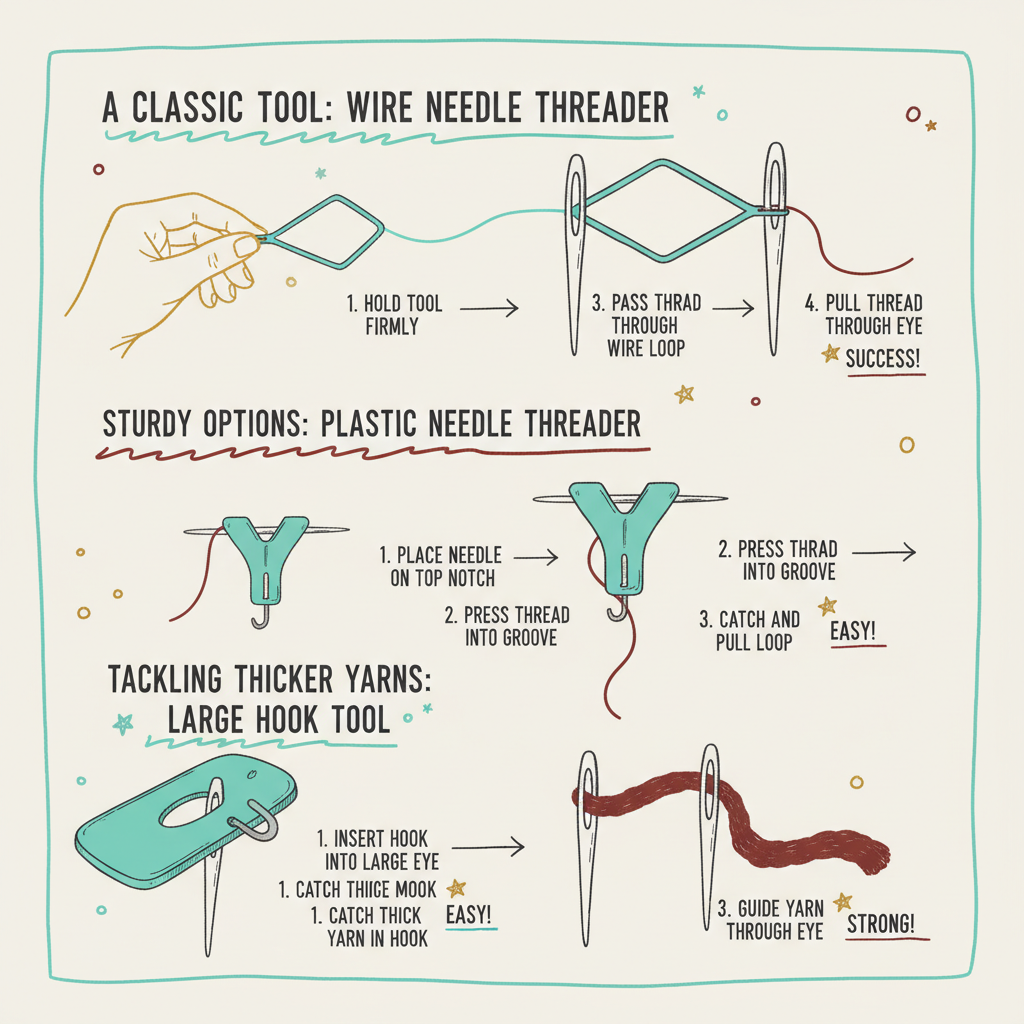
A Classic Tool: How Do You Use a Wire Needle Threader?
Many classic sewing boxes include a small piece of stamped metal attached to a delicate, diamond-shaped filament. Understanding how do you use a wire needle threader is a truly foundational skill for any maker. First, hold your equipment firmly between your thumb and forefinger in your non-dominant hand. Hold the stamped metal base lightly in your other hand.
Carefully guide the flexible diamond shape directly through the tiny metal eye. It will compress slightly as it passes through the tight space. Once the diamond emerges fully on the other side, it will pop back into its wide, open shape. Now, take the clean end of your cotton or polyester strand. Pass it straight through the wide opening of the delicate diamond.
You only need to insert about an inch of the strand. Finally, gently pull the metal base back away from the eye. The delicate wire will catch your strand and drag it cleanly through the opening. You have successfully planted your first beautiful stitch!
Sturdy Options: How Do You Use a Plastic Needle Threader?
Sometimes, delicate metallic filaments bend or snap completely under slight pressure. If you encounter this sad situation, you might ask, how do you use a plastic needle threader? These robust, modern tools usually feature a sturdy Y-shaped top with a tiny metal hook hidden safely inside a groove. They offer fantastic stability and last for a wonderfully long time.
They are absolutely perfect for older hands or anyone who struggles with fine motor control. To use this sturdy variety, place your needle horizontally across the top notch. The eye must rest exactly over the hidden hook. Next, lay your strand of cotton tightly across the groove. Gently push down on the strand.
The hidden hook grabs the soft fibre and pushes it neatly through the opening. Lift your tool away carefully, and a neat loop will appear on the other side. Catch this lovely loop with your fingers and pull it completely through. This reliable method ensures your crafting sessions grow steadily without any interruption.
Tackling Thicker Yarns: How to Use a Needle Threader Tool
When working with heavy wool or thick decorative strands, standard delicate options might fail entirely. Knowing how to use a needle threader tool designed specifically for heavier fibres is essential. These chunky varieties often resemble small, flat plates with a large, rigid hook at one end. They handle thick, unruly materials beautifully, allowing you to create rich, textured textiles.
Insert the rigid hook straight through the large eye of your tapestry or chenille tool. Catch your heavy wool securely inside the deep crook of the hook. Keep the tension slightly taut to prevent slipping. Carefully draw the rigid hook backwards. The smooth metal will guide the chunky wool flawlessly through the opening.
This gentle technique prevents heavy fibres from fraying or splitting at the delicate root. Choosing the right tool acts exactly like feeding a plant high-quality nutrients. The results are always much more vibrant and impressively strong. If you want to expand your techniques, you can easily learn to adjust garments gracefully as your patience improves.
Explore Embroidery and Quilting
Get creative with embroidery classes near me and learn about the rich craft through our hand embroidery history and embroidery London UK. If quilting is your passion, find quilting near me workshops designed to inspire. Our welcoming classes are perfect for all levels, helping your stitching skills grow naturally.
Decorative Stitches: How to Use a Needle Threader for Embroidery
Decorative stitching requires a very different, careful approach. You will likely use stranded cotton, which consists of six tiny individual threads grouped together. If you are learning how to use a needle threader for embroidery, you need a slightly softer touch. A wide, flat aluminium tool works perfectly here.
Push the flat metal tip entirely through your long embroidery eye. Thread your separated strands neatly through the large hole in the aluminium tip. Pinch the loose strands gently against the flat metal to keep them perfectly aligned. Slowly pull the flat tip back through the eye.
Pulling too quickly can cause the delicate individual strands to tangle and form a tight knot. Patience allows your intricate decorative work to flourish beautifully. Take your time to study your supplies. This knowledge acts as the strong foundation for your growing skills.
Our Unique Insight: The Root of Frustration-Free Stitching
We view these tiny tools as much more than simple metal gadgets. They represent a vital bridge between frustration and pure creative freedom. Many talented individuals abandon hand stitching simply because they cannot easily prepare their equipment. This tiny piece of metal removes a massive, daunting barrier. It allows your creativity to blossom completely unhindered.
We strongly encourage our students to view their tools as faithful companions. Taking the time to fully understand your equipment builds deep, lasting confidence. When you respect your tools, they reward you with incredibly reliable performance. Your skills branch out naturally when you remove unnecessary daily obstacles. Proper guidance acts like essential sunlight for a growing plant. You might even develop your foundation to help nurture your new passion alongside others.
Actionable Strategy: Cultivating Good Threading Habits
You can improve your daily technique immediately with one very simple habit. Always cut your cotton on a sharp, forty-five-degree angle using sharp scissors. Never bite or tear the delicate end. Tearing creates tiny, microscopic frayed edges that resemble a badly damaged root. These frayed edges snag incredibly easily on the delicate wire of your device.
Additionally, lightly run the cut end of your cotton over a piece of natural beeswax. This smooths down any stray fibres and creates a perfectly stiff tip. A stiff, angled tip slides effortlessly through the diamond opening. This small act of preparation saves precious time and keeps your materials in pristine condition.
It is a wonderful habit to cultivate early on. Maintaining a tidy workspace also prevents tiny devices from vanishing quickly among colourful fabric scraps. Ensure your hands are clean and free from sticky lotions. Clean hands keep your beautiful materials in pristine condition. You can discover our collection of insights for more gentle tips like this one.
Stepping Stones: How Do You Use a Needle Threader for Beginners?
Starting a new hobby feels deeply exciting but sometimes slightly daunting. Many novices ask us, how do you use a needle threader for beginners without becoming totally overwhelmed? We always advise starting your journey with high-quality supplies. A cheap, flimsy device will bend instantly, causing deep and unnecessary frustration.
Invest in a sturdy, reliable tool from a trusted haberdashery. It acts as the rich soil in which your new skills will confidently grow. Make sure you have excellent lighting before you begin. Sit near a bright window or use a dedicated daylight lamp. Good visibility prevents you from forcing the tool and causing accidental damage.
Always ensure your cotton strand has a clean, crisp cut at the very end. Frayed ends simply refuse to pass smoothly through the tiny mechanism. By preparing your environment carefully, your sewing journey takes root in positive, wonderfully calm conditions.
The Joy of Slow Stitching
Hand sewing invites us to slow down our busy lives. It asks us to focus deeply on one tiny, beautiful action at a time. Using a helpful tool allows you to sink into this peaceful mindset much faster. You do not waste precious energy fighting with your equipment. Instead, you pour your heart directly into the fabric.
This slow, methodical practice is incredibly soothing for the mind. It resembles the quiet joy of watering a beloved garden. You watch something beautiful take shape right beneath your hands. Embrace the gentle pace. Let every single stitch anchor you softly into the present moment. If you enjoy this peaceful environment, explore bespoke guidance to share the joy with friendly faces.
Frequently Asked Questions (FAQ)
Why does my wire threader keep breaking?
Delicate diamond loops break when you forcefully push them through a hole that is too small. You must always ensure you match the size of your device to your specific equipment. Pulling too hard on thick yarn will also snap the delicate mechanism instantly. Treat the tiny mechanism gently, just like a fragile seedling. It will serve you reliably for a very long time.
Can I use this tool for a sewing machine?
Yes, you certainly can use these wonderful little tools for machine work. Many modern machines feature built-in mechanisms, but a simple handheld wire device works perfectly on older models. Simply guide the flexible diamond through the machine needle from front to back. Pass your cotton through the open loop, and gently draw it backwards. This saves tremendous time during your creative sessions.
What if the wire will not fit through the eye?
If the diamond loop refuses to pass cleanly through the tight opening, you are likely using the wrong size needle. Never force the delicate metal, or it will snap completely. Switch to a slightly larger eye, such as a sharp or a lovely crewel needle. Finding the perfect pairing allows your crafting process to flow smoothly. This prevents unnecessary resistance or frustrating breakages.
Should I wet the thread before using the tool?
Wetting the cotton strand with your mouth is a very common old habit. However, it is certainly not the best practice for modern sewing. Saliva breaks down the natural fibres over time and makes the tip swell slightly. Instead, use a clean, sharp pair of scissors to cut a neat angle. Running the tip softly through natural beeswax provides perfect stiffness without damaging your beautiful materials.
Conclusion
We truly hope this gentle guide has illuminated exactly how to use a needle threader for hand sewing in your daily practice. It is such a small tool, yet it offers immense support for your creative growth. By understanding the different varieties and treating them with care, you remove the biggest hurdle to hand stitching. Remember to approach your hobby with patience and a very kind heart.
Every time you successfully guide that delicate strand through the eye, you are planting the seed for a beautiful new creation. Take your time, enjoy the peaceful rhythm of the needle, and watch your wonderful talents flourish. If you ever feel stuck, please reach out for support for a little extra encouragement.
About the Author: Grace, Founder of London Sewing Courses
Grace is the heart and hands behind London Sewing Courses. A passionate and experienced sewing instructor, she founded the studio with a unique mission: to create a calm, friendly space for adults to learn and connect, while using the profits to fund free sewing classes for local children in need. Her personal expertise and commitment to community building are at the core of every class and every stitch.