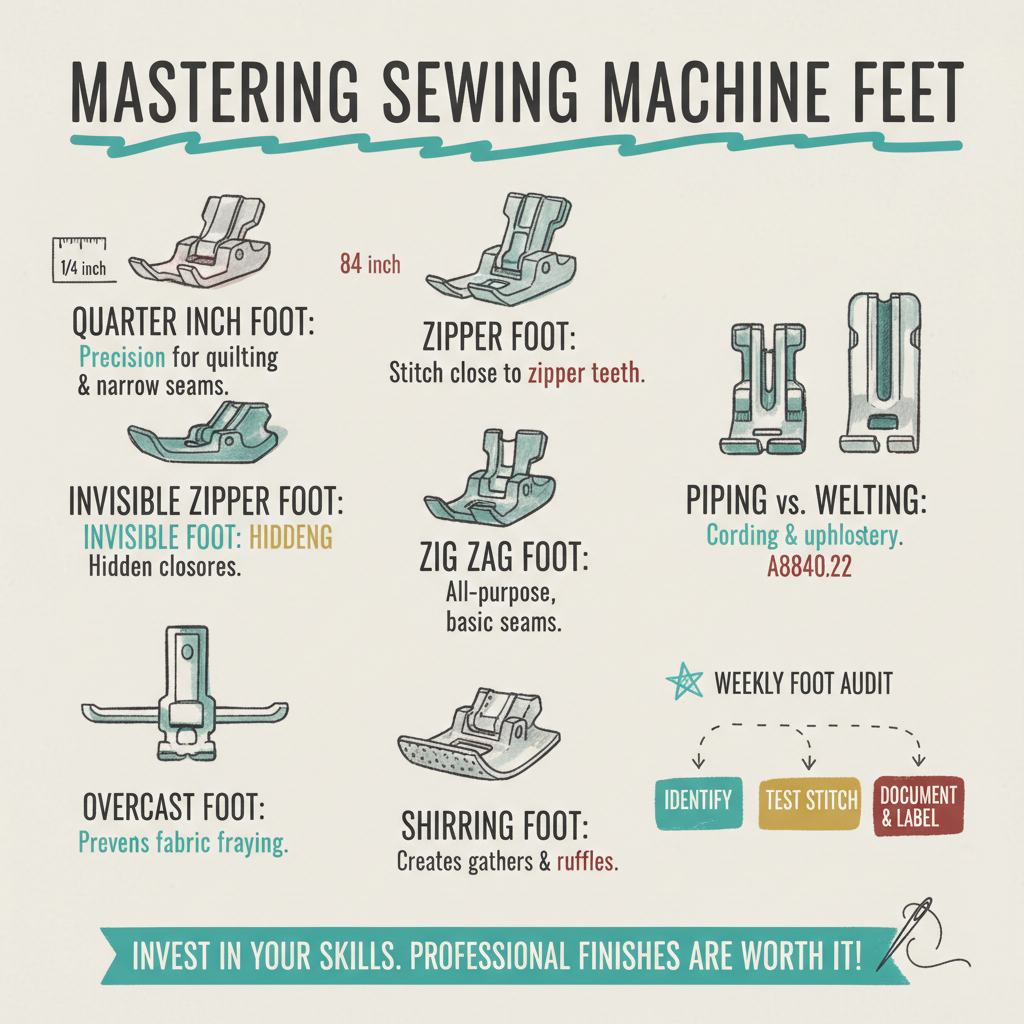
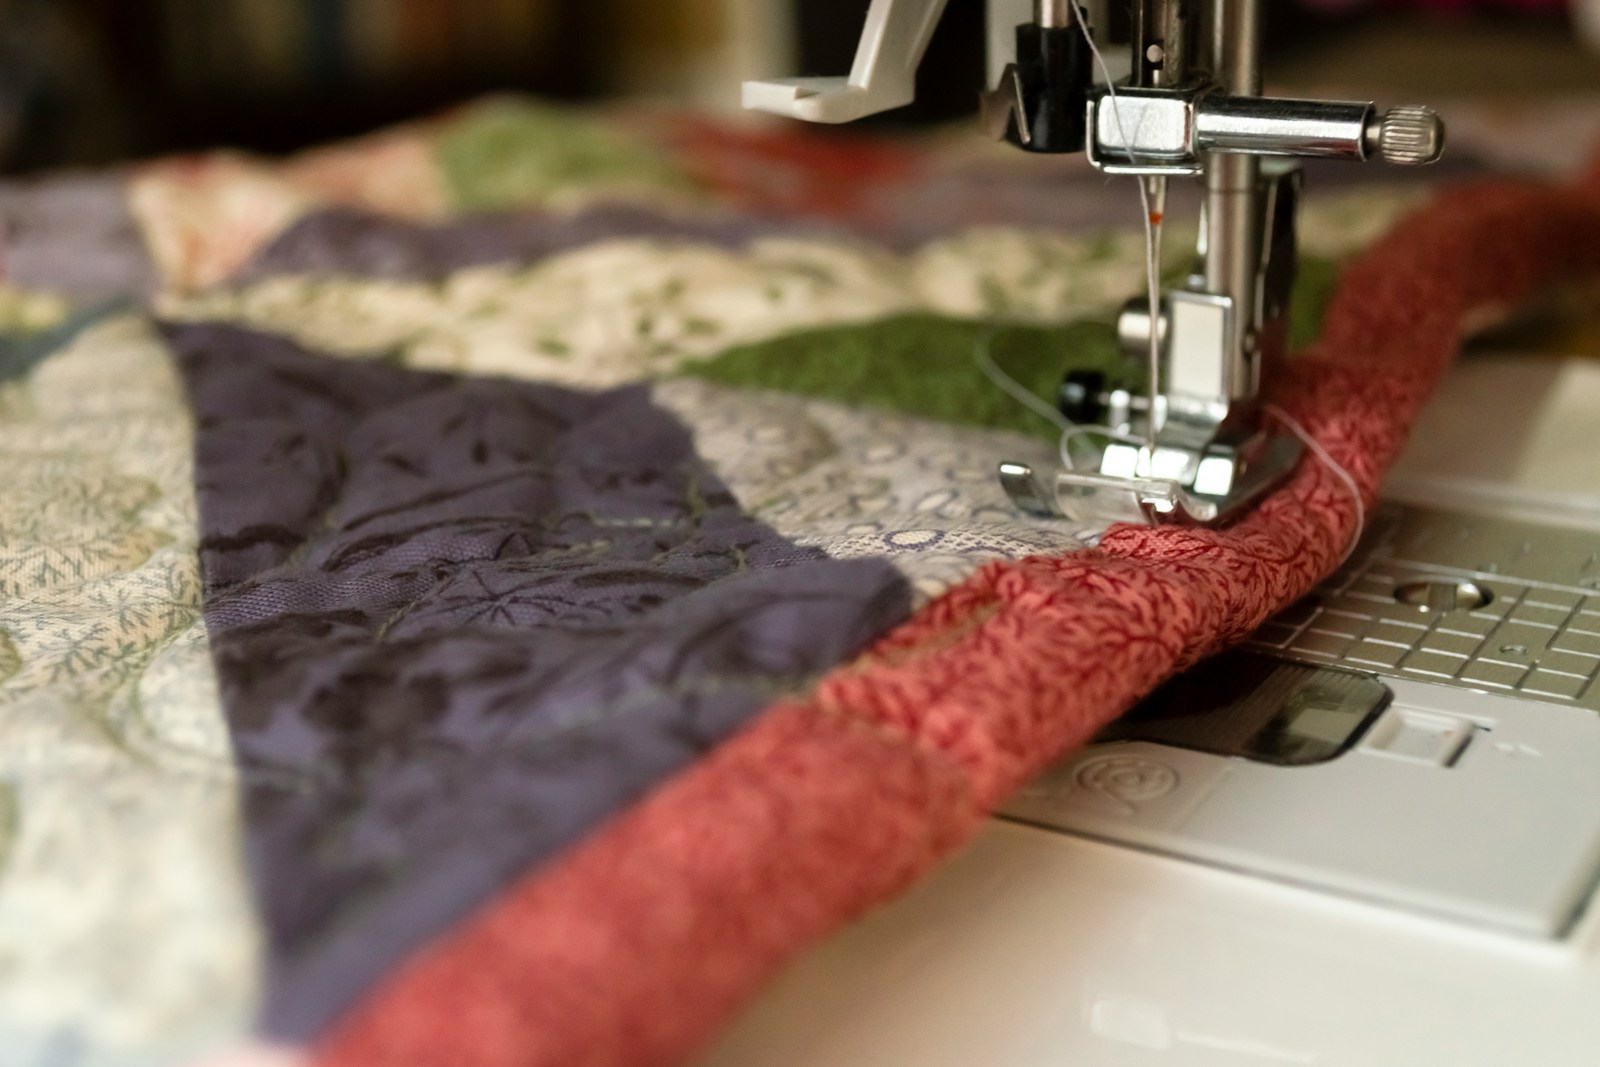
Precision is Paramount: Specialty feet like the quarter inch foot are essential for accurate seam allowances in quilting and garment construction.
Functional Variety: From what is a zipper foot used for to the complexities of a shirring foot, each attachment serves a unique structural purpose.
Professional Finishes: Using tools like an invisible zipper foot or overcast presser foot elevates home-made projects to retail quality.
Creative Expansion: Understanding what is a wing needle for sewing machines allows for decorative heirloom techniques like entredeux.
The world of sewing often feels like a beautiful, intricate puzzle. When you first sit down at your machine, the array of small metal attachments can seem a little daunting. However, these tools are your best friends in the studio. They transform your machine from a simple stitching tool into a versatile instrument capable of high-end tailoring and delicate craft. Whether you are attending sewing classes North Londonor stitching away at home, knowing which foot to click into place is the first step toward mastery.
Perhaps you have looked at your accessory box and wondered, “what is a quarter inch sewing machine foot?” or puzzled over the difference between a piping foot and a welting foot. Each of these attachments has been engineered to solve a specific problem—be it keeping a seam perfectly straight or gathering fabric into soft, even ruffles. This guide will walk you through the most essential specialty feet, ensuring you feel confident and inspired to tackle your next project.
The Foundation of Precision: The Quarter Inch Foot
If you have ever dreamt of making a quilt, you have likely encountered the term “scant quarter inch.” Achieving this level of accuracy by eye is nearly impossible, which is where the quarter inch foot comes in.
What is a Piecing Foot?
Often referred interchangeably as a piecing foot, this attachment is the gold standard for quilters. The distance from the needle to the edge of the foot is exactly 1/4 inch. By aligning the raw edge of your fabric with the right-hand edge of the foot, you ensure every seam is uniform. This precision is vital because even a millimetre of error can result in a quilt block that doesn’t lay flat or line up correctly at the corners.
Improving Your Accuracy
Many versions of this foot come with a small metal flange or “guide” on the right side. This guide prevents the fabric from drifting, making it an excellent tool for beginners who are still developing their steady hand. Beyond quilting, this foot is incredibly useful for topstitching narrow hems or creating precise seam allowances on delicate doll clothes or intricate garment details.
Mastering Fasteners and Closures
Zippers are often the most feared part of a beginner’s journey. However, the right equipment removes the stress entirely.
What is a Zipper Foot Used For?
The standard zipper foot is designed with notches on both the left and right sides. This allows the needle to stitch very close to the zipper teeth or “coils” without the foot riding over them. Because the foot is narrow, you can adjust your needle position to get as close as necessary to the edge of the zipper tape. It is a versatile tool that every sewist should master early on.
What is an Invisible Zipper Foot?
If you want your fastenings to disappear into the seam of a dress or skirt, you need an invisible zipper foot. Unlike a standard version, this foot features grooves on the underside. These grooves “unroll” the zipper coils as you sew, allowing the needle to stitch right in the “ditch” of the zipper tape. When done correctly, the zipper becomes entirely hidden within the seam line.
Professional Edges and Finishes
Not everyone owns an overlocker, but that shouldn’t stop you from achieving a professional finish on your raw edges.
What is an Overcast Presser Foot Used For?
An overcast presser foot (sometimes called an overedge foot) is designed to wrap thread around the edge of the fabric to prevent fraying. It features a small bridge or bar in the centre that keeps the fabric flat and prevents the stitches from pulling the edge into a bunch. When used with an overcasting stitch on your domestic machine, it mimics the look of a professional serged edge.
What is a Zig Zag Foot?
The zig zag foot is likely the one currently on your machine. It is the “all-purpose” attachment with a wide opening to accommodate the side-to-side movement of the needle. While it is perfect for basic seams, using it for specialized tasks can sometimes lead to fabric tunneling or skipped stitches. It is always better to swap to a dedicated foot when the task becomes more specific.
The distinction between a piping foot and a welting foot often causes confusion. A piping foot usually has a single groove on the underside to accommodate the corded trim used in garment making. A welting foot, often used in upholstery, usually features two grooves. This allows you to sew closely to the cord and then sew that cord to the main fabric piece in a subsequent pass, ensuring the cord stays perfectly aligned.
What is a Shirring Foot?
A shirring foot is a magical tool for creating gathers. It is designed with a specific sole that puts uneven pressure on the fabric, causing it to gather as you sew. You can even tuck a piece of fabric into the slot of the foot to gather the bottom layer while keeping the top layer flat—perfect for attaching ruffles to a skirt in a single step.
Our Unique Insight: The Psychology of the “Right Tool”
At our studio, we often notice that a student’s frustration rarely stems from a lack of talent; it usually comes from using the wrong attachment. We believe that learning how to sew is as much about mechanical literacy as it is about creative vision. When you understand the physics of how a foot holds fabric against the feed dogs, you stop fighting your machine and start collaborating with it. Using a specialized foot isn’t “cheating”—it is the mark of a professional who values their time and the quality of their craft.
Identify Three Feet: Take three mystery feet from your accessory box that you have never used.
Test Stitch: Use scrap fabric of different weights (cotton, denim, and silk) and try each foot.
Document the Results: Note down which stitch settings worked best. For example, did the overedge foot work better with a wider or narrower stitch?
Label Your Box: Use a small piece of masking tape to label the compartments in your accessory tray so you never have to guess again.
Is Specialty Sewing Worth the Effort?
When students ask if investing in extra feet is worth it, the answer is a resounding yes. The difference between a “homemade” garment and a “handmade” one often lies in the details—the perfectly straight topstitching from a quarter inch foot or the crisp edges provided by an overcast presser foot.
The Value of Professional Instruction
While YouTube is a great resource, nothing beats the immediate feedback of private sewing lessons London. A tutor can show you exactly how to position your hands and how to adjust the tension for a shirring foot in real-time. This hands-on guidance saves hours of unpicking and ensures your sewing blog worthy projects are successful on the first try.
Investing in Your Skills
Enrolling in sewing classes London for adults provides access to high-end machines and a library of specialty feet you might not want to purchase yet. It is a fantastic way to “try before you buy” while building a community of like-minded makers. Whether you are looking for sewing classes London for beginnersor more advanced seamstress courses, the focus remains on building confidence through technical proficiency.
Frequently Asked Questions (FAQ)
What is a wing needle for sewing machines?
A wing needle is a unique needle with wide, flat “wings” on the sides of the shank. As it enters the fabric, the wings push the threads aside to create a permanent hole. It is used for decorative heirloom sewing, such as entredeux or hemstitching. It works best on natural, crisp fabrics like linen or cotton batiste, where the weave can be easily manipulated.
Can I use a zipper foot for piping?
Yes, you can use a standard zipper foot for piping if you do not have a dedicated piping foot. By moving your needle to the far left or right, you can get quite close to the cord. However, a dedicated piping foot is better because the groove on the underside “locks” onto the cord, preventing it from slipping and ensuring a much more consistent result.
How do I know if a foot fits my machine?
Sewing machines generally fall into two categories: low shank and high shank. Most domestic machines are low shank. To check, lower your presser foot and measure from the centre of the screw hole to the needle plate. If it is about 1/2 inch, it is low shank; if it is 1 inch or more, it is high shank. Always check your manual before purchasing.
Do I really need an overedge foot?
While a standard zig zag foot can finish edges, an overedge foot provides much more control. The little pin in the middle of the foot prevents the fabric edge from curling or “tunneling” under the tension of the zig-zag stitch. If you want your garments to look professional and last through many washes, it is a very worthwhile, inexpensive investment.
Conclusion
The journey from a beginner to an expert maker is paved with small, technical milestones. Understanding what is a quarter inch sewing machine foot and how it differs from a piecing foot or an overedge foot is one of those crucial steps. These attachments are designed to take the guesswork out of your projects, allowing your creativity to flourish without the hindrance of technical errors.
Whether you are joining us for intermediate London sewing courses or just starting your first project at home, remember that your machine is a powerful ally. By choosing the right foot for the job, you ensure that every stitch is a step toward a garment you can be proud of. From the tiny details of a wing needle to the structural necessity of a zipper foot, these tools are the keys to unlocking your full potential as a sewist.
About the Author: Grace, Founder of London Sewing Courses
Grace is the heart and hands behind London Sewing Courses. A passionate and experienced sewing instructor, she founded the studio with a unique mission: to create a calm, friendly space for adults to learn and connect, while using the profits to fund free sewing classes for local children in need. Her personal expertise and commitment to community building are at the core of every class and every stitch.
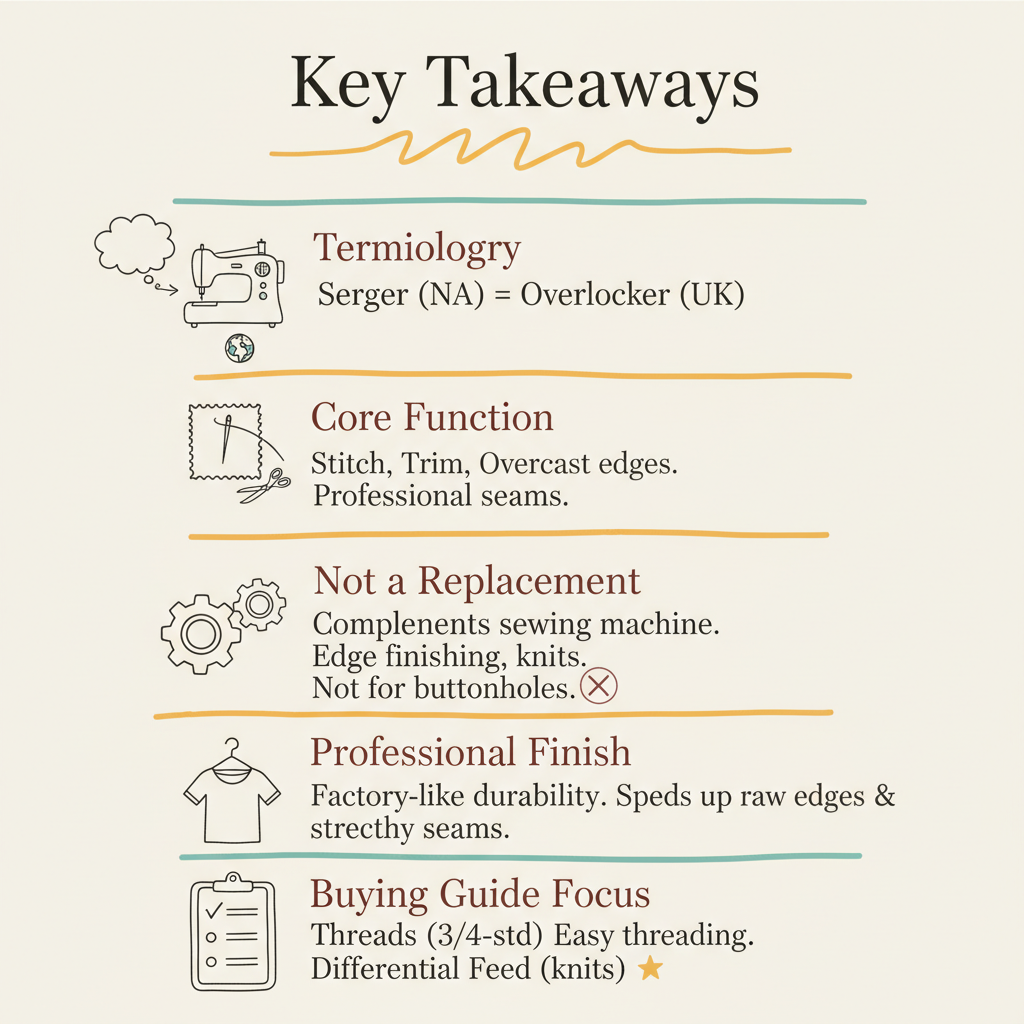
No Stress on Skill Level: You don’t need a professional background to master an overlocker (serger). Modern machines are much easier to thread and use than older models.
Essential Features: The best beginner sergers feature colour-coded threading, differential feed, and adjustable stitch length/width. These simplify operation and prevent fabric distortion.
Top Beginner Brands: Juki and Brother are consistently recommended for their durability, value, and ease of use right out of the box, with Juki often providing a more ‘workhorse’ feel.
Differential Feed is Key: This feature is critical for professional-looking seams, preventing both stretching (on knits) and puckering (on fine fabrics).
Confidence is Built: Learning to use this machine effectively, perhaps through some dedicated seamstress courses, will completely transform the professional finish of your handmade garments.
The jump from a traditional sewing machine to a serger (also known as an overlocker in the UK) can feel like a big one, even for experienced sewists. Suddenly, there are four threads, looping mechanisms, and a sharp blade, making the process look daunting. If you’ve been asking yourself, “What is a good serger for beginners?”, rest assured, you’re not alone.
A serger is a specialist machine that simultaneously sews a seam, trims the excess fabric, and encases the raw edge with a strong, looped stitch. This is what gives high-street clothing that professional, clean finish that a standard sewing machine simply cannot replicate. This guide is designed to be your patient, skilled tutor, helping you understand the essential features, navigate the brand landscape, and confidently select the perfect entry-level model to elevate your sewing projects.
Understanding the Serger: Essential Features
Before we dive into specific models, you must understand the key features that separate a great beginner machine from one that will cause frustration. An overlocker’s value isn’t measured by the number of stitches it can perform, but by the quality and ease of its core functions.
🧵 The Threading Revolution: Colour-Coding
The biggest fear associated with a serger is threading. Older models required intricate manual manipulation, but modern entry-level machines have solved this.
Colour-Coded Path: Every good beginner serger will have the entire threading path for all four threads clearly marked with different colours (usually red, blue, green, and yellow).
Open Access: Look for a machine that allows the front cover to open wide, giving you unobstructed access to the lower looper, which is often the trickiest part.
If a machine boasts “air-threading” or “self-threading,” it’s a huge bonus, though this feature often comes with a higher price tag.
⚙️ The Magic of Differential Feed
This is perhaps the single most important feature to look for when considering what is a good serger. Differential feed refers to the machine’s ability to move the fabric with two sets of feed dogs—one in front of the needle and one behind it—moving at different rates.
Preventing Puckering: By setting the differential feed higher than 1.0 (e.g., 1.3 or 1.5), you can stretch the fabric slightly as it passes through, preventing wavy seams on stretchy knit fabrics.
Creating Gathers: Conversely, setting the differential feed lower than 1.0 (e.g., 0.7) can intentionally create a beautifully gathered effect on woven fabrics.
A machine without this feature will make sewing knits, jersey, and fine fabrics incredibly frustrating, leading to stretched, unprofessional results.
📏 Versatility and Control
Your machine needs to be adaptable to different fabric types and project requirements.
Adjustable Stitch Length and Width: You should be able to easily adjust the length and width of the overlock stitch. A wider stitch (around 7mm) is ideal for heavy fabrics, while a narrower, shorter stitch is better for garment hems and fine materials.
The Knife Bypass: A crucial component that allows you to disengage or swing the cutting blade out of the way. This is essential when you want to use the overlock stitch purely for finishing a pre-cut edge without trimming any material.
Free Arm Capability: While less common on budget models, a free arm allows you to easily sew small, circular items like cuffs, sleeves, and necklines, significantly increasing the machine’s utility for garment making.
Brand Wars: Finding the Best Entry-Level Machine
When you ask seasoned sewists what is a good serger, a few brand names dominate the conversation. We’ll look at four major players, assessing them for a beginner’s needs, value, and overall performance.
Juki: The Industrial Workhorse
Juki was originally known for its industrial machinery, a reliability that translates beautifully into their domestic line. For many, Juki sergers are often regarded as the best value for money for a dedicated, high-quality machine. They are built to stand the test of time.
Top Pick: The Juki MO-654DE is universally recommended as an excellent entry-level serger. It offers the essential features—colour-coded threading, adjustable stitch length and width, and differential feed—in a reliable, easy-to-use package.
Cons: Can be louder and heavier than other brands. Threading the lower looper can still be a bit fiddly initially compared to air-threading models.
Brother: The Beginner’s Best Friend
Brother machines often shine in the entry-level market due to their emphasis on ease of use and affordability.
Top Pick: The Brother 1034D (or similar, widely available models) is a frequent suggestion for new serger users. It’s often highly recommended for its ease of use right out of the box.
Pros: Generally the most affordable option, very clear and simple threading guides, excellent included accessories.
Cons: Not as durable or robust as Juki for high-volume use; the quality of internal components can feel lighter. They can be a great starting point, but many serious sewists upgrade after a few years.
Baby Lock: The Luxury Option
If you’re wondering what is a babylock machine, you’re looking at the top end of the market. Baby Lock is renowned for its patented Jet-Air Threading system, which eliminates all threading fuss by using a puff of air.
Pros: Effortless, immediate threading—a huge time saver. Exceptional stitch quality and reliability.
Cons: Significantly more expensive than Juki or Brother models, often pricing them out of the entry-level budget. A beginner doesn’t necessarily need this luxury, but it certainly speeds up the learning curve.
Singer and Pfaff: The Traditionalists
While names like what is a good singer sewing machine or what is a pfaff sewing machine are synonymous with standard sewing, their sergers can be a mixed bag.
Singer: Their budget sergers are affordable but often lack the build quality and smooth operation of Juki or Brother. They are an option if budget is the absolute priority, but they may lead to more frustration.
Pfaff: Known for precision and high-quality construction, but their sergers tend to be pricier than their equivalents, pushing them towards the intermediate or advanced user.
Actionable Strategy: The ‘Serger Starter Kit’
If you’ve identified what is a good serger for beginners and are ready to take the plunge, follow these three simple steps to ensure a smooth transition and rapid skill development. These small, non-numerous suggestions will significantly reduce the learning curve.
1. Buy Two Extra Cones of Thread (Total Six)
While a serger uses four threads, you should buy six cones: two in black, two in white, and two in a bright, contrasting colour (e.g., neon yellow or orange).
The Rationale: Load the two loopers with the bright, contrasting thread. This allows you to easily see how the threads are interlocking when you test your tension, making it simple to diagnose any issues. Once the tension is perfect, switch to the matching black or white thread for your projects.
2. Dedicate a Time Slot for Tension-Only Practice
Don’t attempt to start a project immediately. Spend your first two hours doing nothing but setting up the machine and testing the tension dials.
The Method: Take a few fabric scraps—a knit, a denim, and a cotton—and label them. Thread the machine and stitch. Adjust the tension dial for one thread by a full number, stitch again, and write down the setting on the fabric scrap. Continue this process until you understand how each dial (Needle Left, Needle Right, Upper Looper, Lower Looper) affects the stitch. This foundational knowledge will save you hours of guesswork later.
3. Seek Local, Hands-On Guidance
While instruction manuals are helpful, a serger is best learned in person. Look into local workshops or private sewing lessons London.
The Benefit: A tutor can show you how to thread your specific machine in minutes, a task that might take an hour of struggle with a manual. They can instantly diagnose tension issues and demonstrate the correct knife pressure for various fabrics, which is invaluable. Search for sewing classes north london or sewing classes london for adults that specifically offer overlocker introduction workshops.
Our Unique Insight: Serger vs. Sewing Machine
For many years, the debate has been, “what is a better sewing machine brother or singer?” in the context of a standard lockstitch machine. However, the true comparison for professional garment construction is between a regular machine and an overlocker. They are not competitors; they are partners.
A serger’s speed and ability to finish seams rapidly are unmatched. It also excels at creating flatlock, rolled hems, and beautifully stretchy seams on knit fabrics. But it cannot sew darts, topstitch, insert zips, or perform buttonholes.
For a new sewist, the best setup is a reliable standard sewing machine (like a high-quality Brother or Juki home model) paired with an excellent entry-level serger. The combination allows you to handle every step of garment construction with professional finesse. Understanding this partnership is the key to moving beyond simply making clothes to crafting high-quality garments.
Frequently Asked Questions (FAQ)
What is a good inexpensive sewing machine to buy for a beginner?
While this article focuses on sergers, if you are looking for a standard machine, consider the Brother CS6000i or the Janome 2212. These machines offer a great balance of features (multiple stitches, easy operation) with a highly approachable price point. They are durable workhorses perfect for learning the fundamental skills like straight seams and zig-zags before you progress to more complex seamstress courses or projects.
Should I choose a Juki or a Baby Lock serger for the long term?
For long-term reliability and professional-grade performance, the Juki is often the better choice, providing an excellent workhorse at a mid-range price. However, if your budget allows for a Baby Lock, the air-threading system significantly improves the user experience. Both are durable, but the Baby Lock provides a major quality-of-life upgrade, while the Juki offers a more traditional and highly robust experience that will last for decades if well-maintained.
What is a good inexpensive sewing machine brand for general use?
In the UK market, Brother and Janome consistently offer the best value for money in the general-use category. They have a wide selection of models at affordable prices that feature modern comforts like top-loading bobbins and simple controls. Avoid unbranded or very cheap machines as they often lead to frustration. If you are aiming for high-end tailoring, the precision of a Bernina or Pfaff is worth the investment later in your sewing journey.
What is a better sewing machine: Brother or Singer?
Historically, Singer was the gold standard, but in the modern, budget-friendly market, Brother often outperforms Singer in terms of build quality, ease of use, and overall value in their entry-level models. Brother machines often have a smoother operation and better included features for a similar price. Juki and Janome are also strong contenders for quality and value, often being the choice of those who take garment construction seriously and are learning how to sew.
Is it necessary to take beginner sewing classes before buying a serger?
While it is possible to jump straight into a serger, it’s highly recommended that you first learn the basics of a standard machine, perhaps through sewing classes London for adults. This will give you confidence in handling fabric, managing tension, and understanding stitch functions. Once you’re comfortable with basic garment construction, then the serger will feel like a tool to enhance your existing skills, rather than an entirely new, overwhelming process.
Conclusion
The journey to finding what is a good serger for beginners doesn’t have to be complicated. The ideal machine is one with colour-coded threading, differential feed, and a reputation for reliable tension (like the Juki MO-654DE). Don’t let the multi-thread setup intimidate you. With a little dedicated practice and perhaps a short, focused course, you’ll soon be achieving the kind of professional, high-street finish that will make your handmade garments truly indistinguishable from shop-bought quality. It’s an investment that pays dividends in both the quality of your craft and your confidence.
Ready to gain the confidence and skill you need to master your new machine? Explore our Intermediate London Sewing Courses for Adults and dedicated workshops to unlock the full potential of your serger.
About the Author: Grace, Founder of London Sewing Courses
Grace is the heart and hands behind London Sewing Courses. A passionate and experienced sewing instructor, she founded the studio with a unique mission: to create a calm, friendly space for adults to learn and connect, while using the profits to fund free sewing classes for local children in need. Her personal expertise and commitment to community building are at the core of every class and every stitch.
Best for Beginners: Highly-rated models for novices often include the Brother CS7000X (computerised for versatility) and the Singer 4423 Heavy Duty (mechanical for durability), focusing on user-friendly features like automatic needle threaders.
Machine Types: Domestic machines are classified as either Mechanical (simple, dial-operated) or Computerised (digital screen, more stitches/features). Beginners often find computerised models with simplified interfaces the easiest to start with.
Essential Accessories: Every machine comes with basic tools, including a bobbin, needles, a seam ripper, and a selection of presser feet (like an all-purpose foot and a zipper foot).
The Power of Stitching: At its core, a sewing machine uses the lock stitch to join fabric, but modern models can also perform complex tasks like overcasting edges, creating buttonholes, and even delicate embroidery.
Your Starter Kit: Beyond the machine, essential items for beginner sewers include high-quality thread, various types of needles (Universal and Ballpoint), a fabric-only pair of sharp scissors, and a reliable seam ripper.
What are the top rated sewing machines
Welcome to the wonderful world of textiles! Taking your first step into sewing can feel a little daunting, particularly when faced with a glittering array of machinery. As your patient, skilled sewing tutor, I am here to guide you. If you are asking what are the top rated sewing machines, you are already asking the right question. The truth is, the “best” machine is the one that fits your ambition, your workspace, and your budget, but certain models consistently rise to the top for their reliability and ease of use. Choosing the correct tool will transform your creative journey, allowing your confidence to flourish from the very first stitch.
Buying Your First Machine: The Best-Rated Sewing Machines for Beginners
The market is full of fantastic options, but for someone just starting out, simplicity and sturdiness are far more important than a thousand decorative stitches. We want a machine that is dependable, forgiving, and helps you master the fundamentals without unnecessary frustration. These top-rated selections are often recommended for their balance of features and accessibility.
One model frequently hailed as the best for beginners is the Brother CS7000X. It is a computerized machine that offers an impressive blend of user-friendly features and versatility, handling everything from basic utility work to intricate quilting projects with ease. It provides neat, consistent stitches on various fabrics, including cotton and denim, and includes conveniences like an automatic needle threader and an easy bobbin winding system. For those who prefer a less digital, more mechanical feel, the Singer 4423 Heavy Duty model is a perennial favourite. This machine is known for its powerful motor and speed, making it reliable for working with thicker fabrics and multiple layers.
The Janome 2222 is another excellent entry-level choice, often praised for being precise and sturdy enough to handle materials like faux leather. Ultimately, a great beginner machine should have straightforward controls, a decent array of basic stitches (straight, zigzag, and buttonhole), and an interface that is intuitive, preventing you from feeling overwhelmed.
Understanding Your Options: Mechanical vs. Computerised
One of the first decisions you face is choosing between a mechanical and a computerised machine, which helps answer the core question of what are types of sewing machine.
Mechanical Sewing Machines: These are the traditional workhorses of the sewing world. They are operated via manual dials and knobs to select the stitch type, length, and width. They are often more durable and easier to repair because they contain fewer complex electronic parts. For a true beginner, a mechanical model like the Brother ST371HD or the Singer 4423 can be less intimidating because the controls are right in front of you, without the need for menus or screens.
Computerised Sewing Machines: These machines feature a digital interface, usually an LCD screen, for selecting and adjusting stitches. They offer hundreds of stitch options, memory functions, and helpful quality-of-life automations like stitch length pre-sets and automatic thread cutting. For a student keen to explore decorative stitches and quick setup, a computerised model like the Brother CS7000X or Janome DC1000 provides fantastic functionality.
The key difference lies in control. A mechanical machine gives you direct physical control over every setting, while a computerised model offers efficiency and a greater range of creative options.
The Simplest Sewing Machine to Use
If your absolute priority is minimal fuss and a swift start, you are likely looking for what is the simplest sewing machine to use. Simplicity usually comes down to three features: ease of threading, automatic tension, and clear controls.
The Brother XR9550 is a great example of intuitive design, featuring just a few buttons and an easy-to-understand LCD screen that sets the length and width automatically when you select a stitch. The SINGER Simple 3337 is another strong contender; its entire design is focused on being user-friendly, offering an automatic needle threader and a simple 1-step buttonhole function.
For a beginner, the learning curve from a basic mechanical model to an intuitive computerised machine is surprisingly small. Look for a machine that has a clear, printed guide for loading the bobbin and threading the top thread, as these are the steps you will repeat most often. Models with a drop-in bobbin (where you simply drop the bobbin into the machine’s top) are generally considered simpler than the older front-loading bobbin systems.
Our Unique Insight: Decoding the Essential Features for Novices
When selecting a machine, it is easy to get distracted by advanced features like alphanumeric stitches or hundreds of embroidery designs. As a sewing tutor, I can tell you that a novice needs two things above all else: clear visibility and reliability in feeding fabric.
What Comes with a Sewing Machine?
When you unbox your new machine, what can you expect to find inside, and what comes with a sewing machine that you will actually use? Every new machine, regardless of the brand, will include a core set of accessories to get you started.
You should always find:
Needles: A basic set of universal needles, though you should upgrade to higher quality needles like Schmetz once you start sewing more often.
Bobbins: At least one, though experienced sewers will tell you to immediately buy extra bobbins compatible with your model.
A Seam Ripper: This is often the most-used tool for a beginner, designed for unpicking stitches. Keep a spare, as they tend to vanish!.
Presser Feet: At minimum, you will receive an All-Purpose Foot (the standard foot), a Zipper Foot for inserting zips, and a Buttonhole Foot for automatically creating buttonholes.
Spool Holders/Caps: These keep your thread spool secure on the machine’s spool pin.
These included items are the baseline, but the quality of your finished garment will rely on upgrading crucial items, particularly your thread and needles, as you begin to explore more challenging fabrics. We often see students struggling with tension issues, which are instantly resolved by switching to a good quality thread, such as Gütermann sew-all.
The Beginner’s Essential Kit: What Do Beginner Sewers Need?
Beyond the box contents, every new sewer needs a few critical, non-negotiable tools to begin their craft. Understanding what do beginner sewers need is key to a frustration-free experience. If you are taking any of our adult sewing classes in London, these are the items we recommend having prepared for your first session:
Sharp Fabric Scissors: Invest in a dedicated pair of high-quality scissors and only use them for cutting fabric. This ensures they stay razor-sharp for a clean cut, which is essential for professional-looking seams.
Measuring Tools: A flexible measuring tape for body measurements and a clear, straight ruler (a 2” x 18” quilting ruler is ideal) for cutting and marking straight lines.
Fabric Markers: Choose marking tools that disappear, such as washable pens, tailor’s chalk, or heat-erasable pens. These allow you to accurately transfer pattern markings to your fabric without leaving a permanent trace.
Good Pins and a Pincushion: Get fine, sharp pins with easy-to-grab heads (like glass balls). Magnetic pin holders are a great addition for keeping pins tidy and easily accessible.
Having this small, foundational kit ready allows you to focus purely on learning how to operate the machine itself, rather than trying to make do with substandard tools. For many beginner sewers, a good starting point is our popular London sewing courses for adults, which provide structured guidance through the fundamentals.
What Can a Sewing Machine Do? The Power of the Lock Stitch
This addresses three of your core questions: what can a sewing machine do, what do sewing machines do, and what does a sewing machine do? Simply put, a domestic sewing machine’s primary job is to create a secure, consistent seam using a mechanism called the lock stitch. It locks two threads (one from the needle, one from the bobbin) together within the layers of fabric.
However, modern machines are capable of much more than just a straight seam. They are versatile creative tools:
Utility Stitching: This includes the straight stitch (for joining fabric), the zigzag stitch (for neatening raw edges or joining stretch fabric), and the reverse stitch (for knotting and reinforcing the start/end of a seam).
Hemming and Finishing: A blind stitch machine is specially designed to create an invisible stitch used for hemming trousers or skirts, but many domestic machines include a blind hem setting to achieve a similar, smooth illusion. A zigzag or overedge foot on a standard machine can mimic the function of a serger (overlocker) by keeping fabric stable while neatening the raw edge to prevent fraying.
Decoration and Customisation: Many computerized machines, even entry-level models, offer decorative stitches and the ability to automate tasks like sewing on buttons or creating perfect buttonholes in one easy step. You can use these features to personalise your projects or explore more advanced techniques like appliqué.
From making a simple cushion cover to complex garment construction, the machine provides the speed and consistency that hand-sewing cannot match. The foundation is the lock stitch, and everything else is a creative variation on that core function. If you are already past the absolute beginner stage, you might be interested in our dedicated intermediate London sewing courses for adults to explore these advanced features further.
Actionable Strategy: Your Three-Step Setup for Success
Starting your sewing journey successfully is about establishing good habits from the beginning. As a beginner, do not rush the setup! These three actionable steps will help you master your machine today and prevent the most common frustrations experienced by new sewers.
1. Master the Threading Path
The number one reason for a machine not stitching correctly is incorrect threading. Every machine has a specific, clear path the thread must follow from the spool pin to the needle.
Action: Open your machine’s manual (or watch a video like the one provided in our sources) and trace the thread path at least five times.
Tip: Always raise the take-up lever to its highest position and ensure the presser foot is raised before you start threading. Raising the foot opens the tension discs, allowing the thread to properly seat itself.
2. Practice Tension on Scraps
Tension is the balance between the top thread and the bobbin thread. You must learn to recognise perfect tension before starting a project.
Action: Take two contrasting colours of thread (e.g., blue on top, yellow in the bobbin). Sew a straight line on a scrap of woven cotton fabric.
Result Check: If both threads look equally flat and secure on the top and bottom of the fabric, your tension is perfect. If you see loops of yellow on the top, your top tension is too high (or the machine is threaded incorrectly). If you see loops of blue on the bottom, your bobbin tension is too loose. Adjust your tension dial in small increments.
3. Learn the Basics: Straight Stitch, Zigzag, and Reverse
Do not try to sew a complicated dress immediately. You need to build muscle memory and confidence with the machine’s basic movements.
Action: Cut several squares of fabric. Practice sewing straight seams, corner turns, and the zigzag stitch on the edges of the squares. Use the reverse stitch at the beginning and end of every seam, which is how you secure the stitches.
Goal: The goal is not a finished project, but a perfect, consistent straight line. This foundational practice will make every future project simpler. When you are ready to apply these skills to garments, you can find further resources on our sewing blog, including a guide to beginner seamstress courses.
What is the most common reason a sewing machine stops working?
The most frequent issue is incorrect threading, particularly when the top thread skips the take-up lever or is not seated properly in the tension discs. Another common culprit is using an incorrect or blunt needle; a good rule is to change your needle after every six to eight hours of sewing time to ensure neat stitches. This simple maintenance step prevents skipped stitches and fabric damage.
Can a beginner use a heavy-duty sewing machine?
Yes, absolutely. In fact, many heavy-duty machines, such as the Singer 4423, are mechanical models with simple, robust designs that are ideal for beginners. They are built to handle thick, difficult fabrics like denim or canvas, which makes them very forgiving and durable. While they may have fewer decorative stitches, their straightforward functionality makes them reliable practice partners for a novice.
Do I need a separate overlocker/serger machine?
For a beginner, a separate overlocker (serger) is not necessary, as most domestic sewing machines offer a zigzag or overlock stitch that can neaten raw edges and prevent fraying. An overlocker is a specialized unit that trims the fabric edge while stitching, providing a professional finish, but it is an extra expense. You should only consider buying one after you have mastered your basic machine and plan to work extensively with stretch or knit fabrics.
Conclusion
The journey of choosing your first machine is a pivotal moment in your creative life. By prioritising simplicity, user-friendly features like automatic needle threaders, and reliable construction, you are setting yourself up for success. We hope this guide has shown you the difference between mechanical and computerised models and highlighted the essential tools you need to feel confident and prepared. Whether you are aiming to learn to use a sewing machine or master complex garment alterations, remember that every master tailor started with a single, simple machine. Now, it is your turn to begin. For personalised guidance or to book a custom private sewing lesson London, please see the details below or visit our Contact page.
About the Author: Grace, Founder of London Sewing Courses
Grace is the heart and hands behind London Sewing Courses. A passionate and experienced sewing instructor, she founded the studio with a unique mission: to create a calm, friendly space for adults to learn and connect, while using the profits to fund free sewing classes for local children in need. Her personal expertise and commitment to community building are at the core of every class and every stitch.
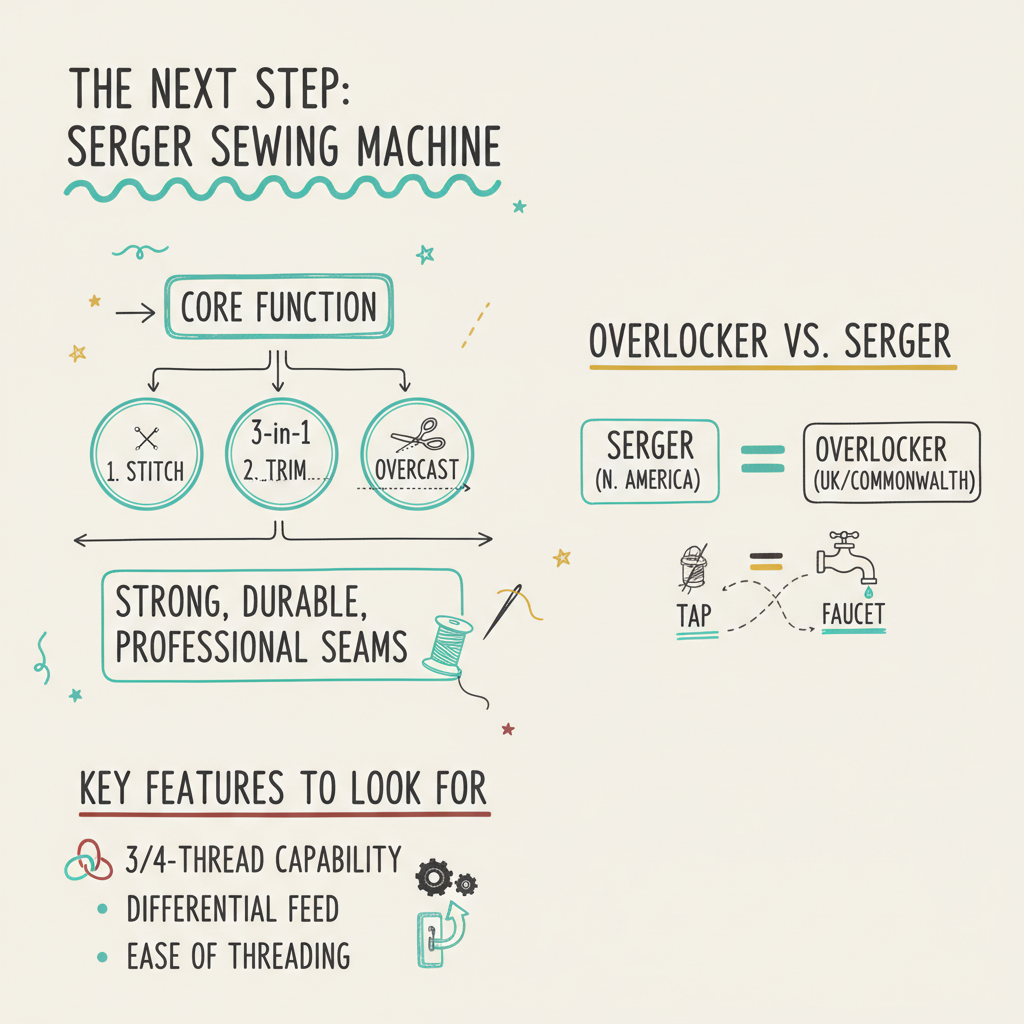
Terminology: A serger is simply the North American term for an overlocker machine. In the UK, we almost exclusively use the term overlocker.
Core Function: The primary role of a serger is to simultaneously stitch, trim, and overcast the edge of fabric, creating professional, non-fraying seams quickly and efficiently.
Not a Replacement: An overlocker does not replace a standard sewing machine; it complements it. It excels at finishing edges and constructing knit garments but cannot perform tasks like buttonholes or topstitching.
Professional Finish: Using an overlocker is the fastest way to achieve the durable, factory-like finish seen on high-street clothing, especially for securing raw edges and creating stretchy seams.
Buying Guide Focus: When deciding what serger should I buy?, focus on the number of threads (3/4-thread is standard), ease of threading, and the presence of differential feed for working with knit and stretchy fabrics.
The Next Step: what is a serger sewing machine?
You’ve mastered your standard sewing machine, and now you’ve encountered a mysterious new tool: the serger. You might hear it called a serger, an overlocker, or even a serger sewing machine, but rest assured, they all refer to the same brilliant piece of kit. It’s the machine that transforms a home-sewn garment from ‘homemade’ to ‘professionally finished,’ and it’s essential for anyone serious about their craft.
Overlocker vs. Serger: Clearing Up the Confusion
Let’s tackle the most common point of confusion first. What is a serger? In short, it’s the name used predominantly in North America. Here in the UK and in most Commonwealth countries, we call it an overlocker. They are exactly the same machine, performing the same function.
Think of it like calling a tap a faucet—different words for the same thing. Since our classes and articles use British English, we will primarily refer to it as an overlocker from here on, but know that any machine labelled a serger is its twin.
The Core Function: what does an overlocker do?
The overlocker’s function is unique and distinct from a regular sewing machine. A standard machine uses two threads (top and bobbin) to create one line of stitching. An overlocker, or serger, uses three, four, or even five threads that interlock around the raw edge of the fabric.
Critically, the machine includes a built-in blade that trims the fabric edge just before the threads wrap around it. This process achieves three things simultaneously:
Stitch: It joins two or more pieces of fabric together.
Trim: It neatly cuts the raw edge of the fabric.
Overcast: It wraps the thread securely around that newly cut edge, preventing fraying forever.
This speed and efficiency are the answers to the question, what does an overlocker do? It creates strong, durable, and highly professional-looking seams in a single, fluid pass.
Our Unique Insight: The Critical Difference a Serger Makes
When we teach our students about garment construction, we always highlight that the durability and longevity of a piece of clothing often come down to the quality of the seam finish. This is the critical difference a serger makes.
Imagine sewing a T-shirt. You sew the side seam on your regular machine. The seam allowances inside are left raw. Over time, in the washing machine and through wear, those raw cotton or knit edges will begin to shed fibres and fray, weakening the seam.
If you use an overlocker instead, the moment the fabric is trimmed, those edges are encased in a cage of thread. This not only stops fraying but also provides incredible stretch and flexibility, which is non-negotiable when working with modern knit fabrics. This capacity for speed, strength, and elasticity is why every piece of clothing you buy off the rack has been touched by a serger. If you are learning to sew and alter clothes, an overlocker is your express lane to achieving professional results.
Understanding what do overlockers do is about appreciating their versatility beyond a simple seam finish. While the 4-thread overlock stitch is its most common function, these machines are powerhouses with several specialty stitches that can elevate your projects.
Beyond the Seam: Decorative and Specialty Stitches
The overlocker’s true magic lies in its ability to create specialist finishes that are impossible on a regular machine:
3-Thread Overlock: Ideal for finishing the edge of non-fraying woven fabrics, such as fine wool or gabardine, or for decorative edges.
Rolled Hem: This stitch is a game-changer for finishing lightweight or delicate fabrics like chiffon and silk. The overlocker rolls the fabric edge tightly into itself and encases it with dense stitching, producing the neat, fine edge you see on scarves and professional eveningwear.
Flatlock Stitch: A strong, flat seam often used for sportswear or creating decorative texture. This stitch is designed to be comfortable against the skin, making it perfect for activewear construction.
Differential Feed: This is an essential feature that allows you to control how quickly the front and back feed dogs move. This prevents stretchy knit fabrics from puckering or woven fabrics from stretching out of shape as they pass through the machine. Learning how to use this machine effectively is a core part of our intermediate courses.
When to Use an Overlocker for a Professional Finish
You should reach for your overlocker whenever you are:
Working with Knits: Constructing tops, dresses, or any garment made from a stretch fabric. The overlock stitch has the necessary ‘give’.
Finishing Raw Edges: Sealing the seams inside a jacket, a pair of trousers, or any woven item to ensure they survive regular washing.
Doing Fine Detail Work: Creating delicate edges on ruffles, napkins, or shirt collars with the rolled hem feature.
Batch Sewing: When you need speed and efficiency, the overlocker cuts down on the time spent finishing seams.
The Purchase Decision: what serger should i buy?
Now that you know the answer to what is a serger and understand the value of an overlocker, the next logical question is: what serger should i buy? The market can seem overwhelming, filled with three-thread, four-thread, and even five-thread models. As your patient tutor, I want to guide you through the features that genuinely matter, ensuring your investment enhances, rather than complicates, your creative journey.
Essential Features: What to Look for in a Beginner Overlocker
Choosing your first overlocker isn’t about finding the most expensive model; it’s about finding a reliable workhorse with the right foundations. When shopping, focus on these three critical features:
3/4-Thread Capability: For almost all home sewing, a machine that can perform both a 3-thread and 4-thread stitch is perfect. The 4-thread stitch is your go-to for strong, construction seams on knits, and the 3-thread is ideal for finishing woven fabric edges and performing rolled hems. Anything more complex, like a 5-thread coverstitch, is usually only necessary for professional tailoring or commercial volumes.
Differential Feed: As we mentioned before, this is non-negotiable. If you plan to sew stretchy fabrics—the very thing an overlocker excels at—you need the differential feed to prevent wavy, stretched-out seams or puckering. Ensure the machine has clearly labelled, easily adjustable dials for this function.
Ease of Threading: Overlockers have a reputation for being tricky to thread, but modern machines have vastly improved this process. Look for machines with colour-coded guides inside the looper covers. Better yet, some premium models now offer air-threading, where you simply push the thread into a port and the machine blasts it into place. If you are learning Sewing Classes North London, we often recommend a model with good threading support to reduce frustration.
Addressing the Buying Anxiety: what is the best serger to buy?
The question what is the best serger to buy? is personal, but we can offer some clear direction. The “best” machine is the one you will actually use. For beginners and those moving to Intermediate London Sewing Courses for Adults, we recommend models from established, reliable brands (often Janome, Brother, or Juki).
Instead of focusing on a specific model number, look for the features above, and read reviews that focus specifically on:
Noise Level: Some cheaper overlockers are extremely loud, which can make long sewing sessions unpleasant.
Stitch Quality: Ensure the machine produces even, balanced stitches across a range of fabric thicknesses.
Customer Support: A good brand will have videos and manuals readily available to help you master re-threading and tension adjustments.
Our expert advice is to invest in the best quality machine you can comfortably afford, focusing on the core 3/4-thread capability and a good differential feed.
Actionable Strategy: Troubleshooting Common Serger Issues
While overlockers are fantastic, they can occasionally present challenges. Knowing how to quickly troubleshoot common issues will keep your machine running smoothly:
Skipped Stitches: This is almost always a sign that your needles are blunt or incorrectly inserted. Solution: Replace the needles (use high-quality serger needles) and ensure the flat side of the needle shank is facing the correct direction, usually toward the back of the machine.
Wavy Seams (Puckering or Stretching): Solution: Adjust the differential feed. If the fabric is stretching and getting wavy, increase the differential feed setting (e.g., from 1 to 1.5). If the fabric is bunching up or puckering, decrease the setting (e.g., from 1 to 0.7).
Tension Tangles: If your stitches are messy or loops are forming on the underside, your tension is wrong. Solution: Reset all four dials back to their factory standard setting (usually marked around 4 or 5). Adjust only one dial at a time, usually the needle tension, to see what impact it has before adjusting the loopers.
A serger typically needs either three or four threads for general home sewing. A 3-thread stitch is used for finishing the edges of woven fabrics and creating rolled hems. A 4-thread stitch is the most common for constructing strong, professional, and stretchy seams on knits. While 2-thread machines exist, and 5-thread machines are available, the 3/4-thread model offers the best balance of versatility and ease of use for the home sewist.
Is a serger hard to re-thread?
The process of re-threading a serger can be daunting at first glance due to the multiple threads. However, if you follow the colour-coded paths precisely and use a pair of long-nosed tweezers, it becomes quite manageable. Many experienced sewists use the “tie-on” method: cutting the old threads, tying the new thread ends to the old ones, and simply pulling them through the machine. This bypasses the need to thread the loopers manually altogether.
Can I use a serger without a regular sewing machine?
You can certainly use an overlocker machine independently, but you cannot replace a regular sewing machine with it. The overlocker is fantastic for creating strong seams and finishing edges, but it cannot perform essential tasks such as topstitching, creating buttonholes, sewing zips, or detailed decorative stitches. The two machines work in tandem, with the overlocker focusing on bulk construction and seam finishing, and the regular machine handling closures and flat stitching.
Conclusion
The overlocker, or serger, is the indispensable companion to your standard sewing machine. It is the tool that closes the gap between the garments you sew at home and the clothes you buy in the shops. By understanding what is a serger and embracing its unique ability to stitch, trim, and overcast simultaneously, you unlock a new level of speed, durability, and professionalism in your projects.
We hope this guide has demystified the overlocker and given you the confidence to consider adding one to your creative toolkit. Whether you’re interested in Custom Private Sewing Lessons London or have a specific question about an overlocker model, we are here to support your journey. Please feel free to visit our Contact page to ask a question or book your next class with us.
About the Author: Grace, Founder of London Sewing Courses
Grace is the heart and hands behind London Sewing Courses. A passionate and experienced sewing instructor, she founded the studio with a unique mission: to create a calm, friendly space for adults to learn and connect, while using the profits to fund free sewing classes for local children in need. Her personal expertise and commitment to community building are at the core of every class and every stitch.
ntroduction: Beginning Your Sewing Journey with the Right Machine
The decision to learn to sew is an exciting one. It opens up a world of creativity, from mending your own clothes to crafting unique garments and home décor. But before you can take your first stitch, there’s a crucial first step: choosing the right machine. For a beginner, this can feel overwhelming. The sheer number of models, brands, and features can be a lot to navigate. That’s why choosing the right novice sewing machine or beginner sewing machine is so important. A well-chosen machine will make your learning process smooth, enjoyable, and free from unnecessary frustration.
Many people think a “simple” machine means a less capable one. This is a myth. The perfect novice sewing machine isn’t about having a thousand decorative stitches; it’s about having the right features that empower you to learn and grow. In this guide, we’ll debunk the common misconceptions and outline the seven key features you should look for to find the best novice sewing machine for you. By the end, you’ll feel confident and ready to take your first step into the wonderful world of sewing.
Understanding Novice Sewing Machines
Before we get into the features, let’s clarify what a novice sewing machine actually is and what makes it ideal for a new sewer.
What Defines a Beginner Sewing Machine?
A beginner sewing machine isn’t necessarily the cheapest model on the shelf. Instead, it’s defined by its user-friendliness. The ideal machine for a sewing machine for novices focuses on core functionality and reliability. It has a straightforward design, clear instructions, and is built to withstand the bumps and learning curves of a new sewer. An overly complicated machine with dozens of buttons and dials can be overwhelming, causing you to lose confidence before you’ve even sewn your first seam. A novice sewing machine should feel like a patient tutor, not a confusing puzzle.
Importance of User-Friendly Design (Easy-to-Use Sewing Machines)
Simplicity is the most important feature of an easy-to-use sewing machine.
Manual vs. Computerised: For many beginners, a mechanical (manual) machine is a great choice because of its robust simplicity and ease of troubleshooting. However, some basic computerised models offer wonderful features like automatic needle threading and a start/stop button that can significantly reduce frustration.
Simplicity in Operation: Look for a machine with fewer dials and buttons. Clear, well-labelled controls are a huge plus.
Intuitive Threading: An easy-to-follow thread path is essential. Many good beginner machines have numbered diagrams printed directly on the body, guiding you step-by-step.
Clear Bobbin Access: Top drop-in bobbins are generally considered easier for beginners to use than front-loading ones. They allow you to see exactly how much thread you have left and are less prone to jamming if installed incorrectly.
7 Essential Features for Novice Sewing Machines (Sewing Machine Features for Beginners)
When you’re shopping for your first machine, these are the seven non-negotiable features that will make your sewing journey easier and more enjoyable.
1. Straightforward Stitch Selection
The most important stitches you’ll ever use are the straight stitch and the zigzag stitch.
Basic Stitches: A good novice sewing machine should have a reliable, consistent straight stitch for piecing seams and a zigzag stitch for finishing raw edges to prevent fraying.
Limited but Useful Options: Don’t be swayed by a machine that boasts hundreds of decorative stitches. For a beginner, these are largely unnecessary and often add to the cost. A few basic utility stitches are all you need to get started.
Clear Stitch Dial/Buttons: The stitch selection mechanism should be simple to use, with a clear dial or easily identifiable buttons.
2. Adjustable Stitch Length and Width
Even as a beginner, you’ll need to adjust your stitch length and width.
Why these adjustments are crucial: A longer stitch is great for gathering fabric, while a shorter stitch is ideal for reinforcing seams at the beginning and end. You’ll need to adjust the zigzag width for different seam finishes.
How to adjust: Look for clear dials or buttons that allow you to easily change these settings.
3. Easy Threading System
Threading your machine can be one of the most frustrating parts of learning to sew. The right features can make a huge difference.
Clearly Marked Thread Path: As mentioned before, a numbered diagram on the machine is a fantastic feature.
Top-Loading Bobbin System: This system is not only easy to access but also makes it simple to see if your bobbin is running low.
Automatic Needle Threader: This feature is a game-changer for beginners and can save you from a lot of eye strain and frustration. While not on every budget model, it’s a definite plus to look for.
While often a feature on more expensive models, it’s worth noting. The presser foot holds the fabric down while you sew.
Why this is important: This feature allows you to adjust the pressure for different fabric thicknesses. Lower pressure is great for delicate fabrics, while higher pressure is needed for thicker materials like denim. If a machine has it, it’s a sign of a high-quality beginner sewing machine.
5. Free Arm Capability
This is an essential feature for a versatile machine.
Essential for a variety of projects: A free arm is a narrow extension of the sewing bed. You access it by removing the accessory tray. It’s crucial for sewing small, tubular items like trouser hems, cuffs, and children’s clothing.
6. LED Lighting
Good lighting is more important than you might think.
Visibility is key: Good illumination of the needle area helps with visibility, especially when you’re working on detailed seams or with darker fabrics. Many modern machines come with bright LED lights, which are a vast improvement over older, dimmer bulbs.
7. Reverse Lever/Button
This is a fundamental feature for securing your stitches.
Crucial for durability: A reverse lever or button allows you to sew backwards a few stitches at the beginning and end of each seam. This locks the stitches in place and prevents your work from unravelling.
Bonus Feature: Speed Control Slider (Sewing Machine Tips for Beginners)
This is a brilliant feature for building confidence.
Start/Stop Button: On some computerised models, a start/stop button is also available, which can be very helpful for beginners who aren’t yet comfortable with a foot pedal.
Allows for control: A speed control slider allows you to set a maximum speed for your machine, regardless of how hard you press the foot pedal. This enables you to sew at a slower, more controlled pace, reducing mistakes and helping you master a consistent seam.
Budget-Friendly Sewing Machines for Beginners (Budget Sewing Machines for Beginners)
You don’t need to spend a fortune to get a great first machine. There are many reliable, affordable sewing machine options on the market.
Finding Value in a Novice Machine
Reasonable price ranges: For a solid beginner sewing machine, a price range of £150-£300 is a good starting point. This range often includes machines with a metal internal frame and the key features we’ve outlined.
Affordable doesn’t mean low quality: An affordable sewing machine can still be a reliable one if you focus on build quality and essential features.
Best Budget Sewing Machines for Beginners
When it comes to finding a novice sewing machine, there are a few brands and models that consistently get good feedback in the UK market.
General Recommendations: Look at trusted brands like Brother, Singer, and Janome. Hobbycraft’s own brand also offers popular entry-level models.
Where to Buy: You can find these machines at specialist sewing machine shops like The Sewing Studio and Direct Sewing Machines, as well as department stores like John Lewis and Argos. Online retailers like Amazon UK and Singer Outlet also have a huge selection.
Value for Money Recommendations
Look for a Good Warranty: Check for a good warranty and see if spare parts and servicing are readily available in the UK. This is crucial for maintaining your novice sewing machine over time.
Prioritise Durability: A machine with a strong metal frame is a better long-term investment than an all-plastic one. It will be a more durable sewing machine in the long run.
User Reviews and Feedback (Sewing Machine Reviews for Beginners)
Before you make your final decision, take some time to read sewing machine reviews for beginners from other users. Their real-world experience can be invaluable.
The Importance of Real-World Experience
What to look for: Look for comments on the machine’s ease of threading, stitch quality, noise level, and customer support. You’ll find honest insights that a product description might not provide.
Community insights: Forums like Reddit can be a great place to ask “what is the best sewing machine for a novice?”. You’ll often find a community of experienced sewers who are happy to share their recommendations.
What Users Say About Their Novice Machines
Addressing frustrations: Common frustrations, such as thread jamming or tension issues, can often be solved with the right machine features or simple sewing machine tips for beginners. For example, a top-loading bobbin system can help prevent a lot of common bobbin-related frustrations.
Common positive feedback: Beginners often praise machines that are “easy to learn,” “great for simple repairs,” and “reliable for my first few projects.”
Setup and Initial Use Tips (Sewing Machine Tips for Beginners)
Once you’ve chosen your novice sewing machine, it’s time to get it set up.
Unboxing and First Steps
Read the manual: Don’t skip this step! The manual is your best friend. It will show you exactly how to thread your specific machine and what each dial does.
Practice, practice, practice: Start by practising on scrap fabric. Sew straight lines, turn corners, and get a feel for the foot pedal and speed.
Basic Maintenance for Longevity
Simple cleaning: Regularly remove lint and thread build-up from the bobbin area and under the needle plate.
Needle changes: Change your needle regularly, especially after a big project. A fresh, sharp needle makes a huge difference to your stitch quality.
Proper storage: Keep your beginner sewing machine covered when not in use to protect it from dust.
Final Thoughts on Choosing the Best Novice Sewing Machine
Your first sewing machine is the foundation of your creative journey. Choosing the right one can make all the difference in whether sewing becomes a lifelong passion or a short-lived frustration.
Summary of Key Features
Remember to prioritise ease of use, essential stitches, a clear threading system, and a robust build. The best novice sewing machine for you will be the one that feels intuitive and encourages you to keep stitching.
Empowerment for New Sewers
Don’t be afraid to take your time and do your research. The right beginner sewing machine will make the learning process enjoyable and rewarding, giving you the confidence to tackle more and more ambitious projects. This foundational choice paves the way for a rich and creative sewing hobby. Happy sewing!
About the Author: Grace, Founder of London Sewing Courses
Grace is the heart and hands behind London Sewing Courses. A passionate and experienced sewing instructor, she founded the studio with a unique mission: to create a calm, friendly space for adults to learn and connect, while using the profits to fund free sewing classes for local children in need. Her personal expertise and commitment to community building are at the core of every class and every stitch.
Welcome, budding creators and curious crafters! Have you ever dreamt of mending your own clothes, crafting unique gifts, or even designing your very own garments? Perhaps you’ve acquired a sewing machine, still gleaming in its box, or dusted off a beloved hand-me-down, and found yourself asking, “how do I learn to use a sewing machine?” You’re not alone! Many aspiring sewists look at their machine and feel a mix of excitement and apprehension, thinking, “is learning to use a sewing machine hard?”. Let us reassure you right from the start: learning to use a sewing machine is a wonderfully rewarding and entirely achievable journey, especially with the right guidance.
Introduction to Sewing for Beginners
The enduring appeal and practical benefits of learning to sew. Sewing for beginners opens up a world of possibilities, transforming simple fabric into something truly personal and practical. It’s a skill that lasts a lifetime, allowing you to create beautiful items for your home, craft unique garments, or simply mend and alter existing pieces, giving them a new lease of life. Imagine the satisfaction of seeing your creative visions come to life, stitch by stitch! Beyond the joy of creation, sewing is incredibly practical, helping you save money on alterations and repairs, and even contributing to a more sustainable lifestyle by extending the life of your textiles.
Why a sewing machine is a fundamental tool for various crafting and repair tasks. While hand sewing has its place for delicate finishes or quick mends, the sewing machine is truly the workhorse of the modern sewist. It allows you to produce strong, consistent stitches at a much faster pace, making larger projects manageable and professional-looking. Whether you’re crafting a sturdy tote bag, assembling a flowing dress, or adding decorative flair to a cushion, your machine will be your most valuable companion. Its efficiency and versatility make it an indispensable tool for almost any fabric-based project you can imagine.
Reassure prospective learners that mastering a sewing machine is a straightforward process with the right guidance. It’s completely normal to feel a little daunted by the array of dials, levers, and mechanisms on a sewing machine. Many people ask, “is it easy to learn to use a sewing machine?” and the answer is a resounding yes! While there’s a learning curve, much like learning to drive a car, it quickly becomes intuitive with practice. You don’t need to read every single page of the manual before you start; many prefer to jump in and learn as they go, referring to the manual for specific instructions. Think of this guide as your patient, skilled tutor, here to walk you through each step of your creative journey, demystifying the process and building your confidence.
Overview of what this comprehensive guide will cover to help readers effectively learn to use a sewing machine. This comprehensive guide is designed to help you confidently learn to use a sewing machine, from the very first plug-in to completing your first project. We’ll delve into the sewing machine basics, including its essential parts and how they work together to create magic with thread. We’ll then provide precise, step-by-step instructions on how to operate a sewing machine, covering everything from winding a bobbin to mastering different stitch types. You’ll also discover fundamental sewing techniques for beginners, helpful troubleshooting tips for common issues you might encounter, and inspiring beginner sewing patterns to get you started. Finally, we’ll guide you on where to learn to use a sewing machine further, from online resources to local sewing workshops near me. So, take a deep breath, embrace your curiosity, and let’s unlock the wonderful world of sewing together!
Before you begin stitching, it’s incredibly helpful to familiarise yourself with the different parts of your sewing machine and understand their purpose. Think of it as getting to know your new creative companion!
Understanding Your Machine’s Anatomy
Every sewing machine, whether a classic mechanical model or a modern computerised one, shares core components that work in harmony to create stitches.
Main Components: Detailed explanation of the handwheel, bobbin winder, spool pin, thread guides, tension dial, stitch length/width selectors, pattern selector, reverse lever, presser foot lifter, needle clamp, presser foot, needle plate, feed dogs, and foot pedal.
Power Switch and Cord: This is your machine’s lifeline. It’s normally found on the right side or back of the machine. Some models power on immediately when plugged in, while others have a dedicated switch.
Spool Pin: Located on the top of your machine, this small pin holds your spool of top thread. It might be horizontal or vertical, depending on your machine’s design. Some machines also come with caps or holders to secure the spool.
Bobbin Winder: Typically to the right of the spool pin, this is where you load an empty bobbin to fill it with thread from your main spool. There’s often a stopper or lever that disengages the needle when winding the bobbin.
Thread Guides: These are a series of hooks, grooves, and channels that guide the top thread from the spool pin all the way down to the needle. Following the numbered path on your machine is crucial for correct threading.
Tension Dial: A small numbered wheel, usually near the thread take-up lever. This controls the amount of pressure applied to the top thread as it feeds through, ensuring balanced stitches. Incorrect tension can lead to looping or puckering stitches. We’ll discuss this in more detail later.
Stitch Adjustment Buttons/Dials: These controls allow you to select your desired stitch type (such as a straight stitch or zigzag), adjust the stitch length (how far apart each stitch is), and the stitch width (for zigzag or decorative stitches). Computerised machines often have screens, while mechanical ones use dials.
Pattern Selector: This allows you to choose from the various stitch patterns your machine offers, from basic straight stitches to more elaborate decorative ones.
Reverse Lever/Button: An essential feature that allows you to stitch backwards, typically used at the beginning and end of a seam to secure your stitches and prevent them from unravelling. You might need to hold it down or press it once to engage.
Handwheel: Located on the side of the machine, this large wheel allows you to manually raise and lower the needle. Always turn it towards you (counter-clockwise) to avoid tangles or timing issues.
Presser Foot Lifter/Lever: Usually a lever located behind or to the right of the needle assembly. It raises and lowers the presser foot, which holds your fabric in place while sewing. You must lower it before you start stitching.
Needle Clamp Screw: This metal screw securely holds the sewing machine needle in place. You’ll loosen it with a screwdriver or your fingers to change needles.
Presser Foot: This metal attachment sits just below the needle and looks somewhat like a small ski. It applies pressure to the fabric, keeping it flat against the needle plate and allowing the feed dogs to move it smoothly. Different feet are available for various tasks, like zippers or buttonholes.
Needle Plate (or Throat Plate): The flat metal plate directly beneath the needle. It often features measurement markings or guidelines to help you maintain a consistent seam allowance.
Feed Dogs: These are small, serrated metal “teeth” that emerge from slots in the needle plate, just under the presser foot. Their primary job is to grip the fabric and move it forward at a steady pace as you stitch.
Foot Pedal: This pedal sits on the floor and connects to your machine by a cord. It controls the speed of your stitching; pressing harder makes the needle move faster. It’s widely recommended to use the foot pedal for better control.
Bobbin Cover: A movable cover, usually near the needle plate, that provides access to the bobbin compartment.
Safety Features: Emphasise proper plugging/unplugging, keeping fingers clear of the needle. Safety is paramount when learning to use a sewing machine. Always ensure your machine is unplugged before you begin any setup, threading, or needle-changing tasks. This prevents accidental power-ons and potential injury from a sharp, moving needle. Keep your fingers well clear of the needle area while sewing. Your hands are for guiding the fabric, not pushing or pulling it directly under the needle. Develop the habit of keeping your foot off the pedal when your hands are near the needle area.
Types of Sewing Machines for the New Seamster
When embarking on your sewing journey, you’ll encounter various types of machines, each with its own advantages. Understanding these can help you decide which is the best sewing machine for me.
Mechanical Machines: Simple, durable, and often recommended for sewing for beginners due to their straightforward operation. Mechanical machines are often the traditional choice for sewing for beginners. They typically feature manual dials and levers for stitch selection, length, and width. Their simpler mechanics make them durable and often easier to troubleshoot basic issues. If you’re looking for a workhorse machine that focuses on fundamental stitches without too many bells and whistles, a mechanical model can be an excellent starting point. They are robust and reliable, often lasting for decades with proper sewing machine maintenance.
Computerised Machines: Offer more features, stitches, and often automated functions; discuss their benefits and potential for growth. Computerised machines, as the name suggests, incorporate electronic components and often have a digital display. These machines tend to offer a wider variety of stitches, including decorative and stretch options, and may have automated features like needle threaders or stitch memory. While they might seem more complex initially, their user-friendly interfaces and automated functions can greatly enhance your sewing experience and offer more room for growth as your skills develop. Many even feature speed control sliders to help you ease into stitching.
Overlockers (Sergers): Briefly mention their purpose (finishing seams) as a potential future upgrade. While primarily focusing on standard sewing machine basics for beginners, it’s worth noting that an overlocker (often called a serger in other regions) is a different type of machine entirely. Overlockers use multiple threads (typically 3-5) and a cutting blade to simultaneously sew, trim, and finish fabric edges, creating very neat and professional-looking seams, especially on knit fabrics. They are fantastic tools for garment sewing but are generally not recommended for true beginners as a first machine due to their complexity. Consider an overlocker as a future upgrade once you’ve mastered your basic sewing machine skills.
Considerations for Choosing Your First Machine (Best Sewing Machines for Beginners) Choosing your first sewing machine is an exciting step! The best sewing machine for beginners isn’t necessarily the most expensive or feature-rich one, but rather one that aligns with your initial goals and comfort level.
Prioritise Basic Stitches: For starters, you primarily need a machine that can perform a straight stitch and a zigzag stitch. A buttonhole feature is also highly beneficial. These foundational stitches will enable you to tackle a vast array of projects. Don’t be swayed by machines offering hundreds of decorative stitches if you’re just beginning; you’ll likely use only a handful.
Ease of Threading: A machine that is intuitive to thread, often with clear numbered guides or even an automatic needle threader, will save you a lot of frustration. This is a common pain point for new sewists, so a user-friendly threading system is a big plus.
Robust Build: While cheaper machines might be tempting, investing in a quality machine, perhaps one with more metal parts, can lead to a much more satisfying experience in the long run. Durable machines are less prone to issues like poor stitch tension or thread breakage, which can quickly discourage a beginner. Look for models known for their reliability rather than just a multitude of functions.
Suitable Price Points: Entry-level machines are perfectly adequate for learning to use a sewing machine. You don’t need to spend a fortune to get started. However, be wary of extremely cheap machines that might offer a frustrating experience. If possible, try out a machine before buying it.
Common Beginner-Friendly Brands: Brands like Brother and Singer often offer excellent beginner models. Many users recommend these for their reliability and ease of use. Researching reviews and asking other sewists in online forums or local fabric shops for recommendations can be very helpful.
Portability: Consider where you’ll be sewing. If space is limited or you plan to attend sewing classes for adults, a lighter, more portable machine might be a good choice.
Machine Manual: Ensure the machine comes with a clear, comprehensive manual, or that one is readily available online. This will be your primary guide as you learn how to use a sewing machine.
Remember, the goal is to find a machine you’re comfortable and happy with, one that encourages you to keep coming back to your creative projects. If you find yourself eager to sew, you’ve made a great choice!
Now that you’re familiar with your machine’s anatomy, it’s time to delve into the practical steps of how to operate a sewing machine. This is where the real fun begins, and we’ll break it down into manageable steps to ensure a smooth and enjoyable learning to use a sewing machine experience.
Setting Up Your Workstation
A well-organised and comfortable workspace is key to enjoyable and efficient sewing.
Placement and Lighting: Ensure a stable surface and adequate light. Place your sewing machine on a sturdy table or desk that can handle the machine’s vibrations. A dining room table can work, but ensure the machine is near a leg for extra stability. The surface should also be non-slippery to prevent your machine from “travelling” as you sew. Sit in a chair that allows you to be comfortable, with your arms and shoulders relaxed, and your machine at a height similar to a computer keyboard. Good lighting is crucial for precise stitching and reducing eye strain. Most machines come with a built-in sewing light, which is a good start. However, consider supplementing this with a gooseneck lamp directed at the presser foot area, positioned so it illuminates your work without shining directly into your eyes. A well-lit room overall will also help reduce harsh contrasts.
Power Connection: Safe plugging in of the machine and foot pedal. Before connecting any power, ensure the machine’s power switch is off. If your machine has a detachable power cord and foot pedal cord, locate their respective ports on the side or back of the machine. Plug them in securely. Position the foot pedal comfortably on the floor where you can easily control it with your dominant foot. Only once everything is connected and your workstation is ready should you turn on the power switch or plug the machine into the mains.
Threading the Machine: Step-by-Step Mastery
Threading your sewing machine might seem complex at first glance, but it’s a foundational skill for learning to use a sewing machine. All machines have a top thread (from the spool) and a bottom thread (from the bobbin), both essential for forming a stitch.
Winding the Bobbin: Detailed instructions on how to wind a bobbin evenly and correctly, ensuring proper tension. This is the first crucial step in getting your machine ready.
Place the Spool: Position your main spool of thread onto the spool pin. Pay attention to how the thread comes off the spool – for cross-wound threads (most common, zigzagging pattern), it should come off the end. For stacked threads (older method, smooth windings), it should unwind from the side, often requiring a vertical spool pin. Some machines have an accompanying cap to hold the spool in place.
Guide the Thread: Follow your machine’s specific diagram or arrows (often numbered) for bobbin winding. This typically involves guiding the thread around a small tension disc or guide near the spool pin, ensuring it’s pulled tightly between any discs to ensure proper tension when winding. If you don’t hear a “clicking” noise when pulling the thread through the tension gauge, your bobbin might not wind with good tension.
Prepare the Bobbin: Take an empty bobbin (ensure it’s compatible with your machine). Feed the thread through one of the small holes in the bobbin, from the inside out, leaving a few inches of tail.
Place on Winder: Put the bobbin onto the bobbin winder pin.
Engage Winder: Slide the bobbin winder to the right (or engage a lever/pull out the handwheel). This action typically disengages the sewing needle, preventing it from stitching while the bobbin winds.
Wind: While holding the thread tail initially for a few rotations, gently press the foot pedal. The bobbin will begin to fill. Most machines automatically stop when the bobbin is full.
Finish: Once wound, slide the bobbin winder back to its original position. Snip the thread connecting the bobbin to the spool.
Inserting the Bobbin: Guidance for both top-loading (drop-in) and front-loading bobbin systems. How you insert the bobbin depends on your machine’s system. Always refer to your manual for precise instructions.
Top-Loading (Drop-in) Bobbins: These are often found under a clear cover on the needle plate, allowing you to see when you’re running low on thread. You typically drop the bobbin in so the thread unwinds in a specific direction (usually counter-clockwise). Then, you pull the thread through a designated notch or guide, often hearing a click as it secures. Leave a few inches of thread hanging out.
Front-Loading Bobbins: These are inserted into a bobbin case, which then slots into the machine behind a small door, usually at the front. The bobbin thread needs to be seated correctly in the bobbin case for proper tension. After inserting the bobbin, close its cover.
Threading the Upper Thread (How to Thread a Sewing Machine / How to Put Thread into Sewing Machine): A precise, step-by-step walkthrough, highlighting the importance of following the machine’s numbered path and lifting the presser foot to engage tension discs. Mention specific threading techniques for popular UK brands if widely relevant (e.g., “how to thread a Singer sewing machine” or “how to thread a Brother sewing machine” as general examples of machine-specific instructions). This is arguably the most critical step for smooth stitching. Incorrect upper threading is a common cause of stitch problems.
Needle Up: Ensure your needle is in its highest position. This aligns the take-up lever correctly for threading. You can achieve this by turning the handwheel towards you or pressing a needle-up button if your machine has one.
Spool Pin: Place your main spool of thread on the spool pin, ensuring the thread comes off correctly.
Follow the Path: Most machines have numbered guides and arrows printed on their body. You’ll typically guide the thread:
Through the first thread guide at the top.
Down the main channel (often numbered “2” or “3”).
Around the bottom of this channel, making a U-turn.
Back up the second channel to the take-up lever.
Engage Take-Up Lever: This is a crucial step. The thread must go through the eye or hook of the take-up lever, often from right to left. If the lever isn’t visible, turn the handwheel towards you until it comes up.
Down to the Needle: Guide the thread back down the machine, through any remaining hooks or guides just above the needle.
Thread the Needle: The final step is to pass the thread through the eye of the needle. Most machines thread from front to back, but check your manual. If you have an automatic needle threader, follow its specific instructions; these are wonderful time-savers. If threading by hand, a clean, moist end of the thread can make it easier. Pull several inches of thread through to the back. For common machines, such as when you learn how to thread a Singer sewing machine or how to thread a Brother sewing machine, the general path is often similar to the one described, but always defer to your specific model’s manual for accuracy.
Bringing Up the Bobbin Thread: The final crucial step before you begin stitching. Now that both your top thread and bobbin are in place, you need to bring the bobbin thread up to meet the top thread.
Hold Top Thread: Hold the tail of your top thread (the one coming from the needle) with your left hand, gently pulling it away from the machine.
Turn Handwheel: With your right hand, slowly turn the handwheel towards you (counter-clockwise). The needle will go down into the needle plate, catch the bobbin thread, and then come back up.
Pull Up Loop: As the needle rises, you should see a loop of the bobbin thread appear through the needle plate. Tug gently on the top thread you’re holding, and the bobbin thread loop will emerge.
Free the Thread: You can then use scissors or a pointed tool to pull the bobbin thread fully free.
Position Threads: Pull both the top and bobbin threads to the back of the machine, under the presser foot, leaving about 4-6 inches of excess. This prevents them from being pulled back into the machine when you start sewing. You are now ready for your first stitch!
Controlling the Stitch: Your First Seams
With your machine threaded, it’s time to start sewing! This section focuses on the practical application of how to operate a sewing machine to create your first seams.
Lowering the Presser Foot: Why this is essential before you begin to sew. Before you even touch the foot pedal, always lower your presser foot onto the fabric. The presser foot applies the necessary pressure to the fabric, allowing the feed dogs to grip and move it evenly. If the presser foot is up, your fabric won’t feed properly, and you’ll end up with a tangled mess or stitches that don’t form correctly. It’s a habit you’ll quickly develop.
Foot Pedal Control: Learning to start slowly and gradually increase speed; practising consistent speed. The foot pedal is your accelerator. The more pressure you apply, the faster your machine will stitch. As a beginner, it’s paramount to start slowly and gently. Just a little pressure is enough to get the needle moving at a controlled speed. Practise maintaining a consistent speed throughout your stitch. This creates even, beautiful stitches. It’s perfectly fine to stop and start again as you get a feel for the pedal. Many machines also offer a speed control slider, allowing you to limit the maximum speed, which can be incredibly helpful when you’re learning how to use a sewing machine. Don’t “floor it” until you feel completely comfortable.
Guiding Fabric: How to guide fabric without pushing or pulling, letting the feed dogs do the work. This is one of the most important aspects of mastering your sewing machine. Your hands are there to guide the fabric, not to push or pull it through the machine. The feed dogs beneath the presser foot are designed to move the fabric along at the correct speed. Pushing or pulling can distort your fabric, break the needle, or cause stitches to jam. Position your hands lightly on the fabric, one to the left and one in front of the presser foot, keeping them well clear of the needle. Your fingertips should slide easily over the fabric as the machine feeds it through. If the fabric isn’t moving fast enough, increase your foot pedal pressure, rather than forcing the fabric. This takes practice, but once mastered, it will make your sewing much smoother and more enjoyable.
Backstitching: Explaining its purpose for securing seams at the beginning and end, and demonstrating the technique. Backstitching is a fundamental technique for securing your stitches. Without it, your seams could easily unravel, especially at the start and end of a stitching line.
Start of Seam: Begin by sewing a few stitches (typically 2-5) forward.
Reverse: Then, hold down your reverse lever or button and sew backwards over those same few stitches.
Continue Forward: Release the reverse control and continue sewing forward along your seam. This creates overlapping stitches that lock the thread in place.
End of Seam: When you reach the end of your seam, stop a few stitches from the edge. Engage the reverse control again and sew backwards for 2-5 stitches. Then, release and sew forward again until you reach the fabric edge or beyond.
The only time you might not backstitch is for temporary stitches, like basting, which are designed to be removed later. Getting into the habit of backstitching will ensure durable, professional-looking projects.
Pivoting: How to turn corners neatly by stopping with the needle down. When sewing square or rectangular shapes, you’ll often need to turn a corner. Pivoting allows you to do this neatly without breaking your stitching line.
Sew to Corner: Sew along your seam line until you reach the point where you want to turn the corner.
Needle Down: Stop with the needle down in the fabric. If your needle isn’t down, turn the handwheel towards you until it is.
Lift Presser Foot: Raise the presser foot using its lever. Keeping the needle down acts as an anchor, holding your fabric in place.
Rotate Fabric: With the needle still in the fabric, gently pivot or turn your fabric to align with the new stitching direction.
Lower Presser Foot: Lower the presser foot back down onto the fabric.
Continue Sewing: Resume sewing in the new direction.
This technique ensures sharp, crisp corners, greatly enhancing the finish of your projects. For tight curves, you can use a “stop-and-go” method, taking a few stitches, lifting the presser foot, turning slightly, lowering, and repeating.
Adjusting Stitch Settings
Beyond the basic operation, learning to use a sewing machine also involves understanding how to adjust your stitch settings to suit different fabrics and purposes.
Stitch Length: Understanding how to adjust it for different fabrics and purposes (e.g., longer for basting, shorter for stronger seams). Stitch length refers to how long each individual stitch is. On your machine, this is typically controlled by a dial or buttons.
Standard Length: For most general sewing on woven fabrics, a standard stitch length of 2.5 to 3.5 millimetres (mm) is common. This provides a strong, neat seam.
Shorter Stitches: You’ll want a shorter stitch length (e.g., 1.5-2mm) for very thin, lightweight fabrics, loosely woven materials, or when working with stretchy fabrics. Shorter stitches create a denser, stronger seam. They are also used for securing high-stress areas like corners.
Longer Stitches: A longer stitch length (e.g., 4-5mm) is used for thicker fabrics, sewing through multiple layers, or when you need a basting stitch. Basting stitches are temporary and easily removed, as their longer length makes them less secure. Longer stitches are also suitable for materials like leather or vinyl, where needle marks can easily damage the fabric.
Always adjust your stitch length with the needle up and out of the fabric, as it can sometimes cause the needle to move.
Stitch Width: Primarily for zigzag stitches, explaining how to adjust it for finishing raw edges or decorative work. Stitch width primarily applies to zigzag and other decorative stitches. It controls how far the needle moves from side to side. For straight stitches, the width setting often controls the needle position (left, centre, or right), rather than actual width.
Zigzag Stitch: The zigzag stitch is incredibly versatile. A narrow zigzag stitch can act as a makeshift stretch stitch for knit fabrics if your machine doesn’t have a dedicated one. A wider zigzag stitch is excellent for finishing raw edges of fabric to prevent fraying. It’s also used for decorative purposes or appliqué.
Adjusting Width: On computerised machines, you’ll typically use buttons to increase or decrease the width. On mechanical machines, a dial controls it. Experiment on scrap fabric to see how different widths look.
Tension: A comprehensive explanation of thread tension, how to test for balanced stitches, and basic adjustments to resolve common issues like looping thread. Thread tension is crucial for strong, balanced stitches. It controls how much thread passes through the machine for each stitch. Both the top thread and the bobbin thread have tension settings, though the bobbin tension is usually preset and rarely needs adjustment.
Troubleshooting Tip: If you’re having persistent issues with thread tension, such as the thread not laying close to the fabric or knotting up, check the “Thread Bunching Solution Guide” (if you have one) or consult your machine’s manual. Often, the problem lies not in the tension dial itself but in incorrect threading of the upper thread or bobbin.
Balanced Stitch: The ideal stitch looks the same on both the top and bottom of your fabric, with the threads locking neatly in the middle of the fabric layers. You should see one thread on each side.
Too Loose (Top Tension): If the top tension is too loose, the top thread will appear wavy or loose on the top of the fabric, and the bobbin thread will lie flat on the bottom, often looking messy or like loops. This is commonly referred to as a “bird’s nest” on the underside of your fabric. To fix this, you need to increase the top tension using the tension dial.
Too Tight (Top Tension): If the top tension is too tight, the top thread will appear very straight, almost like one line, pulling the bobbin thread up to the top side of the fabric. The bottom side of the fabric might show gaps or pulls. To correct this, you need to decrease the top tension.
Default Setting: Many machines recommend a default tension setting, often around 4 or 4.5. This is a good starting point for most fabrics.
Testing Tension: The best way to learn how to use a sewing machine for tension is to test it. Always sew a few test stitches on a scrap piece of the actual fabric you’ll be using, folded in half to mimic two layers. This allows you to fine-tune the tension before you begin your project.
Once you’re comfortable with the basics of operating your machine, it’s time to explore fundamental sewing techniques for beginners that will form the backbone of your sewing skills.
Foundational Stitches and Seams
Straight Stitch: The most common stitch; importance of consistent seam allowance. The straight stitch is your go-to stitch for most construction seams. It creates a sturdy, straight line of stitching, perfect for joining two pieces of fabric together. For most projects, you’ll be using this stitch almost exclusively. A key concept when working with the straight stitch is seam allowance. This is the distance from the raw edge of your fabric to your line of stitching. Sewing patterns will specify a seam allowance (e.g., 1.5 cm or 5/8 inch), and it’s vital to maintain this consistently. Your machine’s needle plate often has guidelines marked in centimetres or inches to help you align your fabric and maintain an even seam allowance. Practising sewing straight lines, focusing on keeping your fabric edge aligned with these guides, is excellent practice for consistency.
Zigzag Stitch: For preventing fabric fraying and sewing stretch fabrics. The zigzag stitch is incredibly versatile and a must-know for any beginner.
Finishing Raw Edges: Its primary use for beginners is to prevent raw fabric edges from fraying. Instead of leaving a raw edge that can unravel, you can sew a zigzag stitch along the edge, effectively encasing the threads and creating a neat finish. Many inexpensive machines even offer an overlock stitch setting, which is a variation of the zigzag stitch for edge finishing.
Sewing Stretchy Fabrics: Crucially, the zigzag stitch is also used when sewing stretchy fabrics like jersey knit. Unlike a straight stitch, which can cause seams to pop when stretched, the zigzag stitch has inherent give, allowing the seam to stretch with the fabric. For a more subtle look, a narrow zigzag stitch or a dedicated stretch stitch (which is a very narrow zigzag) can mimic a straight line while retaining stretch.
Decorative Use: Of course, the zigzag stitch can also be used for decorative purposes or appliqué.
When using a zigzag stitch on stretchy fabrics, ensure you’re also using the correct needle, such as a ballpoint or jersey knit needle, which has a rounded tip to prevent tearing the fabric’s elasticity.
Pressing Techniques: Emphasise the importance of pressing seams as you go for a professional finish. Often overlooked by beginners, pressing is as important as stitching for a professional finish. It’s not just about removing wrinkles; it’s about shaping your fabric and creating crisp, flat seams.
Seam Direction: Seam allowances are typically pressed open (flat on both sides of the seam) for garment sewing, or pressed to one side (usually towards the darker fabric or as per pattern instructions).
Pressing as You Go: Get into the habit of pressing your seams after each significant step of sewing, rather than waiting until the end. This is sometimes referred to as “ironing every seam”.
How to Press: Use an iron and ironing board or mat. Press by lifting and replacing the iron onto the fabric, rather than sliding it, to avoid distorting the fabric.
Congratulations, you’ve embarked on a fantastic journey of creativity and skill! We’ve walked through the sewing machine basics, demystified how to operate a sewing machine, explored essential sewing techniques for beginners, and discovered inspiring beginner sewing patterns to get you started. From understanding the handwheel to mastering the perfect zigzag stitch, every step you’ve taken brings you closer to unlocking your full potential.
Remember, the true mastery of learning to use a sewing machine comes with consistent practice. Each stitch, whether perfect or slightly wobbly, is a valuable learning experience.
Embrace the process, be patient with yourself, and celebrate every small victory. The possibilities are truly endless once you can confidently learn to use a sewing machine. You can mend, create, and customise to your heart’s content.
We hope this guide has inspired you to explore more sewing crafts for beginners and confidently tackle your next project. Keep on stitching, keep on learning, and most importantly, keep enjoying the wonderful world of sewing!
About the Author: Grace, Founder of London Sewing Courses
Grace is the heart and hands behind London Sewing Courses. A passionate and experienced sewing instructor, she founded the studio with a unique mission: to create a calm, friendly space for adults to learn and connect, while using the profits to fund free sewing classes for local children in need. Her personal expertise and commitment to community building are at the core of every class and every stitch.
Introduction: The Enduring Legacy of the Sewing Machine
For centuries, the sewing needle and thread were the primary tools for creating and mending garments. Then, in the 19th century, a revolutionary invention changed everything: the sewing machine. It transformed the textile industry, brought the art of crafting into homes, and made the creation of clothing and home furnishings accessible to the masses. Today, the sewing machine remains an essential tool for millions of people around the world, from hobbyists to professional designers.
However, for anyone new to the craft, the sheer variety of sewing machines on the market can be daunting. There are different types, brands, and countless features to consider. This comprehensive guide is designed to demystify the world of sewing machines, helping you understand their fundamentals, explore the different options available, and ultimately find the perfect machine to kickstart your creative journey.
What is a Sewing Machine?
At its core, a sewing machine is a mechanical device that uses a needle and a bobbin to join layers of fabric with a continuous stitch. It automates the hand-sewing process, making it faster, more consistent, and much more efficient.
Basic Components and How They Work Together
Understanding the basic anatomy of a sewing machine is the first step to using one effectively:
Motor: This is the power source, driving the internal mechanisms of the sewing machine to create the stitches.
Needle Bar & Needle: The needle of a sewing machine is attached to the needle bar and moves up and down, piercing the fabric to carry the upper thread through.
Presser Foot: This metal foot holds the fabric firmly against the feed dogs while you sew.
Feed Dogs: These small, toothed bars move the fabric forward, creating an even, consistent stitch length.
Bobbin System: The bobbin holds the lower thread. The machine’s hook catches this thread to create a secure lockstitch with the upper thread.
A computerized sewing machine is the modern version of the home sewing machine. It is controlled by a microprocessor and often features an LCD screen for selecting stitches and settings.
Pros: These are often referred to as an automatic sewing machine due to features like automatic needle threading, thread cutting, and even programmable stitch sequences. They offer a vast library of stitches and advanced precision.
Cons: They can be more expensive and may be overwhelming for an absolute beginner.
A heavy-duty sewing machine is built with stronger internal components and a more powerful motor than a standard domestic machine.
Purpose: They are specifically designed to handle thicker fabrics like denim, canvas, and multiple layers, and are a popular choice for those who need a durable sewing machine. A prime example is the singer heavy duty sewing machine range, which is well-regarded in the UK market.
A portable sewing machine is a lightweight and compact machine designed for easy transport.
Ideal Use Cases: They are perfect for taking to sewing classes, workshops, or for those with limited space. A portable sewing machine can range from a very basic model to a feature-rich compact sewing machine.
An industrial sewing machine is built for continuous, high-speed use in a factory or workshop setting.
Distinction from Home Machines: They are highly specialised, often performing only one type of stitch, and are not suitable for general home use due to their size, speed, and cost.
7. Overlockers and Embroidery Machines
These are specialised machines that are often used alongside a standard sewing machine. Overlockers (or sergers) are used to professionally finish seams, while embroidery machines are used for decorative stitching
Singer sewing machine is an iconic brand with a long history of making reliable machines. They are a household name in the UK.
Key Offerings: Singer is known for its wide range of products, from simple, affordable models for beginners to its powerful singer heavy duty sewing machine line. The search term machine singer sewing is often used by people looking for this brand.
Brother sewing machine is a modern brand known for user-friendly features and excellent value.
Product Range: They have a wide selection of machines that are particularly popular for home sewing and embroidery. Many people searching for sewing brother sewing machines are looking for a reliable, easy-to-use machine.
3. Janome Sewing Machine (Janome Sewing Machine)
Janome sewing machine is a Japanese brand that is highly regarded for its precision, smooth operation, and durability.
Specialisation: They are a favourite among quilters and garment makers, offering a broad spectrum of machines from entry-level to advanced.
4. Juki Sewing Machine (Juki Sewing Machine)
Juki sewing machine has an industrial heritage, which is reflected in their home machines. They are known for powerful motors, high stitch quality, and robust construction.
Target Audience: Juki is favoured by those who sew heavy fabrics or require a durable sewing machine with industrial-level performance.
A bernina sewing machine is a premium, Swiss-engineered machine known for its exceptional precision, durability, and smooth stitching.
Price Point: Bernina machines are often at the higher end of the price spectrum but are beloved by experienced sewers and quilters for their advanced features and quality.
Other Notable Brands in the UK
You will also find other great brands in UK shops, such as Pfaff, Husqvarna Viking, Silver, and Toyota.
(Quilt Shops Near Me / Quilting Shops Near Me / Quilt Shop Near Me / Quilt Stores Near Me / Essential Features to Look For (Sewing Machine Features)
When you are ready to buy a sewing machine, understanding these key features will help you make an informed decision.
1. Stitch Options
Basic Utility Stitches: Every machine, especially a sewing machine for beginners, should have a straight stitch for general sewing and a zigzag stitch for finishing raw edges or sewing on knit fabrics.
Buttonhole Stitches: A buttonhole function is a very useful feature. A one-step buttonhole is much easier to use for beginners than a four-step version.
Decorative Stitches: These are extra stitches for embellishment and are more common on computerised models.
2. Needle Types and System (Needle of a Sewing Machine)
Universal Needles: A universal needle of a sewing machine is good for most woven fabrics.
Specialised Needles: You will need specialised needles for different types of fabrics, such as ballpoint for knits, denim for heavy fabrics, and leather needles for a leather sewing machine.
Needle Insertion: The needle of a sewing machine must be inserted correctly to function properly. It’s a good idea to check this first if you encounter problems.
3. Presser Feet and Accessories (Sewing Machine Accessories)
Your machine comes with some basic sewing machine accessories, but you can also buy specialised feet to make your projects easier.
Standard Presser Feet: These include an all-purpose foot, a zipper foot, and a buttonhole foot.
Specialty Feet: A walking foot is essential for a sewing machine for quilting, a free-motion quilting foot is for free-motion quilting, and a rolled hem foot is for creating perfect hems.
4. Automatic vs. Manual Functions
Automatic Needle Threader: This is a highly valued feature that significantly reduces frustration.
Automatic Thread Cutter: This is a great time-saving feature that trims the threads at the end of a seam.
Speed Control Slider: A slider allows you to control the maximum speed of the machine, which is excellent for a sewing machine for beginners.
Needle Up/Down Position: This feature is invaluable for pivoting fabric accurately.
5. Bobbin System
A top-loading, drop-in bobbin is generally easier for beginners as it’s easy to access and see when the thread is running out.
6. Tension Control
Correct tension is crucial for a balanced, even stitch. Understanding how to adjust the tension dial is an important skill to learn.
7. Free Arm
A free arm is a narrow sewing bed that you can use for sewing small, tubular items like cuffs and trouser hems.
8. Lighting
Good built-in LED lighting is a brilliant feature for better visibility of the sewing area.
Finding the best sewing machine for beginners is about balancing a few key factors to find a machine that suits your needs and budget.
Budget: Set a realistic budget. An excellent sewing machine for beginners doesn’t have to be expensive.
Intended Use: What types of projects will you focus on? If you’re a keen quilter, you’ll need a different machine than someone who just wants to mend clothes.
User-Friendliness: Look for an easy-to-use sewing machine with clear instructions and an intuitive design.
Durability: A machine with a robust build, such as a metal internal frame, will last longer.
Brand Reputation & Support: Choose a brand with a good reputation and reliable after-sales service and warranty in the UK.
Sewing Machine Maintenance and Repair
Regular maintenance is key to keeping your sewing machine in good working order.
Common Issues
Skipped Stitches: Often caused by a dull, bent, or incorrectly inserted needle of a sewing machine.
Thread Jams: Usually caused by improper threading of the machine.
Broken Needles: Forcing fabric or sewing over a pin can break a needle.
Troubleshooting Tips for Maintaining Your Sewing Machine (Sewing Machine Maintenance)
Regular Cleaning: Remove lint from the bobbin area and feed dogs using a small brush.
Oiling: Follow your manual’s guide for where and how often to oil your machine.
Needle Replacement: Change your needle of a sewing machine frequently for the best results.
Proper Storage: Use a sewing machine cover to protect it from dust when not in use.
When to Seek Professional Help (Sewing Machine Repair / Sewing Machine Repair Near Me)
If you have a complex issue, it’s best to take your machine to a qualified technician. Searching for “sewing machine repair near me” will help you find local services in the UK.
Sewing Machines for Specific Projects
Some projects require a specialised sewing machine to achieve the best results.
1. Sewing Machine for Quilting (Sewing Machine for Quilting / Sewing Machine for Patchwork)
Key Features: A large throat space, a precise 1/4-inch seam capability, and a walking foot are essential for a sewing machine for quilting or sewing machine for patchwork.
2. Sewing Machine for Upholstery (Sewing Machine for Upholstery)
Key Features: A powerful motor and a heavy-duty sewing machine with a high presser foot lift are required for a sewing machine for upholstery to handle thick, dense fabrics.
Key Features: A very strong motor, a walking foot, and specialised leather needles are needed for a leather sewing machine to sew through tough leather without damaging the material or the machine.
An eco-friendly sewing machine is a machine made with sustainable practices, while a multi-functional sewing machine can combine sewing, quilting, and embroidery capabilities for the versatile crafter.
Conclusion: Your Perfect Stitching Partner Awaits
The world of sewing machines is vast and full of exciting possibilities. By understanding the different types, the best brands in the UK, and the key features to look for, you can make a confident choice that will support your creativity. Whether you’re mending a hem, creating a quilt, or tackling a complex garment, the right sewing machine is your perfect stitching partner. We encourage you to explore sewing machine reviews, visit local shops, and confidently select the best sewing machine to start or enhance your crafting adventures.
About the Author: Grace, Founder of London Sewing Courses
Grace is the heart and hands behind London Sewing Courses. A passionate and experienced sewing instructor, she founded the studio with a unique mission: to create a calm, friendly space for adults to learn and connect, while using the profits to fund free sewing classes for local children in need. Her personal expertise and commitment to community building are at the core of every class and every stitch.
Introduction: Finding Your Perfect Quilting Companion
Quilting is a truly special craft. It’s an art form that combines the precision of patchwork with the creativity of free-motion quilting, all to create something beautiful and lasting. The journey of transforming simple fabric into a cherished quilt is incredibly rewarding. However, to make this journey as smooth and enjoyable as possible, having the right tools is paramount. While you can technically quilt on any machine, a dedicated or feature-rich machine makes a significant difference, saving you time, effort, and a lot of frustration.
In this guide, we’ll help you navigate the world of quilting machines. We’ll explore what makes a machine a true quilting companion and help you understand what features to look for in a best rated sewing machine for quilting. We’ll delve into the essential features that turn a good machine into a great one for quilters, discuss some of the best rated sewing machines for quilting available in the UK market, and highlight some indispensable accessories. By the end, you’ll have all the information you need to find the best sewing machines for quilters and stitch your quilting dreams into reality.
Key Features of Best Rated Sewing Machines for Quilting
So, what exactly should you look for when shopping for a machine specifically for quilting? Here are the key features that set the best rated sewing machines for quilting apart from standard models.
1. Expansive Throat Space
The throat space is the area between the needle and the main body of the sewing machine. For quilters, this is a non-negotiable feature. As you move from piecing small blocks to quilting a large, multi-layered project, that space becomes your best friend.
Why it’s important: A generous throat space, often called a ‘long arm’ on domestic machines, is crucial for managing the bulk of a large quilt. It allows you to roll and manoeuvre your project without constantly stopping and starting, which is a game-changer for straight-line quilting and free-motion quilting.
2. Superior Stitch Quality and Options
For quilting, stitch quality is everything. You need a machine that can produce precise, consistent stitches every time.
Precise Straight Stitch: The cornerstone of sewing machine for patchwork. A perfect 1/4-inch seam is vital for making your patchwork blocks fit together accurately. Look for a machine that can be set to this precise measurement and holds its tension beautifully.
Specialised Quilting Stitches: On more advanced computerized sewing machines for quilting, you might find dedicated quilting stitches, such as hand-look quilting stitches or stippling patterns, that can add a professional finish to your work.
Utility Stitches: Don’t forget the basics. A good zigzag stitch is necessary for appliqué, while a blanket stitch or other utility stitches are great for finishing edges.
3. Robust Feed Mechanisms
Feeding your quilt layers evenly is perhaps the biggest challenge in quilting. A machine with a reliable feed mechanism can solve this problem.
Even Feed/Walking Foot Compatibility: A walking foot is a must-have accessory that helps the machine feed the top layer of your fabric at the same rate as the feed dogs feed the bottom layer. This prevents puckering and shifting, which is a common issue when sewing through multiple layers. Some higher-end models even have a built-in dual feed system, which works in a similar way and is an incredible feature for quilters.
Drop Feed Capability: This feature allows you to lower the feed dogs, giving you complete control over the fabric’s movement. It’s absolutely essential for free-motion quilting, where you’re ‘drawing’ with the needle.
Strong Motor: Quilting involves sewing through several layers of fabric and batting. A machine with a robust motor is needed to power through these layers without straining or skipping stitches.
4. Enhanced Lighting
Quilting, especially detailed work, requires excellent visibility.
Bright LED lighting: Good lighting, often provided by multiple LED lights, illuminates the needle area and a significant portion of the work surface. This helps you see your stitches clearly and reduces eye strain, particularly when working with intricate patterns or dark fabrics.
5. Speed Control
Quilting often requires varying speeds for different tasks.
Adjustable Speed Slider: A speed control slider is a fantastic feature. It allows you to set a maximum speed, which is incredibly useful for precise piecing and for controlling your free-motion quilting.
Start/Stop button: Many quilters find a start/stop button helpful, as it allows them to sew without a foot pedal. This can be great for hands-on, intricate work.
6. Needle Up/Down Feature
This small feature makes a world of difference for a quilter.
Perfect Pivoting: With the press of a button, you can set the machine to stop with the needle in the down position. This is invaluable for pivoting at corners and for intricate appliqué work, as it keeps your fabric securely in place.
7. Knee Lift
An ergonomic feature that’s a true luxury for quilters.
Hands-Free Operation: A knee lift is a lever that you nudge with your knee to raise and lower the presser foot. This allows you to keep both hands on your project at all times, guiding the fabric precisely without having to stop and reach for a lever.
8. Automatic Thread Cutter
Another feature that, once you have it, you can’t imagine quilting without.
Time-Saving Convenience: An automatic thread cutter trims both the top and bobbin threads with the press of a button. It’s a significant time-saver and makes for much tidier work.
9. Extension Table Compatibility (or Included)
An extension table provides a larger, flat surface to support your project.
Reduced Drag: By providing a larger workspace, an extension table reduces the drag of a heavy quilt, making it much easier to move the fabric smoothly. Many quilting-specific machines come with one included, but if not, it’s a worthwhile accessory to purchase.
(Best Rated Sewing Machines for Quilting / Top Quilting Sewing Machines)
Finding the right machine is a personal journey, but to get you started, here are seven categories of machines that are consistently praised in quilting sewing machine reviews in the UK.
1. Beginner-Friendly Quilting Machine
For those just starting, the ideal machine is a solid, user-friendly model that includes key quilting features without a huge price tag. A great sewing machine recommendation for quilting in this category would be a Brother or Janome compact quilting model.
Key Features: Look for a computerised machine with a decent throat space for smaller projects, a good array of utility stitches, speed control, and the inclusion of a walking foot and 1/4-inch seam foot. These machines are a perfect entry point for those new to patchwork.
2. Mid-Range Workhorse for Enthusiasts
This category is for the passionate quilter who is ready to upgrade their machine for more advanced features. The Singer Quantum Stylist 9960 is a classic example of a mid-range machine that is well-loved for its durability and extensive feature set.
Key Features: Higher stitch count, automatic needle threader, a powerful motor, and a variety of quilting-specific accessories. This type of machine is a true all-rounder for an enthusiastic quilter.
3. Durable Mechanical/Heavy Duty Option
For quilters who prefer a robust, no-nonsense machine that can power through thick layers, a heavy-duty mechanical machine is an excellent choice. The Janome HD3000 or the Singer Heavy Duty 44XX series are often recommended for their simple-to-maintain nature and sheer strength.
Key Features: A strong motor, a sturdy metal frame, and fewer electronic parts to go wrong. These machines are perfect for a sewing machine for patchwork and for handling thick layers of fabric and batting.
4. Advanced Computerised Machine
As your skills grow, you might want a machine that offers more customisation and precision. Machines like the Brother Innov-is F series or Janome M series are a fantastic next step.
Key Features: A larger throat space, a colour touchscreen for easy stitch selection, advanced tension control, and a wide variety of dedicated quilting feet. These computerized sewing machines for quilting offer fantastic precision for both piecing and intricate free-motion quilting.
5. Premium Quilting & Sewing Machine
For the dedicated quilter, a premium machine like the Bernina 570 QE or Pfaff Quilt Expression 720 is a dream. These are the top quilting sewing machines and are renowned for their superior stitch quality and innovative features.
Key Features: Large throat space, integrated dual feed, a vast selection of high-quality stitches, superior lighting, and ergonomic designs that make hours of sewing a joy. These machines are a serious investment but offer unparalleled performance.
6. Long-Arm Domestic Quilting Machine
For quilters who want to tackle very large projects without the expense of an industrial long-arm machine, there are domestic models with extended arm space, such as specific Brother or Janome models.
Key Features: A very large throat space that makes a queen-sized quilt manageable, high stitching speeds, and often come with precise stitch regulation to ensure perfect, even stitches.
7. Portable Quilting Machine
For the quilter who travels to classes or has limited space, a sturdy, compact model is a great option. These machines, often from brands like Brother or Janome, are lightweight but still offer key features.
Key Features: Lighter weight, still provide an adequate throat space for smaller projects, consistent stitch quality, and walking foot compatibility.
Quilting Accessories for Sewing Machines (Quilting Accessories for Sewing Machines)
Even the best rated sewing machine for quilting needs the right accessories to truly shine. Here are some of the essential tools every quilter should have.
Essential Presser Feet:
Walking Foot: Absolutely indispensable for keeping your layers from shifting.
1/4-inch Seam Foot: For achieving that perfect, consistent seam allowance in your patchwork.
Darning/Free-Motion Quilting Foot: The foot you need for free-motion quilting, allowing you to move your fabric in any direction.
Open Toe Appliqué Foot: Provides excellent visibility for intricate appliqué work.
Cutting Tools:
Rotary Cutters: A sharp rotary cutter is essential for precise, efficient cutting. You’ll want a few different sizes for various tasks.
Self-Healing Cutting Mats: A must-have to protect your surfaces and prolong the life of your rotary cutter blades.
Fabric Shears: A good pair of shears dedicated to fabric is a key tool in any sewing room.
Other Useful Accessories:
Pins & Clips: For securing your layers, both pins and quilting clips are incredibly useful.
Quilting Rulers: Acrylic rulers in various sizes are crucial for accurate cutting.
Quilting Gloves: Provide a better grip on your fabric during free-motion quilting, helping you guide the fabric more easily.
Quilting Needles: Needles specifically designed for quilting are stronger and sharper, allowing them to pierce multiple layers without breaking or skipping stitches.
High-Quality Thread: Investing in good-quality cotton or polyester thread will result in better-looking, more durable quilts.
What to Consider When Choosing a Sewing Machine for Quilting (Sewing Machine Recommendations for Quilting)
Choosing the right machine is a big decision. Here are some final points to consider.
Maintenance: Remember to regularly clean the lint from your machine, especially when using batting. Regular professional servicing will keep your machine running smoothly for years to come.
Budget: Be realistic about your budget. The price of machines varies widely, and knowing what you can afford will help you narrow down your choices. Remember that a higher price often means more features and durability, but there are excellent machines at every price point.
Quilting Level & Goals: A beginner doing small patchwork projects has different needs than an experienced quilter tackling king-sized quilts. Think about what you want to achieve with your quilting.
Space Availability: Consider the size of the machine and the throat space. Will it fit comfortably in your sewing area?
Brand Reputation: Brands like Bernina, Janome, Brother, Pfaff, and Juki are well-regarded in the quilting community. Look for quilting sewing machine reviews from these brands for a good starting point.
Dealer Support & Warranty: Especially for a more expensive machine, a good warranty and local dealer support in the UK can be invaluable for servicing, repairs, and advice.
Test Drive: If possible, try out a machine before you buy it. The feel of a machine in your hands is a very personal thing, and it’s important to find one that feels right for you.
The quest for the best rated sewing machine for quilting is a journey in itself, but a rewarding one. The perfect machine is the one that empowers you, not frustrates you. By focusing on the key features we’ve outlined—a generous throat space, superior stitch quality, and reliable feed mechanisms—you can confidently find a machine that will be your trusted companion for years to come.
Whether you’re a beginner just starting your patchwork journey or a seasoned pro looking for an upgrade, investing in the right machine will enhance your creativity and allow you to produce beautiful, lasting quilts. So, take the time to do your research, read the quilting sewing machine reviews, and find a machine that not only meets your needs but inspires your quilting dreams. Happy stitching!
About the Author: Grace, Founder of London Sewing Courses
Grace is the heart and hands behind London Sewing Courses. A passionate and experienced sewing instructor, she founded the studio with a unique mission: to create a calm, friendly space for adults to learn and connect, while using the profits to fund free sewing classes for local children in need. Her personal expertise and commitment to community building are at the core of every class and every stitch.