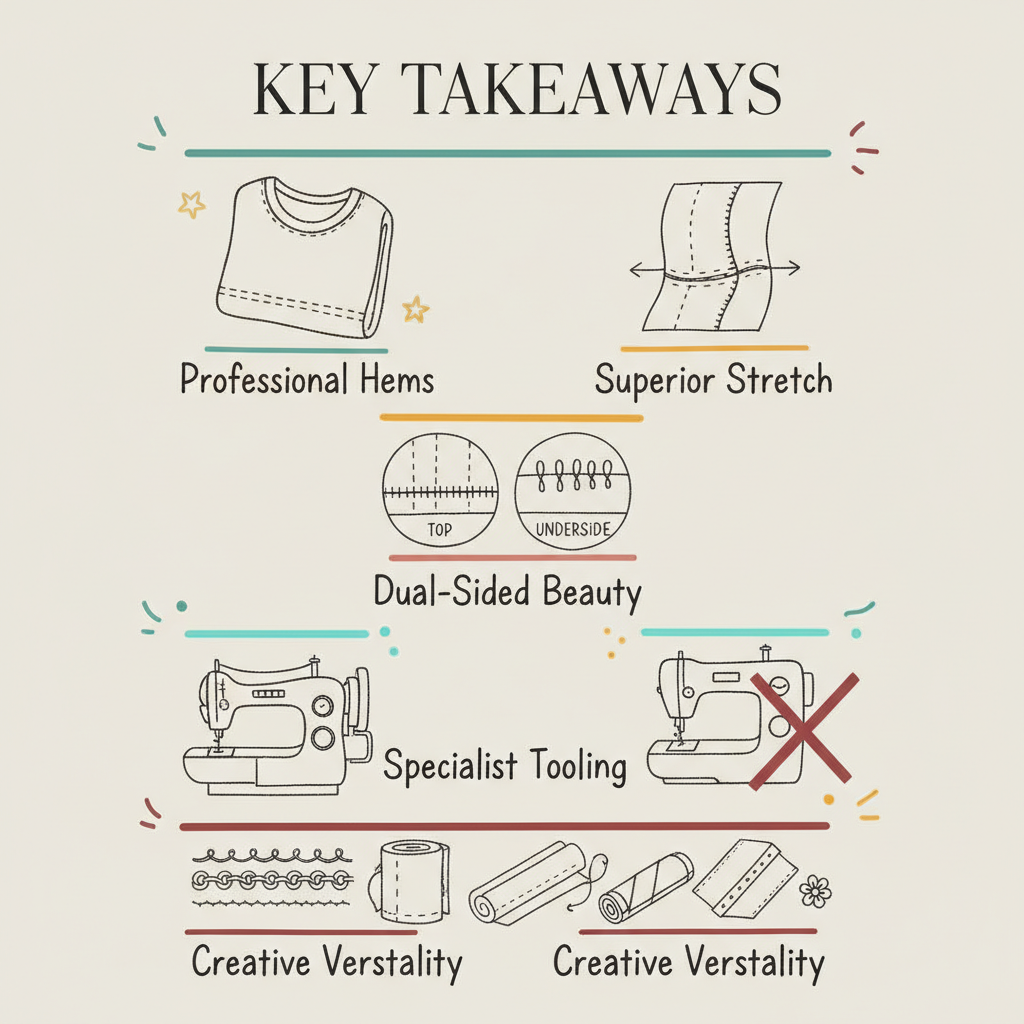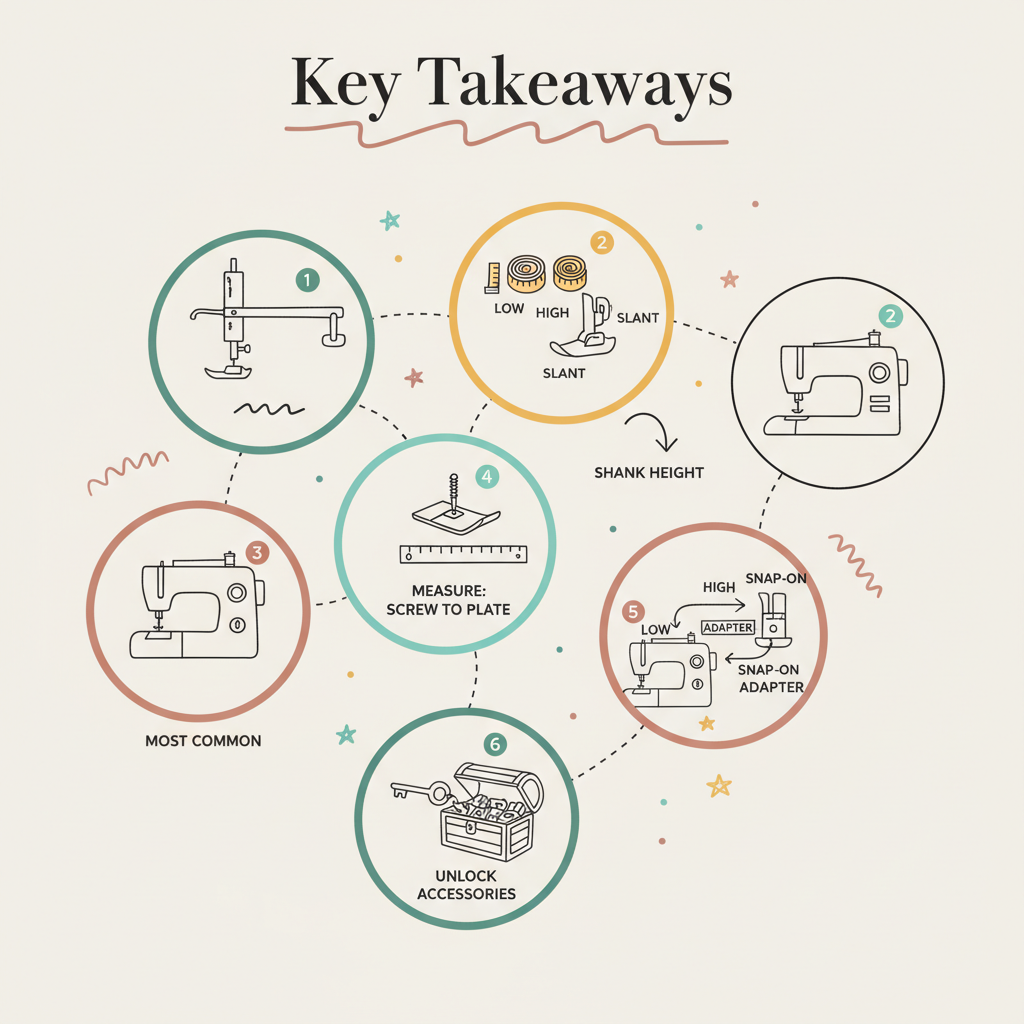
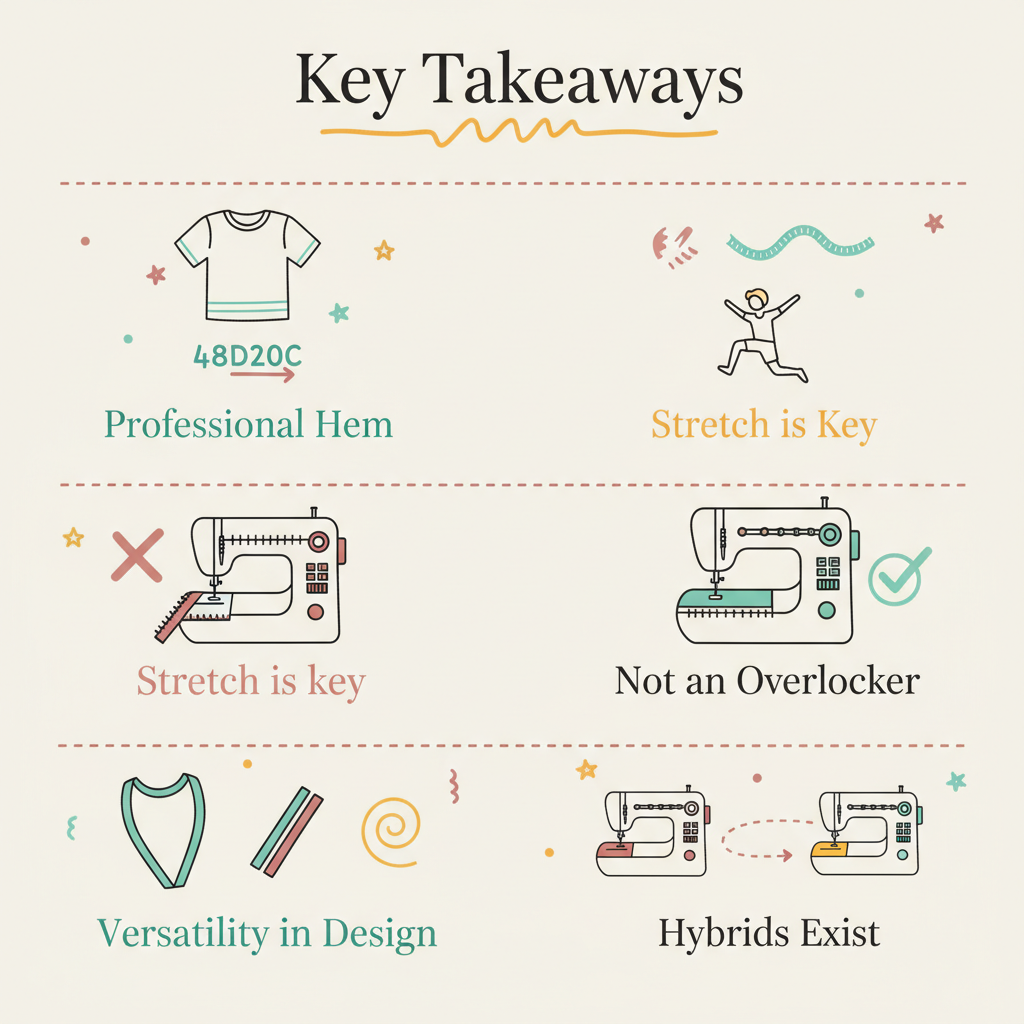
Key Takeaways
- The Professional Hem: A coverstitch machine creates the twin-needle look seen on store-bought t-shirts, but with far superior elasticity.
- Stretch is Key: Understanding what is a coverstitch helps you realise why your standard sewing machine hems snap on activewear, while coverstitch hems do not.
- Not an Overlocker: Distinguishing what does coverstitch machine do versus a serger is vital; one finishes edges, the other hems and decorates.
- Versatility in Design: Learning what is a coverstitch used for opens doors to binding necklines, attaching elastic, and creating decorative chainstitches.
- Hybrids Exist: Knowing what is a coverstitch on a serger helps you decide between buying two separate machines or one “combi” machine.
The Quest for the Perfect Finish
There is a familiar milestone in every dressmaker’s journey. You have successfully sewn a beautiful jersey dress or a pair of leggings using your overlocker (serger). The seams are neat, the fit is perfect, and you feel a swell of pride. Then, you reach the hem. You switch to your standard sewing machine, perhaps using a twin needle, and carefully stitch the bottom edge.
It looks fine—until you stretch it. Snap. Or perhaps you wash it once, and the hem starts to tunnel, creating a ridge that looks distinctly “homemade.”
This is the moment many of my students in our sewing classes North London ask me: “Grace, how do I get that shop-bought finish?” The answer lies in a specific, often misunderstood piece of equipment. If you want to elevate your garments from “crafted” to “couture,” you need to understand exactly what is a coverstitch machine used for. It is the secret weapon of the professional seamstress, designed to handle the modern wardrobe’s reliance on stretch fabrics with elegance and durability.
What is a Coverstitch?
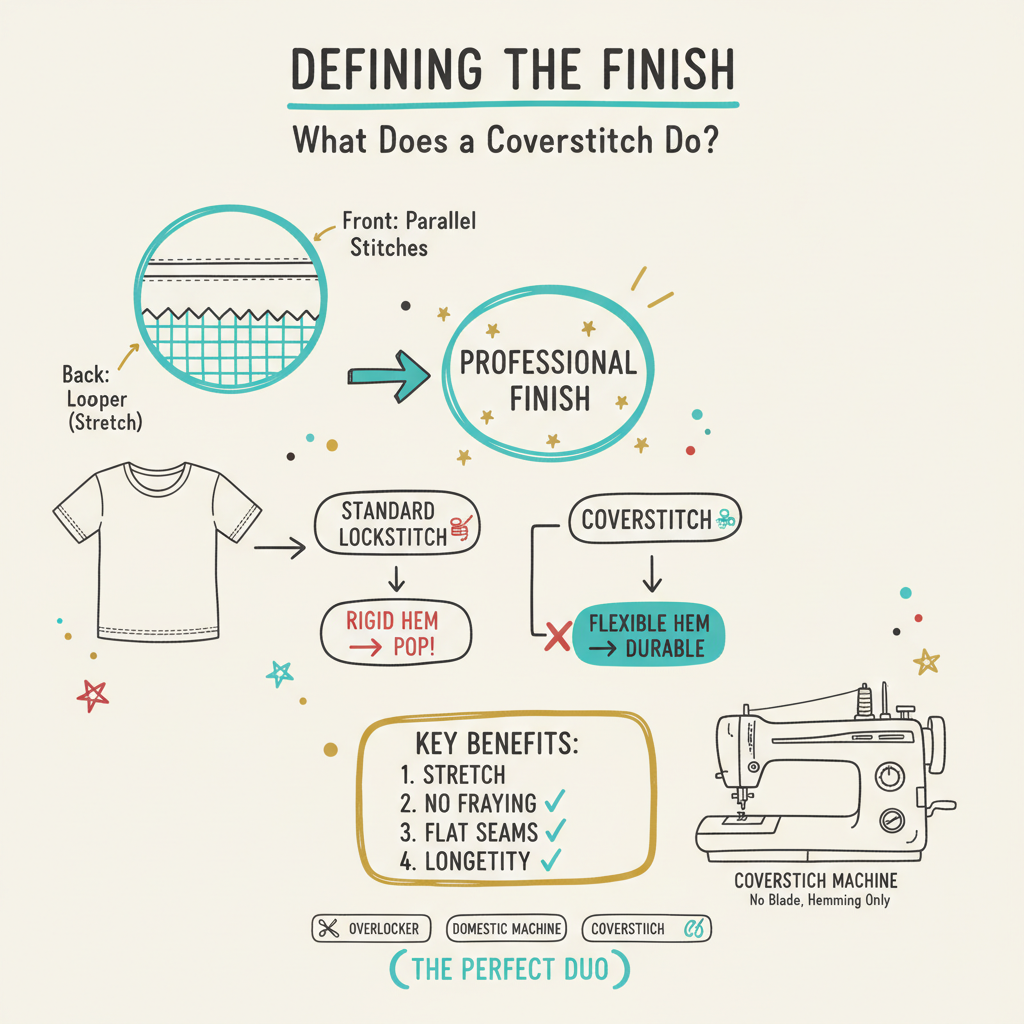
Before we look at the machine, we must understand the stitch itself. So, what is a coverstitch?
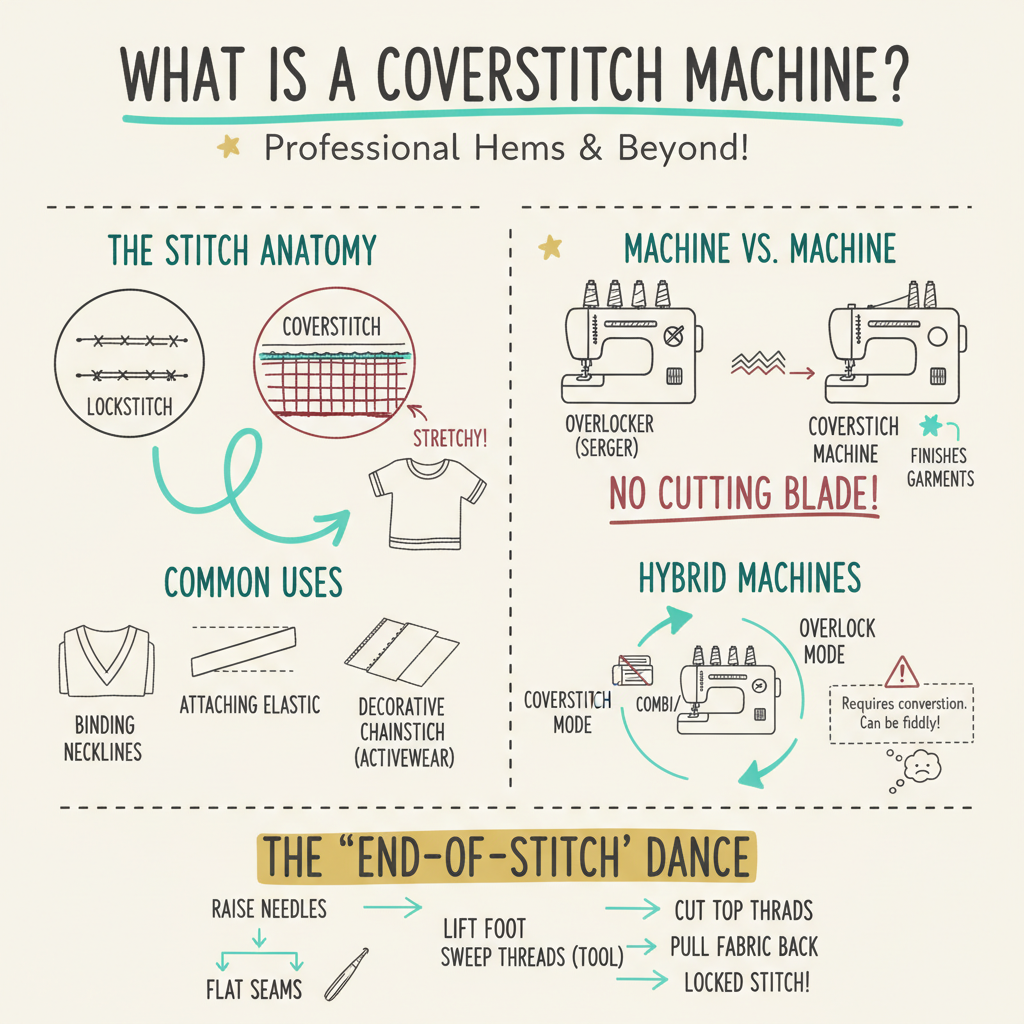
If you look at the hem of the t-shirt you are wearing right now, you will likely see two (or sometimes three) perfectly parallel rows of straight stitching on the outside. This looks deceptively simple, like a standard twin-needle stitch. However, if you turn the hem inside out, you will see a complex grid of interlocking thread that looks like a ladder or a chain.
This is the looper thread. Unlike a lockstitch made by a domestic machine, which ties a top thread to a bobbin thread in a rigid knot, a coverstitch loops the threads together. This looping action gives the stitch an incredible amount of “slack.” It allows the fabric to stretch significantly without breaking the thread, snapping back into shape perfectly when released.
Unpacking the Tool: What Does Coverstitch Machine Do?
To the uninitiated, this machine looks remarkably like an overlocker. It has multiple thread cones (usually three or four) and looks “industrial.” But what does coverstitch machine do that makes it so unique?
The primary function of a coverstitch machine is to hem knit fabrics while retaining their stretch. It covers the raw edge of the fabric on the underside (inside the hem) with that looper thread, protecting it from fraying, while simultaneously creating a topstitch on the outside.
In my sewing classes London for beginners, I often explain it this way: An overlocker constructs the garment (seams), but a coverstitch finishes it (hems). It does not have a cutting blade like an overlocker, meaning you can stitch in the middle of a fabric piece without fear of slicing a hole in your work. This capability is what makes it indispensable for professional-looking activewear, swimwear, and lingerie.
Beyond Hemming: What is a Coverstitch Used For?
Once you have mastered the basic hem, you might wonder what is a coverstitch used for regarding creative design. It is far more than just a “hemmer.”
- Binding Necklines: With a binder attachment, you can fold and stitch a strip of fabric over a raw neckline edge in one smooth pass. This is the standard finish for bodysuits and vest tops.
- Attaching Elastic: You can sew elastic directly onto fabric (like a waistband) using a coverstitch. The stitch stretches with the elastic, preventing that tight, restricting feeling you often get with rigid stitching.
- Decorative Chainstitching: If you use only one needle, the machine produces a strong, beautiful chainstitch. This is often used for decorative jeans stitching or for basting (temporarily holding fabric together) because it is very secure but easy to unravel if you pull the correct thread tail.
- Flat Seams: You can create flat, athletic-style seams (often seen on yoga pants) by stitching over a seam allowance to flatten it, reducing bulk and friction against the skin.
Hybrid Machines: What is a Coverstitch on a Serger?
This is where terminology can get a little “fuzzy” for students looking to buy their first machine. You might see machines advertised as “Combi” or “Hybrid” models. So, what is a coverstitch on a serger?
Some manufacturers combine both functions into one unit. These machines can be converted from an overlocker (which cuts and seams) to a coverstitch (which hems). You typically have to deactivate the cutting blade, change the needle plate, and re-thread the entire machine.
While these save space, I often advise students in our London sewing courses for adults to be cautious. The conversion process can be fiddly and time-consuming. If you are switching back and forth five times during one project, it can kill your “sewing mojo.” However, for those with limited space in their London flats, a high-quality combination machine is a powerful solution.
Clarifying Terminology: What is a Coverstitch Serger?
You may hear the term “coverstitch serger” thrown around in forums or online shops. Strictly speaking, what is a coverstitch serger? It is often a misnomer or a shorthand for the combination machines mentioned above.
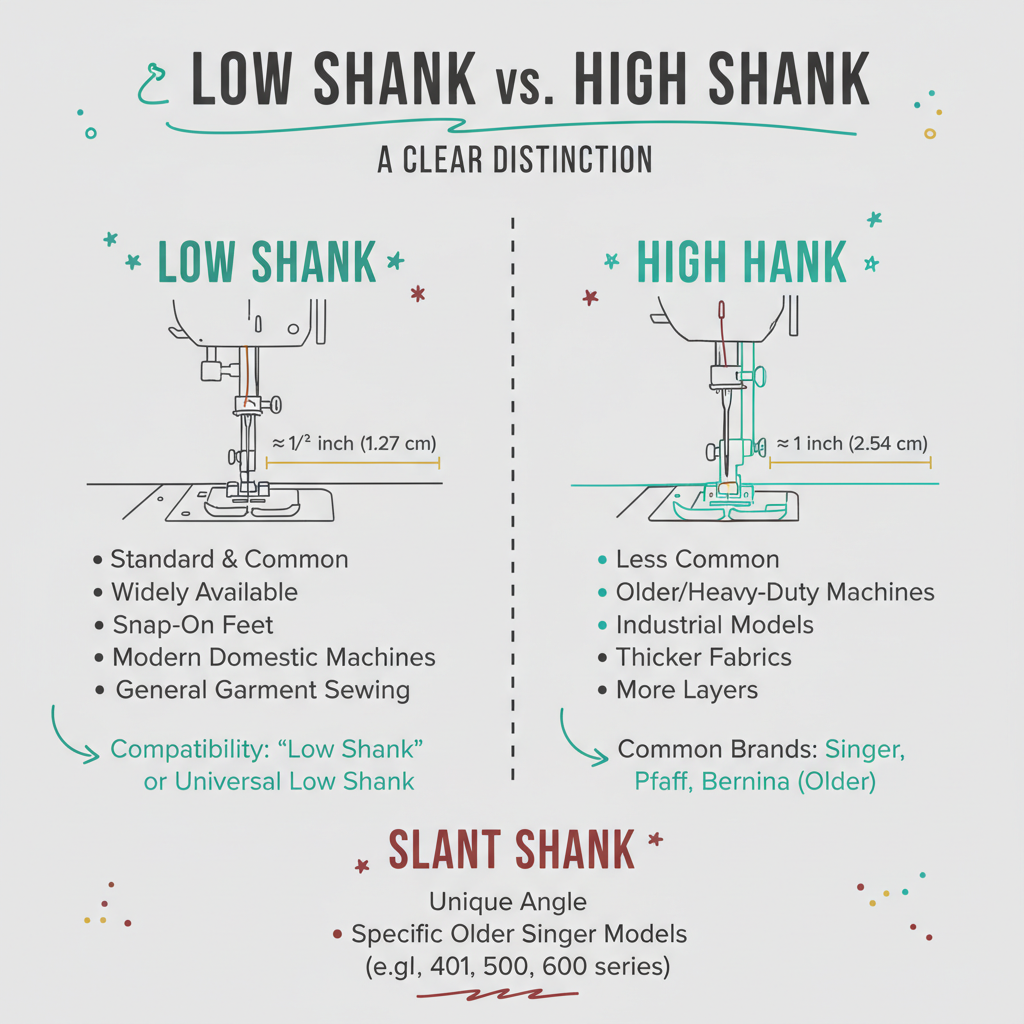
In the industry, we keep them distinct:
- Serger (Overlocker): Cuts and seams edges. Uses 2 loopers.
- Coverstitch: Hems and topstitches. Uses 1 looper (usually).
If you see a machine labelled as a “Coverstitch Serger,” it is almost certainly a combination machine. Always check the specifications to see if it requires a conversion process.
Our Unique Insight: The “End-of-Stitch” Dance
The most common frustration I see during private sewing lessons London is removing the fabric from the machine. Unlike a regular sewing machine, you cannot just pull the fabric to the back and cut. If you do, the stitches will unravel instantly.
I teach a specific “dance” to end your coverstitch cleanly:
- Raise the needles to their highest position.
- Lift the presser foot.
- Sweep tool: Take a thin tool (like tweezers or an allen key) and sweep it behind the needle threads, pulling them forward towards you to create slack.
- Cut the top threads: Snip these loops you have pulled forward.
- Pull back: Firmly pull the fabric straight back behind the machine. This action pulls the cut top threads through to the underside and locks them with the looper thread.
Mastering this small manoeuvre is the difference between a secure hem and one that unravels in the wash.
Actionable Strategy: The “Test Drive” Protocol
Before you invest in a coverstitch machine, or if you have one gathering dust, try this strategy to build confidence.
- Fabric Match: Gather scraps of jersey, fleece, and Lycra.
- The Differential Feed: Locate the differential feed dial on the machine. This controls how the feed dogs move.
- Set it to 1.0 for standard fabric.
- Set it to 1.5 or higher if your fabric is stretching out and looking “wavy” (common with thin knits).
- Set it to 0.7 if you want to create a “lettuce edge” ruffle effect.
- The Twin Needle Comparison: Sew a hem on a scrap with your sewing machine’s twin needle, and another with the coverstitch. Stretch them both to their limit. You will instantly feel the difference in resistance. The coverstitch will yield; the twin needle will likely “lock” or snap.
Frequently Asked Questions (FAQ)
Is a coverstitch machine difficult to thread?
It can be intimidating at first because of the looper system, which requires a specific path. However, unlike an overlocker, the looper on a coverstitch machine is much easier to access. Most modern machines have colour-coded guides. Once you have done it three times, it becomes muscle memory. I always recommend tying your new thread to the old thread and pulling it through to save time.
Can I just use a twin needle instead?
You can, and for woven fabrics or loose knits, a twin needle is perfectly adequate. However, for high-stretch garments like gym leggings or swimwear, a twin needle stitch often lacks the necessary elasticity. It is also more prone to “tunnelling,” where the fabric creates a raised ridge between the stitches. A coverstitch machine solves both of these mechanical issues.
Does a coverstitch machine cut the fabric?
No, it does not. This is the primary difference between it and a serger (overlocker). Because it has no blade, you can use it in the middle of a garment for decorative stitching or pocket attachment. If you are hemming, you usually fold the hem up, stitch, and then trim away any excess fabric on the underside afterwards with sharp scissors.
Do I need special thread for a coverstitch machine?
You can use standard sewing thread in the needles, but for the looper (the bottom thread), many professional seamstresses recommend “woollie nylon” or textured nylon thread. This thread spreads out like yarn, providing even better coverage and softness against the skin, which is particularly nice for children’s clothing or underwear.
Conclusion
Deciding to introduce a coverstitch machine into your studio is a significant step. It signals a move from “making clothes” to “engineering garments.” By understanding exactly what is a coverstitch machine used for, you empower yourself to tackle fabrics that might have previously intimidated you.
Whether you are looking to master these skills in our London sewing courses for adults or are simply reading our sewing blog to refine your technique, remember that every machine is just a tool waiting for your creativity to guide it. The coverstitch might seem complex, but its purpose is simple: to give your hard work the professional, durable finish it deserves.
About the Author
Grace Barrett is the founder and lead tutor at London Sewing Courses. With a background in professional tailoring and a passion for teaching, Grace specialises in demystifying complex sewing techniques for her students. From her welcoming studio in North London, she runs everything from sewing classes London for beginners to advanced seamstress courses. She believes that with the right patience and the right tools, anyone can how to sew and alter clothes to a professional standard.
Sources
- Seamwork: Do I Really Need a Coverstitch Machine? (https://www.seamwork.com/fabric-guides/do-i-really-need-a-coverstitch-machine)
- Threads Monthly: What Is a Coverstitch Machine? (https://threadsmonthly.com/what-is-a-coverstitch-machine/)
- Ellie and Mac: Coverstitch Secrets (https://www.ellieandmac.com/blogs/blog/coverstitch-secrets-how-to-end-a-coverstitch)
- Seamwork: Coverstitch Machine Tutorials (https://www.seamwork.com/sewing-tutorials/coverstitch-machines)