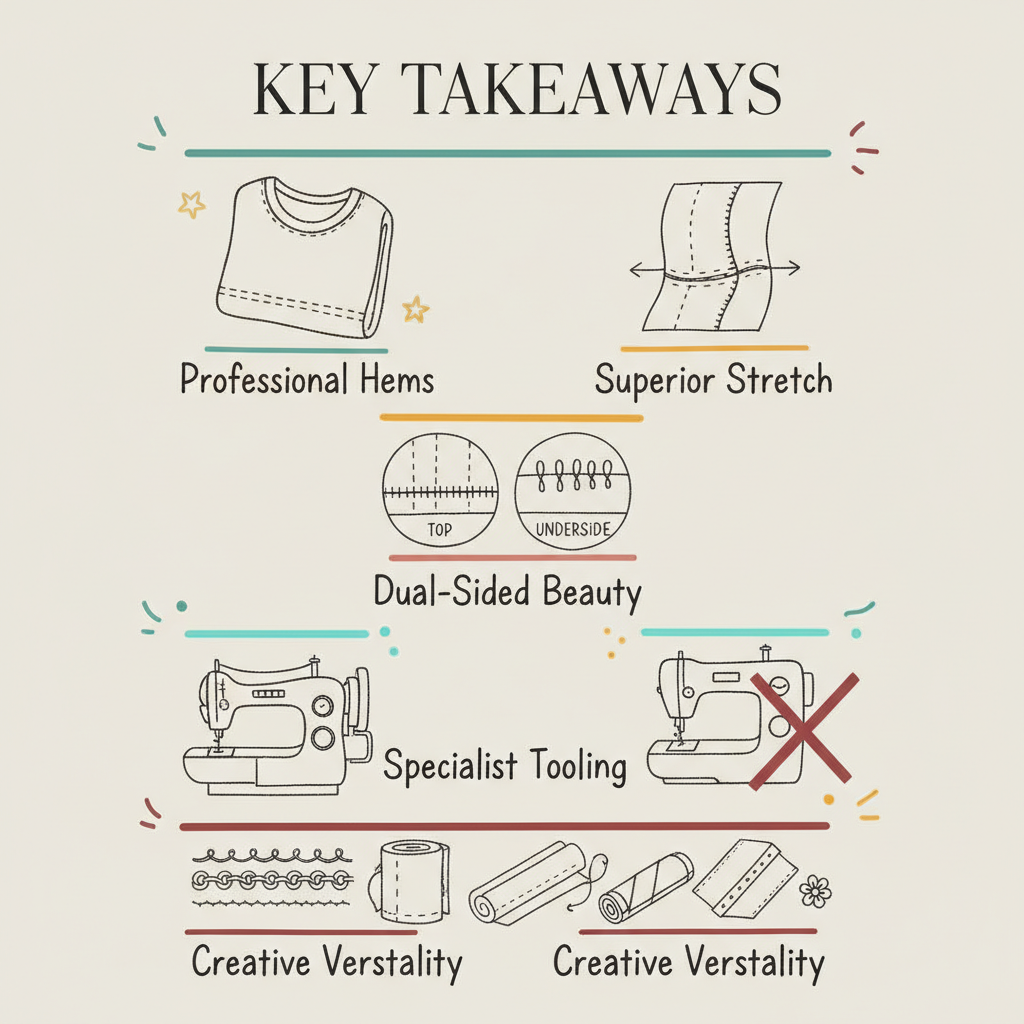
Key Takeaways
- Stretch and Knit Fabrics: Always use a Ball Point or Stretch needle to prevent skipped stitches and fabric damage.
- Woven Cottons: A Sharp or Universal needle works best for stable, natural fibres like cotton.
- Synthetic Polyesters: Universal needles are suitable, but Microtex needles offer superior precision for fine synthetics.
- Needle Size Matters: Match the needle size to the fabric weight—finer needles for silks, thicker for denim.
- Regular Replacement: Change your needle every 8 hours of sewing to maintain stitch quality and protect your machine.

Choosing the right tool is the first step in any creative journey. When you sit down at your machine, the question of what needle should I use for stretch fabric often arises as soon as you touch a piece of jersey or Lycra. It is a vital question because the wrong choice can lead to frustrating skipped stitches or, worse, tiny holes in your beautiful material. For many beginners, the world of sewing machine needles feels like a secret language, but once you understand the “why” behind the needle tip, your confidence will grow. Whether you are sewing a simple cotton tote or a complex stretch garment, your needle is the bridge between your skill and a professional finish.
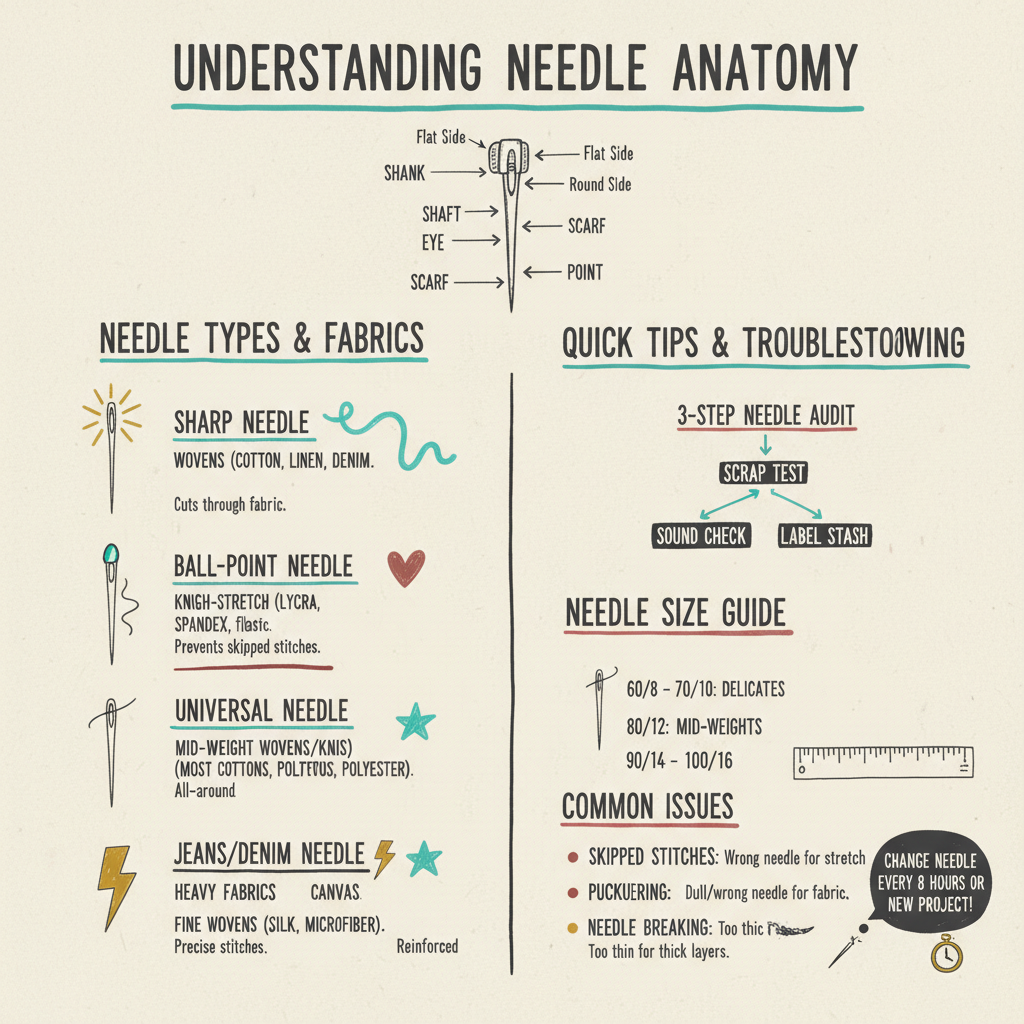
Understanding Needle Anatomy and Why It Matters
Before we dive into specific fabric types, it is helpful to understand that not all needles are created equal. A sewing machine needle is an engineered tool designed to pass through fibres in very specific ways. If you use a needle designed to pierce through tough denim on a delicate knit, you will likely tear the fibres. Conversely, a blunt needle used on heavy cotton will struggle to penetrate, potentially timing out your machine.
The “point” of the needle is the most critical factor. Sharp needles are meant to cut through the weave of woven fabrics. Ball-point needles are designed to push the yarns of a knit fabric aside rather than cutting them. This subtle difference is the key to preventing “runs” in your fabric, much like a ladder in a pair of tights.
What Needle to Use for Lycra Fabric and Elastics
When working with highly elastic materials, the specific question of what needle to use for lycra fabric becomes paramount. Lycra, Spandex, and other high-stretch synthetics require a “Stretch Needle.” While a standard ball-point needle is often okay for basic t-shirt jersey, Lycra has a high elastic content that can cling to the needle, causing the thread to skip.
Stretch needles have a specially designed scarf (the indentation above the eye) that allows the bobbin hook to catch the thread more easily, even when the fabric is being pulled or compressed. If you are learning how to sew swimwear or activewear, this needle is your best friend. Similarly, when considering what needle to use for elastic, the stretch needle remains the champion. It prevents the needle from “chewing” the rubber or latex strands inside the elastic, ensuring the waistband or cuff remains durable and functional.
The Versatile World of Cottons: Which Needle Wins?
Cotton is the backbone of the sewing world, loved for its breathability and ease of use. However, because cotton comes in so many weights—from airy lawn to heavy canvas—you might wonder what needle should I use for cotton. For most mid-weight woven cottons, a Universal needle is perfectly adequate. It has a slightly rounded tip that is sharp enough to pierce the weave but won’t damage the fibres.
If you are working with very fine, high-thread-count cottons, you might find that what needle to use for cotton shifts toward a “Sharp” or Microtex needle. These have a very slim, acute point that creates perfectly straight stitches. For those just starting their journey with sewing classes London for beginners, sticking to a 70/10 or 80/12 Universal needle for your first few cotton projects is a safe and reliable choice.
What Sewing Machine Needle to Use for Cotton Quilting
Quilting involves sewing through multiple layers—the quilt top, the batting, and the backing. Therefore, what sewing machine needle to use for cotton in a quilting context requires a bit more strength. Quilting needles are reinforced to handle the bulk without bending. They have a tapered point that can pass through several layers of cotton and wadding while maintaining a straight line. If you are exploring seamstress courses that involve patchwork, investing in a dedicated quilting needle will make the process much smoother and prevent the needle from deflecting as it hits thicker seams.
Mastering Synthetics: What Needle to Use for Polyester
Polyester is a modern marvel, found in everything from silky blouses to sturdy upholstery. When deciding what needle to use for polyester, you must consider the structure of the fabric. If it is a polyester knit (like many sports tops), refer back to the stretch needle. However, for woven polyester, a Universal needle is usually the standard.
Polyester fibres are incredibly strong and can sometimes dull a needle faster than natural fibres. If you notice your machine making a “thumping” sound, it is time to change the needle. For very fine or densely woven polyesters, a Microtex needle is often the secret to success, providing the sharpest point possible to avoid puckering the seams.
Our Unique Insight: The Psychology of the “Perfect Stitch”
At our London sewing courses for adults, we often observe that a student’s frustration isn’t due to a lack of talent, but a mismatch of tools. We believe the needle is the “unsung hero” of the sewing room. Most sewists wait until a needle breaks to replace it, but we suggest viewing the needle as a consumable, much like thread.
A fresh needle doesn’t just prevent damage; it changes the way the machine feels. It reduces noise, vibration, and resistance. By matching your needle precisely to your fabric, you aren’t just following a rule—you are removing a barrier between your intention and the finished garment. This small act of mindfulness at the start of a project sets the tone for a calm, successful sewing session.
Actionable Strategy: The 3-Step Needle Audit
To ensure you never struggle with the wrong tools again, try this simple strategy before starting your next project:
- The Scrap Test: Never start on your actual garment. Take a scrap of your project fabric and sew a few inches. If you see skipped stitches or “puckering,” change your needle type immediately.
- The Sound Check: Listen to your machine. A dull needle makes a distinct “pop” or “thump” as it enters the fabric. A sharp, correct needle should be almost silent.
- Label Your Stash: Use a small piece of washi tape or a pin cushion with sections to mark which needle is currently in your machine. There is nothing more confusing than forgetting if you have a Stretch or Universal needle loaded!
Exploring Advanced Options for Specialists
As you progress through intermediate sewing courses London adults enjoy, you might encounter more niche needles. Denim needles, for example, have a very thick, strong shaft to prevent breakage when sewing through multiple layers of heavy twill. Topstitching needles have an extra-large eye to accommodate thicker decorative threads, which is essential for that professional “jeans” look. Leather needles have a “cutting” point shaped like a wedge to slice through hide. Understanding these variations ensures that as your skills grow, your toolkit grows with you.
Actionable Strategy: How to Build a “Core” Needle Library
You don’t need every needle ever made, but having a “Core Library” will save you from midnight runs to the haberdashery. We recommend stocking:
- Universal (Sizes 70, 80, 90): For almost all woven projects.
- Stretch (Sizes 75, 90): For jersey, Lycra, and leggings.
- Microtex (Size 70): For silks, microfibres, and delicate synthetics.
- Jeans (Size 100): For repairs and heavy-duty bags.
Having these on hand means you can pivot from making a cotton cushion to a jersey top without any technical delays.
The Importance of Needle Size (Numbers Explained)
You will notice two numbers on a needle pack, such as 80/12. The first number (80) is the European metric size, and the second (12) is the American size. Essentially, the smaller the number, the finer the needle.
- 60/8 to 70/10: Use for very lightweight fabrics like chiffon or organza.
- 80/12: The “goldilocks” size for most mid-weight fabrics.
- 90/14 to 100/16: Use for heavy fabrics like denim or curtain material.
Using a needle that is too thick for a fabric will leave visible holes, while a needle that is too thin might snap. If you are unsure, our sewing classes North London team is always happy to offer a quick bit of advice on matching your project to the right gauge.
Custom Learning: Why One-on-One Guidance Helps
Sometimes, reading about needles isn’t enough; you need to feel the difference in the machine. Private sewing lessons London are a fantastic way to troubleshoot specific issues you might be having. Whether you are struggling with a specific brand of sewing machine or a particularly tricky fabric like velvet, a tutor can show you the subtle nuances of tension and needle choice that make all the difference. This personalised approach often helps students overcome “machine fear” and start enjoying the creative process much faster.
Frequently Asked Questions (FAQ)
What happens if I use a universal needle on stretch fabric?
Using a universal needle on stretch fabric often results in skipped stitches because the needle cannot properly catch the bobbin thread as the fabric stretches. Furthermore, the universal tip may nick the elastic fibres, leading to small holes or “ladders” that appear after the garment has been worn or washed. It is always better to switch to a dedicated ball-point or stretch needle to ensure the longevity and professional finish of your knitwear.
How often should I actually change my sewing machine needle?
A general rule of thumb followed by professionals is to change your needle after every 8 hours of actual sewing time or at the start of every new project. Over time, the tip of the needle becomes microscopicly dull or hooked, which can snag fabric and cause uneven tension. If you hear a “thumping” sound or notice your stitches looking irregular, it is a clear sign that your needle has reached the end of its life.
Can I use the same needle for both cotton and polyester?
Yes, you can often use a Universal needle for both woven cotton and woven polyester, provided the fabric weights are similar. However, if the polyester is a fine synthetic or the cotton is a heavy denim, you should adjust the needle size accordingly. Always perform a test stitch on a scrap of the fabric you intend to use to check that the needle isn’t causing puckering or leaving excessively large holes in the material before proceeding.
Why does my needle keep breaking when I sew thick seams?
Needle breakage on thick seams usually happens because the needle is too thin for the task or it is “deflecting” (bending) as it hits the bulk, causing it to strike the throat plate. To prevent this, switch to a larger needle size, such as a 90/14 or 100/16, or use a specific “Jeans” needle. Additionally, try slowing down your sewing speed and using a “hump jumper” tool to keep the presser foot level as you cross thick intersections.
Conclusion
The journey from a beginner to a confident sewist is paved with small, technical realisations. Answering the question of what needle should I use for stretch fabric is one of those “lightbulb moments” that instantly improves your results. By respecting the relationship between the needle, the thread, and the fibre, you unlock the ability to work with any material you desire. Whether you are visiting a sewing blog for inspiration or attending sewing classes london for adults to refine your technique, remember that the smallest part of your machine is often the most important. Keep your needles fresh, your tension balanced, and your creativity will have no bounds.
About the Author: Grace, Founder of London Sewing Courses
Grace is the heart and hands behind London Sewing Courses. A passionate and experienced sewing instructor, she founded the studio with a unique mission: to create a calm, friendly space for adults to learn and connect, while using the profits to fund free sewing classes for local children in need. Her personal expertise and commitment to community building are at the core of every class and every stitch.
Sources
- How to Sew Stretch Fabrics (https://www.blog.wawak.com/post/how-to-sew-stretch-fabrics)
- What Needle to Use for Stretch Fabric (https://www.mhthread.com/blog/products/what-needle-to-use-for-stretch-fabric)
- Schmetz Needle Guide (https://www.schmetzneedles.com/pages/needle-guide)