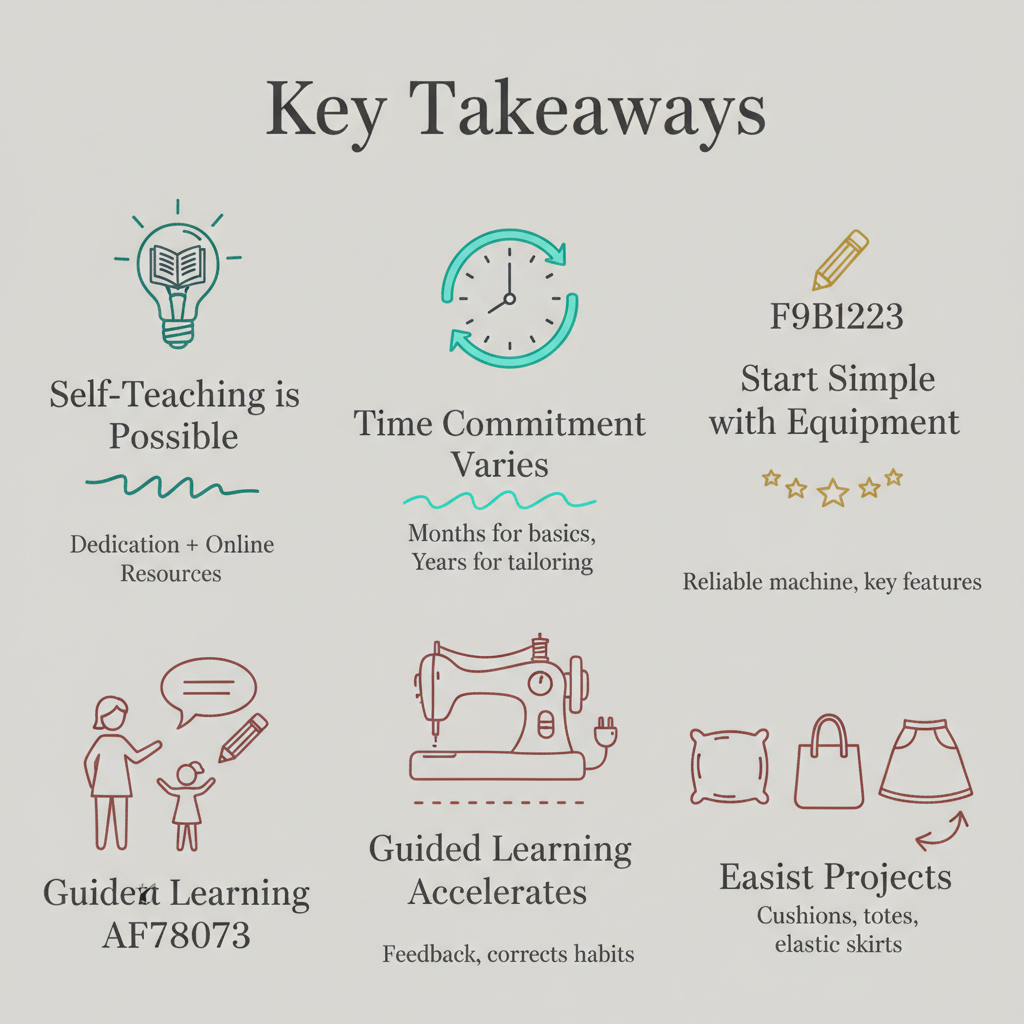
Tag: DIY

  • Can Sewing Be Self Taught?

    Can Sewing Be Self Taught?

    Key Takeaways

    • Self-Teaching is Possible: The answer to “can sewing be self taught” is yes, but it demands dedication and a structured approach, often starting with high-quality online resources.
    • Time Commitment Varies: Basic proficiency can be reached in months, but mastering complex skills like tailoring takes years of consistent practice.
    • Start Simple with Equipment: A reliable, decent sewing machine for a beginner doesn’t require a huge initial investment, but look for key features like adjustable stitch length and good reviews.
    • Guided Learning Accelerates Progress: While possible to teach yourself, a sewing class provides immediate feedback, corrects bad habits early, and shortens the learning curve significantly.
    • Easiest Projects: Start with non-garment items like cushion covers, tote bags, or simple elastic-waist skirts to build confidence.

    the creative world of fabric, thread, and machine is calling. Perhaps you’ve been scrolling through images of beautifully made garments or perfectly tailored home furnishings, and the spark of ambition has ignited. Now you face the first, most fundamental question on your journey: Can sewing be self taught? The short, encouraging answer is a resounding “yes.” Countless talented seamstresses and tailors across history have started their journey with nothing more than a curious mind, a needle, and a piece of cloth. The path is open to anyone with the passion and patience to pursue it.

    However, the journey of learning to sew outside of a formal setting is less a straight road and more an adventure full of twists, turns, and the occasional unpicking session. It requires discipline, a knack for finding high-quality resources, and the mental resilience to learn from every mistake. As seasoned educators in the craft, we believe that understanding the commitment involved is the true first step. The modern world offers an unparalleled wealth of video tutorials, blogs, and online communities that make self-teaching more viable than ever before. But to truly succeed, one must approach it with the rigour of an actual student, following a curriculum rather than simply bouncing from one project to the next.

    Is it Possible to Be a Self-Taught Seamstress?

    Absolutely, it is possible to become a highly competent self-taught seamstress or tailor. The craft is fundamentally a collection of mechanical skills—how to operate the machine, how to cut fabric, how to manage tension—all of which can be learned through dedicated practice. The internet has levelled the playing field by putting world-class instruction in front of anyone with an internet connection. Whether you are looking to create simple items for your home or dream of one day designing your own capsule wardrobe, your commitment is the only true prerequisite. You can certainly learn the mechanical fundamentals of the machine and the basics of stitching without ever setting foot in a classroom.

    Passion Trumps Pedigree: The Self-Teaching Mindset

    The key differentiator for those who succeed in self-teaching is mindset. It’s not about having a certificate; it’s about having an unshakeable drive. The self-teaching path requires you to be your own most patient tutor. You will inevitably encounter problems—tension issues, puckered seams, misaligned patterns—that a professional would solve instantly. When this happens, you must embrace a spirit of forensic investigation. You need to be prepared to search for the answer, read multiple sources, and meticulously test adjustments until the problem is solved. This resilient, problem-solving approach is what defines a successful self-taught crafter. Your enthusiasm for the final creation must outweigh the frustration of the learning process.

    The Importance of High-Quality Resources

    While a tutor offers direct, real-time feedback, the self-taught student must become adept at curating their own syllabus. The quality of your learning materials directly impacts the speed and depth of your progress. Relying on poor tutorials can lead to ingraining bad habits that are incredibly difficult to unlearn later on. When looking for guidance on how to sew and alter clothes, for example, seek out sources that are clear, provide high-quality visuals, and explain why a certain technique is used, not just how. Look for comprehensive guides on how to learn to use a sewing machine before you even thread your first needle. A strong foundation built on reliable teaching is essential for long-term success, even in a self-guided environment.

    seiwng Self-Taught

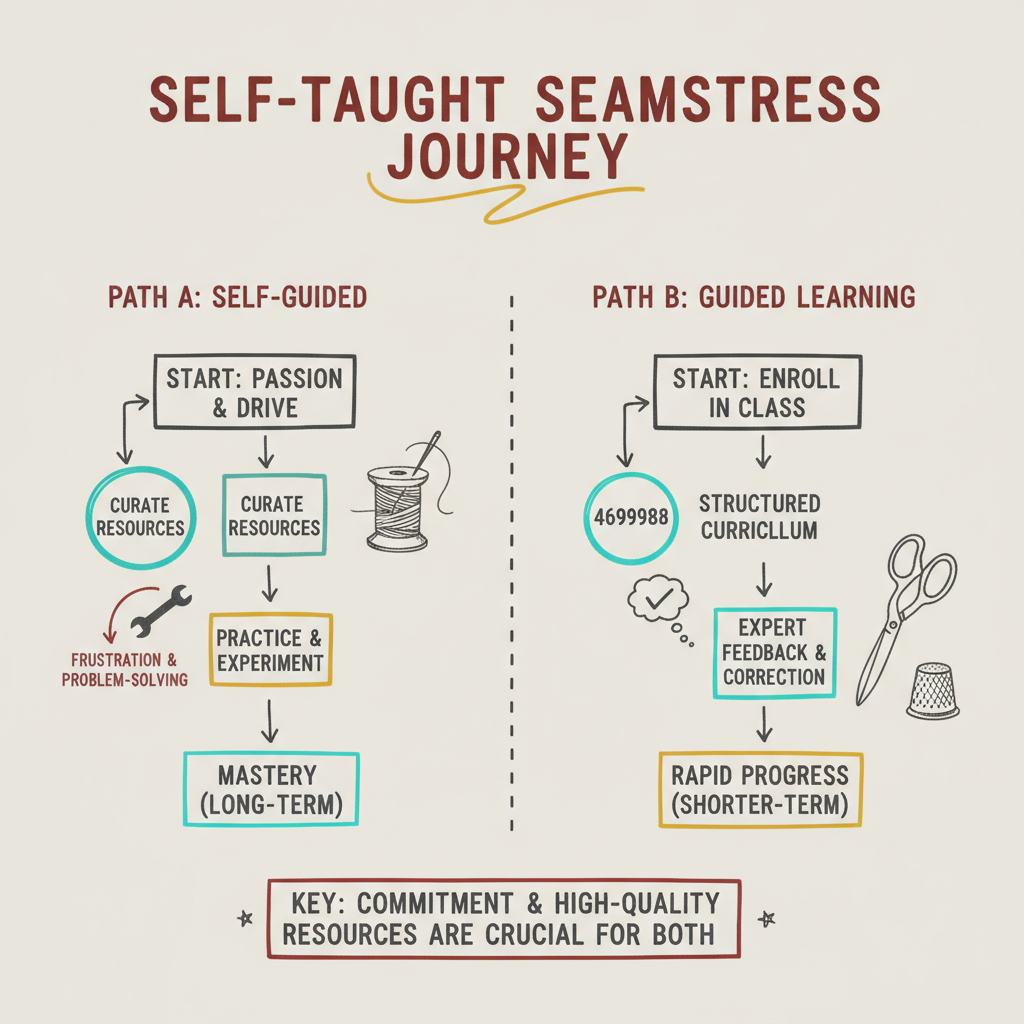
    Our Unique Insight: Self-Taught vs. Guided Learning

    The choice between self-teaching and guided learning often boils down to two things: time and confidence. While can sewing be self taught is a question of possibility, how quickly and how well is a question of strategy. The greatest advantage of a structured learning environment, such as dedicated sewing classes London for adults, is the immediate access to expert knowledge and real-time correction. This support system dramatically reduces the amount of time spent on guesswork and frustration.

    Why a Class Accelerates ‘How Long Does It Take to Learn to Sew’

    One of the most common questions we hear is, how long does it take to learn to sew? The answer is heavily dependent on your learning environment. A self-taught student may spend an entire weekend trying to solve a machine tension problem that a tutor in a Sewing Classes North London course could identify and fix in five minutes. Classes provide a proven, sequential curriculum that ensures you master foundational skills—like cutting accurately and understanding fabric grain—before moving on to more complex patterns. This structured approach means you progress faster, build a solid technical base, and avoid the pitfalls of skipping crucial steps in your development. For those serious about rapid skill acquisition, joining sewing classes London for beginners is the most effective accelerator.

    The Hidden Costs of Trial-and-Error

    Self-teaching can seem free, but it often comes with hidden costs. The money saved on tuition can quickly be spent on wasted fabric due to bad cutting or incorrect seam allowances. More importantly, there’s the cost of time and motivation. Constantly struggling with a project or trying to decipher confusing instructions can lead to burnout, and many aspiring sewists abandon their machine altogether. A tutor not only shows you the right way but also teaches you the industry-standard techniques that make projects look professional. They provide the encouragement and structure needed to keep momentum, turning potential frustration into satisfying progress.

    The Time Commitment: How Long Does It Take to Learn to Sew

    The answer to the time commitment query is nuanced, as it depends entirely on your goal. To be able to operate a machine competently, mend clothing, and produce simple items like cushion covers, you might reach this basic level of functional skill within a few months of dedicated, weekly practice. This early phase is focused on mastering the mechanics. However, to achieve a state where you can confidently tackle complex patterns, understand fabric drape, and make garments that look professionally finished, the timeline extends significantly.

    From Zero to Hero: The Beginner’s Timeline

    For the purpose of achieving basic proficiency, let’s look at the rough timeline:

    • 1-2 Months (The Basics): Learning to thread the machine, understanding different stitches, sewing a straight line, and completing simple projects like a tote bag or a pillowcase.
    • 3-6 Months (Functional Skill): Confidently following a simple pattern, managing basic fabrics (cottons, linens), and learning to insert a simple zip or elastic waistband. This stage is where your skill truly starts to solidify, allowing you to confidently tackle simple patterns with minor adjustments. It is vital to consistently practice different types of seams and finishes, which elevates a handmade item from a simple project to a piece of carefully crafted work. Do not rush through this foundation phase; solid skills now prevent costly mistakes later on.
    • 1 Year+ (Intermediate Skill): You can alter commercial patterns, handle trickier fabrics (e.g., silk, knits), understand garment construction techniques, and complete tailored items like jackets or trousers. At this point, moving to intermediate London sewing courses for adults is a great way to refine your skills and address specific weaknesses.

    How Long Does It Take to Learn to Sew Clothes?

    Focusing specifically on garment making, the complexity increases significantly because clothes require three-dimensional thought and an understanding of how fabric behaves on a human form. To make a simple item, like an elasticated skirt or pyjama trousers, you can achieve a wearable result within a few weeks of concentrated effort. However, to consistently produce well-fitting garments—where the shoulders don’t slump and the darts are perfectly positioned—you should budget at least one year of consistent practice. This time is spent not just sewing but mastering fit, pattern reading, and the often-overlooked skill of pressing. It is in this field that a supportive environment, such as that offered by various sewing classes London for adults, truly pays dividends by correcting fitting errors early on.

    How Long Does It Take to Learn Tailoring? The Advanced Skillset

    Tailoring is not just sewing; it is an entirely different discipline and is widely considered the pinnacle of garment construction. If you are asking, how long does it take to learn tailoring with the goal of producing bespoke, structured items like fully lined suit jackets, the answer is measured in years, not months. A master tailor spends years as an apprentice honing skills in padding, canvassing, and complex hand-stitching. While you can certainly learn advanced techniques through a specific programme, true mastery requires consistent dedication, an exceptionally fine eye for detail, and a deep understanding of wool and interlining. Acquiring these skills means dedicated study of advanced pattern drafting, fabric manipulation, and meticulous handwork, and for many, this is where the support of a master tutor becomes indispensable. This pursuit represents the ultimate commitment to the craft, and even professionals seek out custom private sewing lessons London to hone specific, high-level skills.

    a row of sewing machines sitting on top of a table

    Actionable Strategy: Your First Sewing Machine and Projects

    The machine is your primary tool, and choosing the right one is crucial to maintaining enthusiasm when self-teaching. The market is flooded with options, but a beginner needs a reliable, user-friendly model that won’t fight them on every seam. The first step in this actionable strategy is to set a budget and focus on core features over unnecessary digital bells and whistles.

    How Much is a Decent Sewing Machine? Setting a Realistic Budget

    Asking how much is a decent sewing machine is like asking how much a decent car costs—it depends on your needs. For a beginner, you do not need an industrial or high-end embroidery machine. A solid, mechanical machine from a reputable brand (like Brother, Janome, or Singer) can be acquired new for between $\text{£}150$ and $\text{£}300$. This budget range provides you with a robust, metal-framed machine that will handle most common fabrics and offer the essential stitches (straight, zigzag, buttonhole) you need. Anything significantly cheaper may lack the necessary power or reliability, leading to tension and maintenance issues that will frustrate a novice.

    Which Sewing Machine is Best for Home Use Beginners?

    When selecting which sewing machine is best for home use beginners, look for the following features:

    1. Top-Loading Bobbin: These are much easier to install and monitor than front-loading bobbins, reducing a common source of beginner frustration.
    2. Adjustable Stitch Length and Width: While basic, having the control to adjust these is vital for sewing different types of fabric.
    3. Automatic Needle Threader: A huge time-saver and a great convenience feature.
    4. Included Accessories: Ensure it comes with a few basic presser feet (zipper foot, buttonhole foot).

    A simple mechanical machine is often better than a complex computerised one because it forces you to understand the mechanics, not just push a button. You want a workhorse, not a gadget.

    Keeping Your Machine a Trusted Companion: Basic Maintenance

    A crucial piece of advice for the self-taught sewist is to become intimately familiar with your machine’s maintenance routine. A high-quality sewing machine is an investment, but it will quickly underperform if neglected. You must learn the essentials: cleaning out the bobbin case area, removing lint buildup from the feed dogs, and regularly oiling the specified points. These simple acts are often overlooked by beginners but are responsible for the most common faults, such as skipped stitches or uneven tension. Every machine comes with a manual—consider this your second most important instruction book after your first pattern. Take the time to read the maintenance chapter cover-to-cover. By knowing how to care for your machine, you transform it from an intimidating tool into a trusted, reliable companion, saving you countless trips to a repair technician and preventing hours of troubleshooting frustration. This proactive approach to machine care ensures your dedication to the craft is rewarded with consistent, high-quality results.

    What is the Easiest Thing to Sew? 3 Perfect Starter Projects

    To build confidence and a successful track record, you must start with simple, flat projects before attempting anything that requires a sleeve or a neckline. Directly answering what is the easiest thing to sew, we suggest these three perfect starter projects:

    1. The Cushion Cover (Envelope or Simple Zip): This project teaches you to cut straight, sew a perfectly square seam, and master a closure method. It’s forgiving and instantly rewarding.
    2. The Simple Tote Bag: Ideal for learning to manage seam allowances, reinforce stress points (like handles), and handle a slightly heavier weight fabric.
    3. The Elastic-Waist Skirt/Pyjama Bottoms: Your first garment! Because there are no complex curves, set-in sleeves, or tricky waistbands, it’s a great introduction to using a pattern, sewing in the round, and creating a wearable item.

    Beyond the Basics: Mastering Advanced Skills

    Once you have mastered your first set of projects, you will inevitably hit a wall where self-teaching becomes less efficient. You know the basics, but your finished garments lack that professional polish, or you struggle with complex materials. This is the natural point where many sewists seek out professional instruction to make the leap from competent hobbyist to skilled artisan.

    Making the Leap to Intermediate London Sewing Courses for Adults

    The decision to enrol in formal training is an investment in quality and speed. Intermediate London sewing courses for adults are designed to tackle the skills that are hardest to teach yourself. These classes typically cover:

    • Advanced dart manipulation and complex fitting adjustments.
    • Working with specialist fabrics (e.g., chiffon, leather, stretch knits).
    • The use of interfacings, linings, and specific closures.

    The value here is the direct, expert critique of your work. A tutor can spot a tension issue or a pressing mistake that you may overlook, shaving months off your learning curve. This focused, collaborative environment is the best way to move from simply making clothes to creating well-made clothes. You can see the range of options available on our sewing blog.

    The Path to Custom Private Sewing Lessons London

    If your passion leans towards highly specialised work—perhaps bridal alterations, advanced menswear, or historical costume—you will find that general classes no longer meet your needs. At this stage, the ultimate step is to seek out custom private sewing lessons London. This is a one-on-one consultation with a master tutor designed entirely around your specific goal. You may want to master a specific French seam technique, learn advanced grading, or troubleshoot a complex design project. Private lessons offer an unparalleled depth of focused instruction, providing the most direct route to professional-level mastery and the precision needed for complex tasks like tailoring.

    Frequently Asked Questions (FAQ)

    What is the quickest way to learn to sew?

    The quickest way to learn is through immersion and consistency. Enrolling in intensive seamstress courses or a series of dedicated workshops provides a structured curriculum and immediate access to a tutor for rapid feedback. This eliminates the trial-and-error of self-teaching. Commit to practising the same technique until it is perfect, and focus on mastering the machine’s operation before moving on to complex patterns.

    How many hours a week should I practise?

    For meaningful progress, aim for a minimum of 4-6 hours of focused practice per week. This can be split into two or three sessions. Consistency is far more important than intensity; two hours twice a week is better than one eight-hour marathon session. Regular, short practice allows your brain to retain muscle memory and prevents burnout, which is a common problem for the self-taught.

    Do I need a professional machine to start?

    No, a professional or industrial machine is unnecessary for beginners. In fact, a dedicated home-use beginner machine is often better as it is designed to be more intuitive and versatile for a wide range of projects. Professional machines are highly specialised for one type of fabric or stitch. Focus your investment on a reliable, mechanical model with good reviews that offers essential features like adjustable stitch length and a decent set of included feet.

    Conclusion

    So, can sewing be self taught? Yes, it absolutely can. Your journey into the world of fabric and thread begins the moment you decide to pick up a needle or sit at a machine. The path you choose—whether it’s a self-guided adventure through online tutorials or a structured course with our London sewing courses—depends entirely on your budget, your timeline, and your personal learning style.

    The self-taught sewist must embrace the role of the dedicated detective, seeking out quality resources, troubleshooting every setback, and remaining motivated through every unpicking session. For those who value speed, professional polish, and an accelerated learning curve, formal Sewing Classes North London or other metropolitan areas offer an invaluable, confidence-building head start. Ultimately, whether you teach yourself or take classes, your greatest asset will always be your passion for the craft. If you have the drive to turn a flat piece of fabric into a three-dimensional creation, the world of sewing is wide open and ready for your talent to take root and flourish. If you’re ready to start your guided journey, we encourage you to get in touch with us today.

    About the Author: Grace, Founder of London Sewing Courses

    Grace is the heart and hands behind London Sewing Courses. A passionate and experienced sewing instructor, she founded the studio with a unique mission: to create a calm, friendly space for adults to learn and connect, while using the profits to fund free sewing classes for local children in need. Her personal expertise and commitment to community building are at the core of every class and every stitch.

    Sources

    How to Sew

  • How to Sew and Alter Clothes

    How to Sew and Alter Clothes

    Your Gateway to Sewing

    Welcome, aspiring sewists and seasoned stitchers alike, to a truly rewarding journey into the world of fabric and thread! Here at London Sewing Courses, we believe that learning how to sew is not just about mastering a practical skill; it’s about unlocking a vibrant creative outlet that brings immense satisfaction and allows you to express your unique style. Whether you dream of creating your own wardrobe, mending beloved garments, or crafting thoughtful gifts, this comprehensive guide will walk you through everything you need to know, from the absolute basics to practical alterations and inspiring beginner sewing projects.

    Sewing has an enduring appeal, connecting us to a rich craft heritage that spans thousands of years, long before the invention of the sewing machine. Today, with an abundance of online resources, it’s easier than ever to get started, regardless of your prior experience. We’re here to guide you, step by step, with a warm and encouraging approach, just as we would in our London classrooms. So, let’s begin to transform flat pieces of fabric into beautiful, wearable creations, one stitch at a time.

    Essential Tools for Sewing

    Before we delve into the exciting realm of stitches and seams, let’s talk about the foundation of any successful sewing endeavour: your tools! Think of them as your trusted companions on this creative journey. While the world of sewing offers a vast array of gadgets, you certainly don’t need everything to start. As you progress, you’ll naturally discover which tools become indispensable for your projects. A well-organised sewing box is a wonderful way to keep your essentials tidy and accessible.

    1. Sewing Machine: Your Primary Companion

    For many, the sewing machine is the heart of their sewing space. It’s a versatile tool that can drastically speed up your projects and allow for a wider range of techniques compared to hand sewing alone.

    Choosing Your First Machine: What to look for in a sewing machine for beginners

    If you’re looking to purchase your first machine, it can feel a little daunting with so many options available. Don’t worry about getting the most advanced model right away. A good sewing machine for beginners should be straightforward to operate and offer essential functions. Many machines, even older ones like a Singer machine from a previous generation, can work perfectly well. If you’re on a budget, consider borrowing one from a friend or family member or looking for a secondhand machine. The most important thing is that it makes stitches on fabric effectively.

    Understanding Machine Parts

    While machines vary, they all share fundamental components. Familiarising yourself with these parts will give you confidence and control.

    • The Hand Wheel: This is a circular dial typically found on the side of your machine. Always turn it towards you to manually form a stitch. It’s particularly useful when you’re a beginner and prefer to go slowly, or when you need precise control, such as when pivoting at corners.
    • Stitch Selector: This dial or display allows you to choose the type of stitch you want to make. For beginners, focusing on the basic straight stitch is key, as it’s the most common and versatile stitch.
    • Stitch Width: Often represented by a zigzag symbol, this setting controls how wide your stitch is. For a straight stitch, it won’t have a width, but for a zigzag, you can adjust how broad it is.
    • Stitch Length: This setting determines how long or short your stitches will be. Shorter stitches are generally more secure and neat, while longer stitches (around 4mm) are perfect for temporary stitches like basting or gathering, as they are easier to remove. A basic stitch length of 2.5mm is often recommended.
    • Bobbin Winder: This is a small spindle on your machine used to wind thread onto your bobbin. We’ll go into detail on how to use this soon.
    • Tension Dial: This dial controls the tension of your thread, ensuring your stitches are even and smooth. For most machines, a setting around ‘4’ works well, and it’s best not to adjust it much as a beginner unless you notice problems like loose threads.
    • Presser Foot: This little foot holds your fabric firmly in place while you sew. It has a lever, usually at the back or side, that allows you to raise and lower it. Always lower the presser foot before you start sewing, otherwise your fabric won’t move forward, and you might get tangled threads.
    • Needle: This is where your upper thread passes through to meet the bobbin thread, forming your stitches. Machine needles need to be changed regularly to prevent snags and skipped stitches.
    • Backstitch Button/Lever: This function allows your machine to stitch backwards, which is crucial for securing your seams at the beginning and end of a stitching line.
    • On/Off Button: Simply put, this controls the power to your machine.
    Types of Sewing Machines (Briefly)

    While the basics are universal, sewing machines come in various types. Most home sewists use mechanical or computerised machines. Mechanical machines are typically simpler, with manual dials, while computerised ones offer more stitch options and sometimes automated features. For finishing raw edges, you might eventually explore an overlocker (also known as a serger), which trims and neatens the fabric edge very professionally.

    2. Hand Sewing Supplies

    Even with a machine, hand sewing remains an invaluable skill for delicate work, mending, or when you just don’t feel like setting up your machine. Let’s explore the essential tools for how to hand sew.

    • Needles: Hand sewing needles come in various types and sizes, each suited for different tasks. The size numbers range from 1 (coarsest) to 10 (finest).
    • Sharps: These are medium-length, slender needles with round eyes, good for general hand sewing. A number seven sharp is a good choice for beginners.
    • Betweens: Shorter than sharps, these are used for fine handiwork, such as quilting.
    • Crewel (or Embroidery) Needles: These have larger eyes, making them easier to thread, and are used for darning, embroidering, and regular sewing with thicker threads like embroidery floss.
    • Darning Needles: Longer than crewel needles with wider eyes, used for mending.
    • You’ll often find a pack of assorted needles useful. Smaller needles are better for thinner fabrics, while larger ones suit thicker materials.
    • Threads:
    • For most projects, especially as a beginner, 100% polyester thread is recommended due to its strength and smoothness. Cheaper polyester threads can be fluffier and break easily, perfect for practice projects that don’t need to last professionally. For items you want to be strong and durable, a good quality 100% polyester thread like Gutermann Sew-All is excellent. This type of thread is also typically very strong and smooth.
    • Threads come in numerous sizes and colours to match your project. When choosing polyester thread, look for spools with a cream or white top, as other colours indicate different thread types for specific uses.
    • For hand sewing, all-purpose thread is usually sufficient. The general rule is to match your thread colour as closely as possible to your fabric so it doesn’t show. If an exact match isn’t possible, choose a slightly darker shade. You can also choose a contrasting colour for decorative stitches.
    • Cotton and silk threads are also available, often chosen to match the fabric type (e.g., cotton fabric with cotton thread, silk with silk thread).
    • Scissors: Investing in good quality cutting tools is essential for a clean finish and to prevent fabric damage.
    • Fabric shears (often called dressmaking shears) are long scissors with one small ring for your thumb and a larger handle for other fingers. Always use these exclusively for fabric to keep them sharp.
    • Pinking shears have triangular teeth that create a zigzag edge, which helps prevent fabric from unravelling.
    • Smaller embroidery scissors are handy for cutting thread. Keep your scissors clean and sharp, occasionally oiling the blades with a drop of sewing machine oil.
    • Pins and Pin Cushion: Pins are incredibly helpful for holding fabric layers together, especially for beginners. A pincushion keeps your pins neat and handy, some even designed to be worn on your wrist for convenience.
    • Dressmaker or silk pins have sharp points and are good for fine fabrics.
    • For knit fabrics (stretchy materials), use ball-point pins, as their rounded points won’t snag the threads.
    • When pinning, you can place pins perpendicular or parallel to your seam line. The crucial thing is to remove pins before your needle reaches them to avoid breaking your machine needle or causing it to fly off.
    • Measuring Tools:
    • A flexible tape measure (60-inch, fabric or plastic-coated) is vital for taking body measurements and marking fabric.
    • A small measuring gauge or 6-inch ruler can help with smaller measurements like seam allowances and hems.
    • Marking Tools: To transfer pattern markings to fabric, you’ll need:
    • Tailor’s chalk or fabric pens are great for making thin lines that brush off easily.
    • A tracing wheel is also used with tracing paper to transfer markings, such as for darts and folds, to the wrong side of the fabric.
    • Seam Ripper: Affectionately known as a ‘stitch un-picker’, this tool is your best friend for correcting mistakes, and believe us, everyone makes them!
    • Thimble: A small, hard cap, usually metal, wood, or leather, worn on your middle finger to protect it from needle pricks while hand sewing. It helps you push the needle through the fabric more easily.
    • Beeswax: This may sound unusual, but running your thread over beeswax before hand sewing gives it a coating that helps prevent tangling and makes it stronger.
    • Emery Bag: Often shaped like a small strawberry, an emery bag is used to sharpen dull hand needles by pushing them back and forth through it.

    3. Fabrics and Threads: Making Informed Choices

    Choosing the right fabric is like picking the perfect canvas for your masterpiece. It significantly impacts your project’s outcome and ease of sewing.

    Beginner-Friendly Fabrics:

    For your initial projects, we highly recommend stable woven fabrics. These materials don’t stretch much and are less likely to slip around while you’re sewing, making them much easier to manage. Excellent choices include:

    • Cotton: Quilting cotton or broadcloth is fantastic for learning due to its stability and ease of handling.
    • Linen: This natural fibre is very fashionable and, when woven, is quite stable and a great beginner-friendly fabric.
    • Flannel: Soft and easy to work with, flannel is also a good option.
    • Denim: While heavier, lightweight denim can also be manageable for beginners, just ensure you have the correct needle size for thicker materials.

    It’s also crucial to pre-wash your fabric before you begin sewing. This prevents it from shrinking later and distorting your finished garment. Always check the care label for specific instructions.

    Understanding Fabric Grain:

    Fabric is made up of threads running in specific directions, and understanding these “grains” is fundamental to cutting and sewing correctly.

    • Lengthwise Grain (Warp): These threads run the length of the fabric, parallel to the selvage (the self-finished, non-fraying edge along the long side of the fabric). Fabric is typically purchased by “yardage” (or metreage in the UK) measured along this grain. Garments cut on the lengthwise grain tend to hang smoothly with minimal stretch.
    • Crosswise Grain (Weft): These threads run across the width of the fabric. They have a bit more stretch than the lengthwise grain.
    • Bias: This is the diagonal line across the fabric, running at a 45-degree angle to the lengthwise and crosswise threads. The bias has the most stretch and drape, making it ideal for creating garments with a beautiful flow, though it can be trickier for beginners to sew.
    • Raw Edge: This is the cut or torn edge of the fabric, which will typically fray if not finished.
    • Right Side and Wrong Side of Fabric: The ‘right side’ is the “pretty” side, with the print or more vibrant colour, which you want to face outwards on your finished garment. The ‘wrong side’ is the back, or inside, which is usually less vibrant. When sewing, you’ll often place right sides together so the seam is hidden on the inside.
    Thread Selection:

    As mentioned, polyester thread is a great all-rounder. The key is to match your thread to your fabric type and colour. When in doubt, a slightly darker thread colour will blend in better than a lighter one.

    Basic Sewing Techniques

    Now that your tools are ready and your fabric is chosen, let’s dive into the core techniques that will bring your sewing projects to life. We’ll start with preparing your machine, then move on to mastering its basic operations, and finally explore essential hand stitches.

    1. Preparing Your Machine: How to Thread a Sewing Machine

    Properly threading your machine is crucial for preventing common issues like tangled threads or skipped stitches. While specific diagrams may vary by machine model (always consult your manual!), the general steps are quite similar.

    Winding the Bobbin:

    The bobbin holds the lower thread, which locks with the upper thread to create a secure stitch. You’ll often need to wind your own bobbins to match your project’s thread colour.

    1. Position the Spool: Place your spool of upper thread onto the spool pin, usually horizontally or vertically. On many machines, the thread should be coming off the bottom of the spool, similar to a toilet paper roll that unwinds from underneath. Use the correct sized spool holder to keep it secure.
    2. Guide the Thread: Follow your machine’s diagram (usually on the top) to guide the thread through a tension disc or gauge. You should feel it snap or click into place, ensuring proper tension for even winding. Without proper tension, your bobbin won’t wind nicely.
    3. Thread the Bobbin: Take an empty bobbin and feed the thread from the inside to the outside through one of its small holes.
    4. Place on Bobbin Winder: Put the bobbin onto the bobbin winder spindle and push it firmly to the right to engage it.
    5. Disengage Needle: Pull the hand wheel out towards you (it might make a popping sound). This disengages the sewing mechanism, allowing the machine to only wind the bobbin without moving the needle.
    6. Start Winding: Hold onto the thread tail coming out of the bobbin tightly. Press your foot down on the pedal to start winding. Wind a few times, then cut off the excess tail close to the bobbin.
    7. Fill the Bobbin: Continue winding until the bobbin is full. Most machines have a sensor or stopper that will automatically stop the winding when the bobbin is completely filled.
    8. Remove Bobbin: Push the bobbin winder back to the left, lift the bobbin off, and trim the thread.
    Threading the Upper Thread: Detailed instructions on how to thread a sewing machine

    The upper thread is the one that goes through the needle. Again, follow your machine’s numbered guide or arrows, but here’s a general path.

    1. Position Spool: Ensure your thread spool is correctly placed on the spool pin, typically unwinding from underneath for cross-wound threads, or at a right angle for stacked threads, using a horizontal or vertical spool pin as appropriate.
    2. First Guide: Take the thread end and guide it through the first tab or hook, often marked ‘1’, ensuring it clicks in.
    3. Down the First Channel: Guide the thread down the first channel or slit, usually marked ‘2’.
    4. U-Turn at the Bottom: Make a U-turn at the bottom of the channel and bring the thread back up the second channel.
    5. The Take-Up Lever: This is a crucial step! At the top of the second channel (marked ‘3’), your thread must go through the hole in the take-up lever. If the take-up lever isn’t visible, turn the hand wheel towards you to raise it. Ensure the thread clicks into the front of the eye or slit of the lever. If this step is missed, you’ll likely encounter tangles and nests of thread on the back of your fabric.
    6. Down to the Needle: Bring the thread back down the channel towards the needle, through any remaining hooks or guides, often marked ‘4’.
    7. Thread the Needle: Now, thread the needle from front to back, either by eye or using a needle threader if your machine has one (these can be temperamental, ensure the needle is at its highest point first). Pull several inches of thread through the needle.
    8. Position Under Foot: Pass the threaded upper thread neatly under the presser foot and towards the back of the machine.
    Bringing Up the Bobbin Thread:

    This vital step connects the upper and lower threads so they can form a proper stitch.

    1. Insert the Bobbin: Open your machine’s bobbin case (usually a clear cover at the bottom). For a drop-in bobbin case, hold the bobbin so the thread unwinds counter-clockwise (like a ‘ P′ for perfect), then drop it into its spot. Feed the thread tail through the designated slit or groove until it clicks securely into place.
    2. Connect the Threads: Hold the upper thread tail loosely. Gently turn the hand wheel towards you for one full rotation. Watch as the needle goes down, catches the bobbin thread, and pulls it up through the hole in the throat plate. Continue turning until the take-up lever is in its highest position again.
    3. Pull Out Loop: You should see a loop of the bobbin thread appear. Use a scissor blade or a pointer to pull this loop fully through, bringing the bobbin thread to the top of the machine.
    4. Position Threads: Pull both the upper and bobbin threads together, place them under the presser foot, and guide them towards the back of the machine.
    5. Close Bobbin Case: Close the bobbin case cover, ensuring it clicks firmly into place. Now, your machine is ready to sew!

    2. Mastering the Machine: How to Use a Sewing Machine

    With your machine threaded and ready, let’s explore the fundamental controls for making your first stitches.

    • Foot Pedal Control: The foot pedal controls the speed of your machine, much like an accelerator in a car. Practise gently pressing and releasing it to gain control over your speed. It’s perfectly fine to start slowly; control is more important than speed, especially when learning.
    • Stitch Selection: As a beginner, you’ll primarily use two main stitches:
    • Straight Stitch: This is the most basic and frequently used stitch, forming a straight line of individual stitches. It’s ideal for joining two pieces of fabric to create a seam.
    • Zigzag Stitch: This stitch forms a “zig-zag” pattern and is excellent for finishing raw edges to prevent fraying or for sewing stretchy fabrics.
    • Seam Allowance: This is the distance between your stitching line and the raw edge of your fabric. Sewing patterns will specify the seam allowance (e.g., 5/8′′ or 15mm is common in patterns, while 21​′′ is often used in the fashion industry). Your machine’s needle plate often has guidelines to help you maintain a consistent seam allowance by aligning the edge of your fabric with the corresponding mark. Consistency is key for a well-fitting garment.
    • Backstitching: This technique involves stitching backward a few stitches at the beginning and end of a seam to lock it in place and prevent it from unravelling. It’s a fundamental step for durable sewing.
    • Pivoting: This technique allows you to stitch around corners neatly. When you reach a corner, stop with your needle down in the fabric. Lift the presser foot, rotate your fabric, lower the presser foot, and continue sewing in the new direction.
    • Practising Straight Lines and Curves: The best way to get comfortable is to practise! Use scrap fabric to simply stitch straight lines, trying to keep them even. Then try curves, lifting your presser foot and pivoting as needed for smooth turns. This builds muscle memory and confidence.
    white thread

    3. How to Hand Sew

    Even with a machine, hand sewing is an essential sewing skill for finishing details, mending, or for times when a machine isn’t practical. Let’s explore the fundamental hand sewing stitches.

    Threading a Hand Needle:
    1. Cut the Thread: Take about an arm’s length of all-purpose sewing thread. Cut the end cleanly with sharp scissors to prevent fraying, and if needed, lick or wet the end to make it stiff.
    2. Guide Through Eye: Carefully push the thread through the eye (the hole) of your needle. If you struggle, consider a needle threader or needles with larger eyes.
    3. Single or Double Threaded:
    • Single Threaded: Pull the thread through until the needle is a few inches from one end. You’ll work with one long strand.
    • Double Threaded: Pull the thread through until both ends meet, effectively doubling your thread. This creates a stronger seam.
    1. Tie a Knot: At the longer end (or both ends for double threading), tie a secure knot. A simple method is to loop the thread around your finger, slip the loop off, and pull the end through. Double or triple knotting ensures it stays secure.
    Basic Hand Sewing Stitches:

    These stitches are the building blocks of any hand-stitched project.

    • Running Stitch: This is the simplest and quickest stitch, creating a dashed-line pattern.
      • How to: Bring your needle up from the back (wrong side) of the fabric, pull until the knot catches. Go forward about ¼½ inch, push the needle down, then come up from the back the same length forward, and repeat. You can pick up several stitches on the needle before pulling the thread through to speed up the process.
      • Uses: Ideal for temporary basting (holding fabrics together before machine sewing, easily removed due to longer stitches), gathering fabric, or for seams that won’t experience much wear and tear. It looks similar on both sides of the fabric.
    • Backstitch: This is a strong and durable stitch that closely resembles machine stitching.
      • How to: Start like a running stitch, bringing the needle up and making one stitch forward. Then, bring the needle up again one stitch length ahead of your first stitch, and push the needle back into the hole where the previous stitch ended. This creates a continuous, strong line.
      • Uses: Perfect for securing seams that need to be strong, like clothing construction. It’s often used for embroidering letters.
    • Whipstitch/Overcast Stitch: This stitch connects two pieces of fabric or finishes raw edges.
      • How to: Bring your needle up through the top of a folded edge (or through both layers if joining two pieces). Then, at an angle, catch just a tiny bit of the opposing fabric, bringing the needle back up through the fold. It creates a distinct angled look.
      • Uses: Excellent for hemming (especially on jeans), closing the sides of pillows, cushions, stuffed animals, or as a decorative stitch on blankets and plushies. It helps prevent fraying.
    • Slip Stitch/Ladder Stitch: This stitch creates an almost invisible seam or hem.
      • How to: Fold in the raw edges of the fabric. Bring your needle up from inside one fold. Go directly across to the other folded edge, push the needle into that fold, and travel a short distance (about 41​ inch) inside the fold before bringing the needle back out. Repeat, going back and forth across the opening, creating tiny, barely visible stitches on the outside.
      • Uses: Ideal for closing openings in stuffed items (like toys or pillows) after turning them right side out, or for invisible hems on garments.
    • Catch Stitch: Used to help fabric stretch or for hemming. While the zigzag stitch is its machine equivalent, the catch stitch creates a flexible, invisible-like hand stitch.
      • How to: Pierce the needle through the wrong side of the fabric at a diagonal, then bring it back up through the first hole to create a point. Repeat this process, moving left to right and creating points by sliding the needle through the previous stitch’s first hole.
      • Uses: Commonly used for sewing in elastic waistbands or for flexible hems.
    Basic Embroidery Stitches:

    While our main focus is practical sewing, basic embroidery stitches can add beautiful decorative details. The running stitch and backstitch are fundamental for outlining and simple designs. The satin stitch is used to fill in designs smoothly, with stitches placed close together without overlapping. For long lines, an outline stitch (also called stem stitch) is effective.

    Altering Clothes: Practical Skills for Everyday Wear

    One of the most empowering aspects of learning to sew is the ability to alter and mend your clothes, ensuring a perfect fit and extending the life of your favourite pieces.

    1. How to Hem Pants

    Hemming trousers or skirts is a common alteration that can make a huge difference to how a garment looks and fits.

    • Measuring and Marking: First, try on the trousers (inside out if possible) and mark the desired new length. Add a seam allowance to this mark (usually around 1-2 inches, depending on the desired hem width).
    • Pressing and Pinning: Fold the raw edge up by about 41​ inch and press (this initial fold hides the raw edge and prevents fraying). Then, fold it up a second time to your desired hem width, ensuring all raw edges are hidden within this double fold. Press it flat and secure it with pins. Using an iron at this stage is highly recommended for a crisp finish.
    • Machine Hemming: You can machine stitch your hem using a straight stitch. Stitch close to the folded edge, maintaining a consistent line. Remember to backstitch at the start and end of your stitching line to secure it. Some machines also offer a blind hem stitch, which creates a nearly invisible machine-stitched hem.
    • Hand Hemming: For a truly tailored and invisible finish, the slip stitch is perfect. The whipstitch is another option, creating tiny, barely noticeable stitches on the front.

    2. How to Sew a Button

    Learning how to sew a button is a fundamental sewing skill for mending and garment construction.

    • Flat Buttons (Two-Hole and Four-Hole Methods):
    1. Mark Position: Mark the precise spot where the button needs to be sewn.
    2. Thread Needle: Use a hand sewing needle and double-threaded all-purpose thread, tying a secure knot at the end.
    3. Start Stitching: Come up from the back (wrong side) of the fabric at the marked spot, pulling the thread until the knot catches. For a two-hole button, stitch back and forth through the holes. For a four-hole button, you can create parallel lines or a cross shape. Make sure you leave a small ‘shank’ by wrapping the thread around the stitches under the button a few times for reinforcement.
    • Patching Larger Holes (How to Sew on a Patch): For bigger holes, a patch is needed.
    1. Choosing and Preparing the Patch: Select a fabric for your patch that matches or complements the garment. Cut the patch slightly larger than the hole, ensuring it has clean edges, perhaps by folding them under or using a zigzag stitch.
    2. Applying the Patch: Position the patch over the hole on the right side of the fabric. You can then machine or hand-stitch it in place for durability. Stitch around all edges of the patch, reinforcing with backstitching at the start and end.
    • Decorative Patches: Attaching iron-on or sew-on patches for aesthetic purposes is also popular. While iron-on patches offer a quick fix, sewing them on provides much greater durability. You can use a running stitch or machine stitch around the edge of the patch.

    4. How to Sew a Zipper

    Learning how to sew a zipper can seem intimidating, but with practise, it becomes a straightforward sewing skill.

    Finding Quilt Shops Near Me (Quilt Shops Near Me / Quilting Shops Near Inspiring Beginner Sewing Projects

    The best way to solidify your new skills is to apply them to a fun, tangible project. Here are a few ideas that are perfect for beginners.

    a tray of spools of thread and spools of thread

    1. How to Sew a Tote Bag

    A tote bag is a classic first project for a reason! It’s forgiving, practical, and teaches several essential sewing skills.

    • Skills Learned: Straight seams, hemming, creating a casing, and inserting a drawstring or handles.
    • Project Overview: You’ll typically cut a rectangular piece of heavy fabric (like denim or burlap). You’ll sew the side seams, create a casing at the top for a drawstring or straps, and hem the edges. This project is a great way to practise machine stitching long, straight lines.

    2. How to Sew a Pillowcase

    This project is not only useful but also a fantastic way to practise precise straight lines and explore seam finishes.

    • Skills Learned: Straight stitching, hemming, and potentially French seams (a neat, enclosed seam finish).
    • Project Overview: You’ll typically cut rectangular pieces of fabric, sew them together along straight lines, and hem the opening. It’s an ideal project for getting a feel for your machine’s feed dogs and practicing with different fabric types. It typically involves sewing a tube and twisting it.
    • Simple Pouch/Cosmetic Bag: This project introduces you to zippers on a smaller, more manageable scale before tackling larger items.
    • How to Sew Felt: Felt is a non-fraying fabric, making it very forgiving for hand sewing. You can make simple hand-sewn toys or decorations, which are excellent for practising basic stitches like the running stitch or blanket stitch.
    • How to Quilt for Beginners: An introduction to basic quilting techniques, such as piecing fabric squares together, for small projects like placemats. This focuses on precise straight stitching.
    • Cloth Napkins: A quick and satisfying project that teaches hemming and pivoting at corners. You can use quilting cotton, which tears easily for straight edges, and then iron the edges before hemming.

    Tips for Your First Projects:

    • Topstitching: A visible line of stitching on the right side of the fabric, used for decorative purposes, to flatten seams, or to add durability.
    • Start simple: Don’t pick something too complicated that might put you off.
    • Practice on scrap fabric.
    • Learn about different types of seam finishes, such as a French seam which encloses the raw edge, providing a very professional and durable finish that prevents fraying, especially useful for knit fabrics. If you don’t have an overlocker, a zigzag stitch can serve a similar purpose.
    • Edgestitching: Stitching very close to a folded edge or a seam line for decorative or reinforcing purposes.
    • Understitching: A line of stitching sewn on the facing or lining close to the seam line, which is then pressed towards the facing/lining. This helps the facing or lining stay hidden inside the garment.
    • Staystitching: A row of simple straight stitches sewn within the seam allowance on curved or bias edges of fabric (like necklines or armholes) to prevent them from stretching and distorting before the seam is sewn. It’s a foundational step for maintaining the shape of your garment.

    Essential Sewing Skills: Beyond the Basics

    As you become more comfortable, you’ll want to expand your skills. Here are some techniques and tools that will help you tackle more advanced projects.

    • Knits and Stretchy Fabrics: These fabrics require specific techniques to prevent them from stretching and getting wavy. Use fine, sharp needles to avoid snagging. Sharp scissors are crucial for clean cuts. Handle these fabrics carefully to prevent distortion. Techniques like using a walking foot or tissue paper underneath can help.
    • Heavy Fabrics: Materials like heavyweight canvas or upholstery fabrics require a robust approach. Use appropriate needles (larger sizes, e.g., 100/16 or 110/18) designed for heavy materials. Use strong thread suitable for heavy-duty projects. Adjust your machine settings for a longer stitch length if necessary and go slowly to avoid snapping needles.
    • Using a Rotary Cutter: A rotary cutter is a tool that resembles a pizza cutter, used for cutting fabric quickly and precisely.
    • Benefits: It’s excellent for cutting straight lines and curves, especially when paired with a self-healing cutting mat and rulers. This speeds up cutting time and provides very accurate pieces.
    • Safety Precautions: The blades are extremely sharp, so always remember to retract the blade after each use to protect yourself and your work surface.
    • Sewing Machine Maintenance and Troubleshooting:
    • How to Change a Needle: You should change your needle regularly, especially after every few projects or if you notice it’s getting dull or snagging the fabric. This is even more important when sewing with a special one or one with lightweight fabric. If your needle snags or puckers the fabric, it might be blunt or the wrong size.
    • How to change: Unscrew the little black screw that holds the needle in place, being careful to catch the old needle. Insert the new needle with the flat side facing the back of the machine, pushing it all the way up into the shaft. Tighten the screw firmly. Remember to rethread the machine after changing the needle.
    • General Care: Keep your machine covered when not in use to protect it from dust. Always unplug it when performing maintenance or when you’re finished sewing.
    • Sewing Machine Troubleshooting: Even with diligent maintenance, you might encounter occasional issues. Don’t panic! Many common problems have simple solutions.
    • Common Issues and Solutions:
    • Skipped Stitches: Often caused by a dull or incorrect needle (especially with knits), or improper threading (particularly the take-up lever). Try changing the needle, rethreading the entire machine, or checking the tension.
    • Tangled Threads: A ‘birds nest’ of thread on the back of your fabric is almost always due to improper threading. Rethread the entire machine, ensuring the presser foot is up when you do this. Also, ensure the bobbin is inserted correctly.
    • Broken Needles: This can happen if you pull on the fabric while sewing, if your needle is the wrong size for the fabric, or if you hit a pin. Always remove pins before you sew over them.
    • When to Seek Professional Help: If you’ve tried troubleshooting common issues and your machine still isn’t performing correctly, or if you suspect a deeper mechanical problem, it’s best to seek assistance from a qualified sewing machine technician. They can diagnose and repair issues safely.

    Non-Sewing Related Keywords

    We understand that you might search for a wide range of topics related to your home and environment. However, some search terms, such as “How to Get Rid of Sewer Gnats” or “How to Get Rid of Sewer Flies,” relate to household pests and plumbing issues, which are entirely unrelated to the craft of sewing. For these queries, we recommend consulting resources specifically dedicated to home maintenance or pest control, as they fall outside the scope of sewing techniques and fabric arts.

    Conclusion: Your Journey into Sewing

    Congratulations on embarking on or continuing your sewing journey! We hope this comprehensive guide has provided you with fundamental knowledge and practical sewing skills to empower you to create and alter clothes with confidence. From understanding the essential tools and mastering basic machine and hand sewing stitches, to tackling practical alterations and exciting beginner sewing projects, you now have a solid foundation. Learning to sew offers so much more than just functional skills. It’s a wonderful creative outlet that allows for self-expression, a way to mend and extend the life of your garments, and a deeply satisfying pursuit. The joy of wearing something you’ve made yourself, or the satisfaction of expertly repairing a beloved item, is truly unparalleled. As Shaelynn Haning, a professional tailor, wisely advises, committing to doing each step right leads to better sewing outcomes.

    Remember, sewing is a continuous learning process. Mistakes will happen, even to experienced sewists, but each one is an opportunity to learn and improve. Don’t be afraid to unpick a seam and try again; it’s all part of the journey. We encourage you to continue exploring more advanced sewing techniques, experiment with different fabrics, and challenge yourself with new patterns. Join online sewing communities, or even consider taking local classes – a fantastic way to connect with fellow sewists, share knowledge, and further develop your skills.

    The world of sewing is vast and wonderful, and your creative potential is limitless! We look forward to seeing the amazing things you’ll create. Happy stitching.

    About the Author: Grace, Founder of London Sewing Courses

    Grace is the heart and hands behind London Sewing Courses. A passionate and experienced sewing instructor, she founded the studio with a unique mission: to create a calm, friendly space for adults to learn and connect, while using the profits to fund free sewing classes for local children in need. Her personal expertise and commitment to community building are at the core of every class and every stitch.